Organizing your Divi Email Optin module's fields inline creates a sleek and professional appearance that can improve user experience and potentially increase conversion rates. By arranging the email field and submit button side by side, you make the form more visually appealing and save space on the page. In this guide we show you how to easily display your Divi Email Optin form fields inline.
Display Divi Email Optin Form Fields Inline using the Divi Booster 'Inline Form' Option
This method demonstrates how to arrange Divi Email Optin form fields side-by-side using the 'Inline Form' option added by the Divi Booster plugin. This approach is ideal if you want a quick, no-code solution.
Add and Configure the Email Optin Module for Inline Display
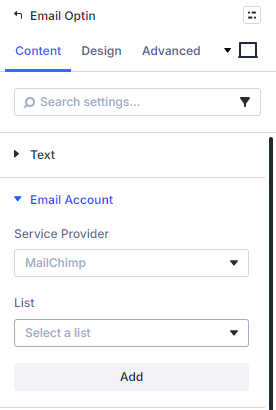
Within your Divi Builder layout, add an Email Optin module to your desired section. In the module's settings expand the Email Account section under the Content tab. Configure your desired Service Provider, if you haven't already.

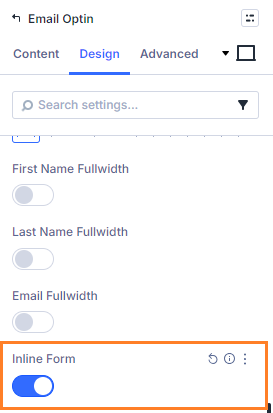
Adjust Layout and Enable the Inline Form Option
Switch to the Design tab in the Email Optin module settings, then expand the Layout group. In the Layout dropdown, select your preferred layout. Next, turn ON the Inline Form toggle (added by Divi Booster) to arrange the form fields side-by-side.
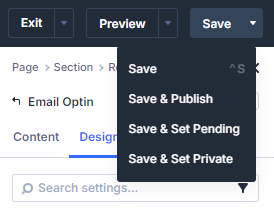
Save and Publish Your Changes
Once your settings are configured, save / publish your page. This ensures your changes go live.

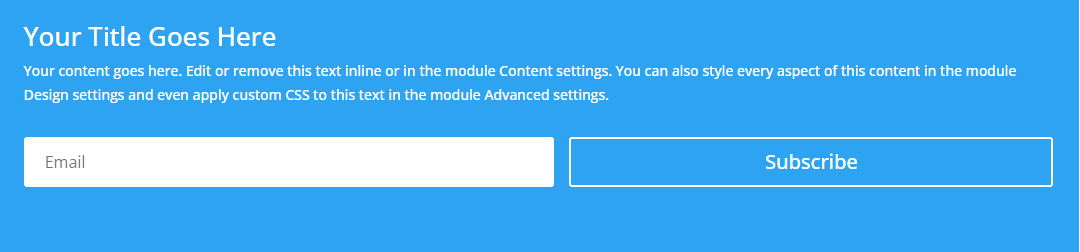
Confirm the Inline Form on the Front End
Visit your published page and check your email optin form. You should see the email input field and subscribe button arranged neatly in a single horizontal line.

Style Divi Email Optin Module for Inline Form Display using Custom CSS
This method shows you how to apply custom CSS within the Divi Email Optin module’s settings to display form fields side-by-side, achieving an inline layout. This approach is especially useful if you want a flexible solution that doesn’t require custom code files or external plugins.
Add and Configure the Email Optin Module
Add an Email Optin module to your layout and expand the Email Account section, selecting your preferred Service Provider.
Add Custom CSS for Inline Styling
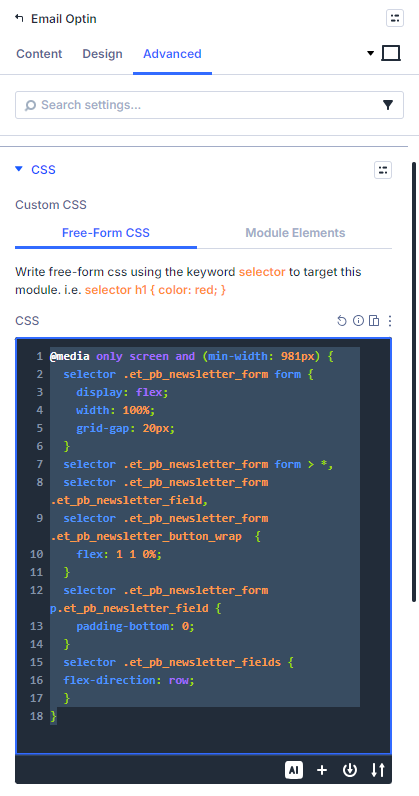
Navigate to the Advanced tab of the Email Optin module settings. Expand the Custom CSS section and locate the free-form CSS field. Paste the following CSS code into this area to display your form fields inline on larger screens:
@media only screen and (min-width: 981px) {
  selector .et_pb_newsletter_form form {
    display: flex;
    width: 100%;
    grid-gap: 20px;
  }
  selector .et_pb_newsletter_form form > *,
  selector .et_pb_newsletter_form .et_pb_newsletter_field,
  selector .et_pb_newsletter_form .et_pb_newsletter_button_wrap  {
    flex: 1 1 0%;
  }
  selector .et_pb_newsletter_form p.et_pb_newsletter_field {
    padding-bottom: 0;
  }
  selector .et_pb_newsletter_fields {
	flex-direction: row;
  }
}
You may see an "Unknown property" warning in the CSS box if you're using Divi 4, but you can safely ignore this – it's a limitation of the CSS box which doesn't affect the styles from applying on the front-end.
Save and Publish Your Changes
After adding your CSS, save / publish your page so your new styles are visible on the live site.
Check That the Inline Form Style is Applied
Visit your page on the front end and confirm that the email field and subscribe button now appear side-by-side in a single row.
Conclusion
Displaying your Divi Email Optin form fields inline can give your site a cleaner, more modern look and enhance the user experience. Whether you use Divi Booster's built-in option or add your own custom CSS, the process is simple and effective.
Thanks to this tutorial by Geno for the original inspiration and implementation of this feature.


It looks like a recent Divi update may have broken this again, as the inline form button isn't working, and neither is this code. I can't get the submit button to sit in line with the fields. 😫
Always the way… ignore my last post, it works fine IF you have the form set to text above, form below. D'oh. Sorry!
Hey Jo, thanks for bringing this to my attention. I hadn't noticed that the layout options Divi had added were affecting it – I'm glad you were able to find one that worked :) Next chance I get I'll have a play around and see if I can make it compatible with all the layout options. Thanks!
Thank you so much for this. I have been looking for a very long time for a CSS code like this. Much appreciated.
You're welcome, CC!
Just wanted to thank you for all the help you post for us new to Divi and CSS. Much appreciated. I am purchasing your booster.
You're very welcome, Steven! Enjoy Divi Booster and give me a shout if there's ever anything I can help with. Cheers!