Want to create a stylish fade effect on your Divi image module—where one side fades smoothly into the background? With a bit of CSS, you can make any edge (or corner) of the image fade out: top, bottom, left, right, or even diagonally.

Fade a Divi Image Module Edge into the Background using CSS
Here's how to make an edge of your image module image fade into the background.
Add the image edge fade CSS
Copy and paste the following code into "Divi > Theme Options > General Custom CSS", or your child theme stylesheet:
/* Left to right */
.et_pb_image.faded-left .et_pb_image_wrap img {
  mask-image: linear-gradient(to right, transparent, black 50%);
  -webkit-mask-image: linear-gradient(to right, transparent, black 50%);
}

/* Right to left */
.et_pb_image.faded-right .et_pb_image_wrap img {
  mask-image: linear-gradient(to left, transparent, black 50%);
  -webkit-mask-image: linear-gradient(to left, transparent, black 50%);
}

/* Top to bottom */
.et_pb_image.faded-top .et_pb_image_wrap img {
  mask-image: linear-gradient(to bottom, transparent, black 50%);
  -webkit-mask-image: linear-gradient(to bottom, transparent, black 50%);
}

/* Bottom to top */
.et_pb_image.faded-bottom .et_pb_image_wrap img {
  mask-image: linear-gradient(to top, transparent, black 50%);
  -webkit-mask-image: linear-gradient(to top, transparent, black 50%);
}

/* Top-left to bottom-right (diagonal) */
.et_pb_image.faded-top-left .et_pb_image_wrap img {
  mask-image: linear-gradient(to bottom right, transparent, black 50%);
  -webkit-mask-image: linear-gradient(to bottom right, transparent, black 50%);
}

/* Top-right to bottom-left (diagonal) */
.et_pb_image.faded-top-right .et_pb_image_wrap img {
  mask-image: linear-gradient(to bottom left, transparent, black 50%);
  -webkit-mask-image: linear-gradient(to bottom left, transparent, black 50%);
}

/* Bottom-left to top-right (diagonal) */
.et_pb_image.faded-bottom-left .et_pb_image_wrap img {
  mask-image: linear-gradient(to top right, transparent, black 50%);
  -webkit-mask-image: linear-gradient(to top right, transparent, black 50%);
}

/* Bottom-right to top-left (diagonal) */
.et_pb_image.faded-bottom-right .et_pb_image_wrap img {
  mask-image: linear-gradient(to top left, transparent, black 50%);
  -webkit-mask-image: linear-gradient(to top left, transparent, black 50%);
}
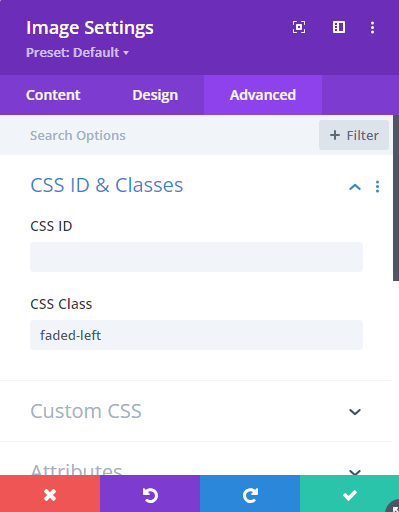
Add the fade class to your image module
Just open the settings for your Image Module, go to the Advanced tab and expand CSS ID & Classes, and add one of the following classes to the CSS Class field:
faded-leftfaded-rightfaded-topfaded-bottomfaded-top-leftfaded-top-rightfaded-bottom-leftfaded-bottom-right
Each class applies a different fade direction—choose the one that fits your design.
(Optional) Tweaking the Fade
If you'd like the fade to finish sooner or extend further into the image, you can adjust the 50% value. For example, this will complete the fade by 30% of the image width, making the visible area start sooner.
mask-image: linear-gradient(to right, transparent, black 30%);
Conclusion
That’s it! Your image will now fade smoothly in the direction you choose, blending into the background without needing extra plugins or image editing.

0 Comments