If you're looking to have your Divi Menu module display different menus in different circumstances, such as the user's navigation path, here's an example of how it can be achieved with a bit of PHP code. In this example we'll let the set it up so that we can include the ID of the menu we want to display in the page URL itself. That way we can show a different menu depending on which link on our site the user followed to reach the page.
To dynamically change the Divi menu module's displayed menu:
- Set up WordPress menus and note their IDs.
- In Divi Builder, add a Menu Module and select a default menu.
- Use Divi PHP Code Module to add PHP code that switches the menu based on a URL parameter
- Test by visiting page URLs with different menu parameters.
Step 1: Set up your WordPress Menus
If you have existing WordPress menus you want to switch between, you can skip this step, but if not, let's add some now.
Adding WordPress Menus
Menus are created and managed in the WordPress dashboard under Appearance > Menus. Here, you can create menus, add links to them, and edit existing menus. You can also assign a menu to various locations, but that isn't necessary for our purposes – we'll instead use the settings in Divi's menu module to determine which menu to display as the default, and then we'll use PHP code to override that default as needed.
Go ahead and create your menus (at least two, so we can switch them), like so:
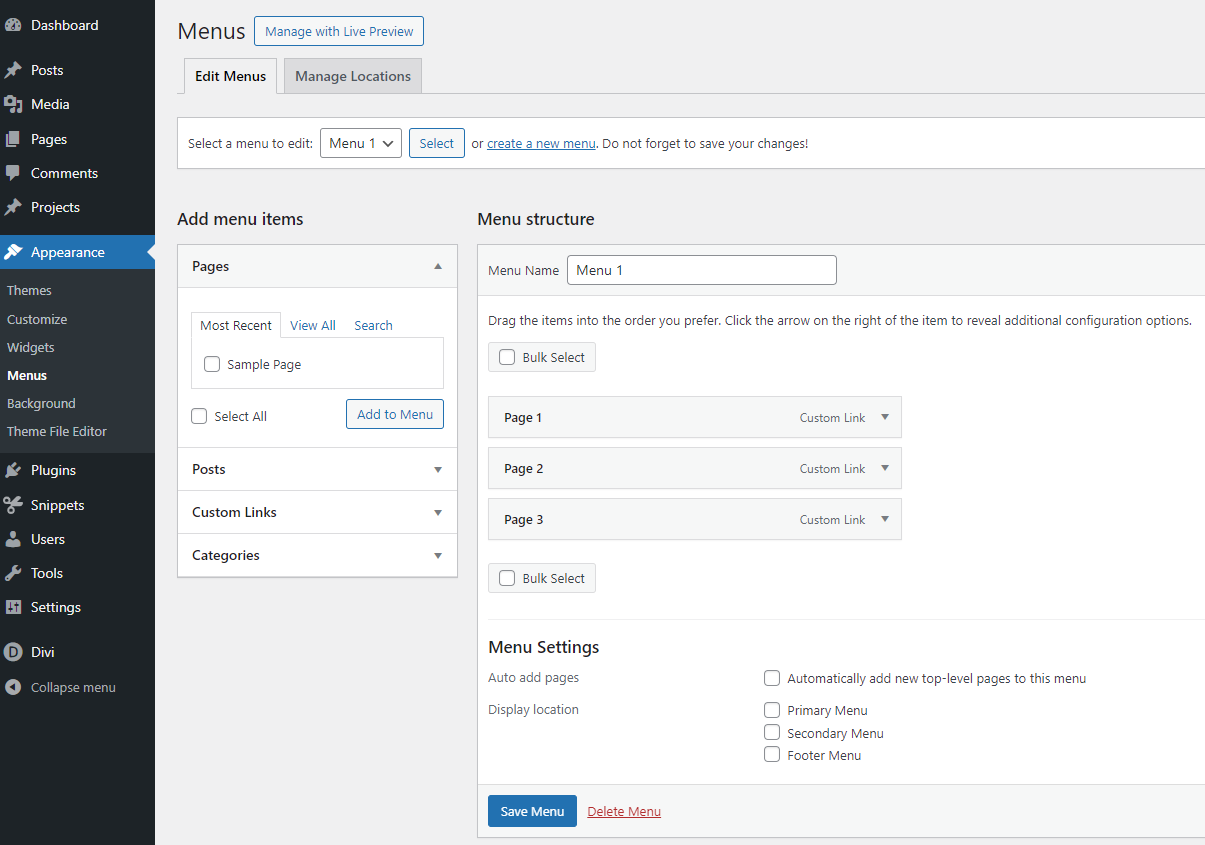
Finding Menu IDs
Each menu in WordPress is assigned a unique ID. To find this ID, navigate to the Menus section in the WordPress dashboard, select a menu to edit, and examine the browser's address bar. You'll usually find the menu's ID as a number in the URL, typically after menu=.
Make a note of the IDs for each of your menus.
Step 2: Set up your Divi Menu Module
If you haven't already added a menu module to your page in the Divi Builder, now is the time to do so. The menu module will allow you to display one of your WordPress menus on your website and is an essential part of creating a dynamic menu experience.
Add a Divi Menu Module to your Page
Here’s how to add a menu module to your page:
- Open the Divi Builder on the page where you want the menu to appear.
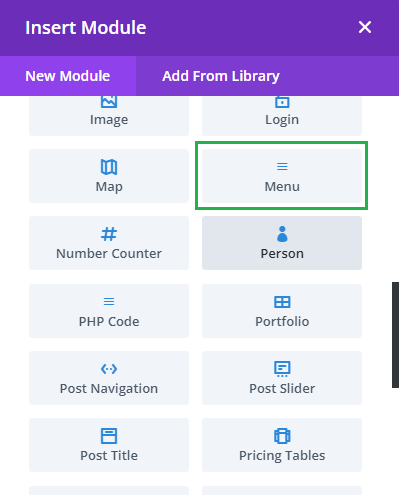
- Click the gray plus button to add a new module to your layout.
- In the module list popup, search for "Menu" and click on the Divi Menu Module to add it to your page.
Select a Default Menu
Now that you've added the module, it's time to select the default menu:
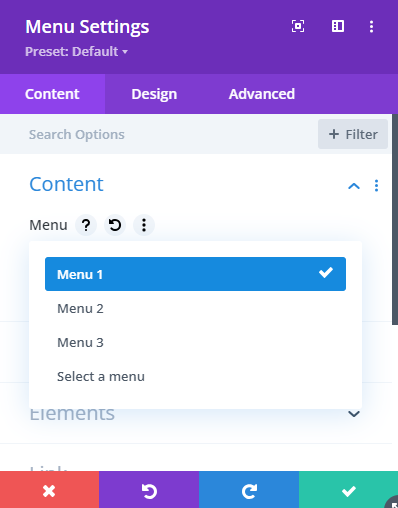
- Once the menu module is placed on the page, click on the module settings to open the menu module’s options.
- Find the menu setting within the Content tab. This is where you'll choose which of your WordPress menus to display by default.
- From the dropdown list, select the menu you've created that will serve as your default. Remember, this will be the menu shown to users unless overridden by the PHP code we'll add next.
By setting a default menu, you ensure that there is always a default navigation available for users, which is particularly important in the event that the dynamic menu functionality isn't triggered or is missing a parameter. With your default menu selected, you've laid the foundation for a dynamic and adaptable navigation structure.
In the next step, we'll use PHP code to allow this menu to change under certain conditions.
Step 3: Add the PHP Code
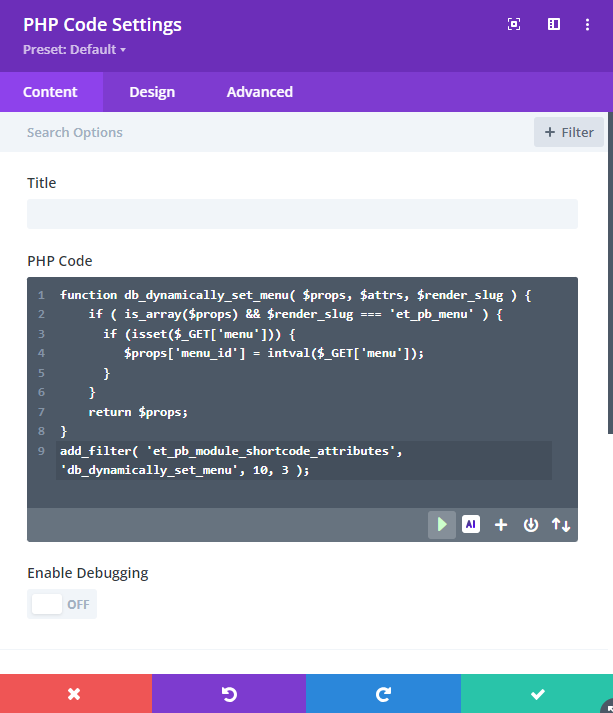
Now we need to add some PHP code that dynamically updates the menu ID. In our case, we'll use PHP code which checks for the "menu" parameter in the page URL. If it is set, then it will use that ID as the menu ID in the menu module. Here's the PHP Code:
function db_dynamically_set_menu( $props, $attrs, $render_slug ) {
    if ( is_array($props) && $render_slug === 'et_pb_menu' ) {
        if (isset($_GET['menu'])) {
            $props['menu_id'] = intval($_GET['menu']);
        }
    }
    return $props;
}
add_filter( 'et_pb_module_shortcode_attributes', 'db_dynamically_set_menu', 10, 3 );
Adding the PHP Code using Divi PHP Code Module
If you want to use the menu module on a single page, or a small number of pages, the best way to add this code to your site is using the Divi PHP Code module. It allows you to enter PHP code directly into your Divi Builder layout, exactly where you need it.
Place a Divi PHP Code module in your layout just before the menu module you want to affect. Paste in the code provided above and save your page. Now you menu module will dynamically change the menu based on the menu URL parameter.
Adding the PHP Code Globally
Using the Divi PHP Code module has the advantage that it limits the scope of the code so that it doesn't affect menu modules elsewhere on your site. But if you do want to apply this dynamic menu changing to menu modules throughout your site, you can add the code globally.
To add this code globally, you can either place it in your child theme's functions.php file or use a general code management plugin like Code Snippets.
Related Post: Adding PHP to the Divi Theme
Step 4: Test the Menu Switching
With the code in place, you are now ready to test dynamically switching the displayed menu using a URL query string. Suppose your page is located at https://example.com/page/ and you want a particular link to the page to activate the menu with ID "5", then visit your page using a URL like this:
Change "5" to the ID of a different menu and visit the page from that URL – you should now see the corresponding (different) menu displayed.
When a user visits the URL, the PHP code retrieves the menu ID from the URL and switches the WordPress menu accordingly.
Advanced: Custom Dynamic Menu Logic
While switching the menus based on the URL parameter gives a lot of flexibility, it may not be sufficient for some applications. But by modifying the way the menu_id is determined in the PHP code, this dynamic approach can be extended further to cater to various scenarios, such as tracking user navigation paths with session variables. For example, if you want to keep the menu consistent across multiple page views for a particular user session, you could modify the PHP snippet to check a session variable and set the menu_id based on that, rather than a URL parameter.
Please feel free to get in touch if you need to switch your menus according to conditions not given here and I'll be happy to try and help out.

Considering getting the PHP Code module. While my usage case would probably not match changing ET shortcodes (as I believe this to be doing), my interest is piqued because of Divi 5 and the supposed demise of shortcodes in Divi. Out of curiosity would you expect Divi 5 to break this particular example?
Thanks!
Hey David, it remains to be seen. This code is actually one step removed from the shortcodes themselves. At the moment, Divi parses the shortcode and, after some processing, calls the "et_pb_module_shortcode_attributes" filter with the processed module settings (props), the original shortcode attributes and the module slug. Despite the name, the filter itself doesn't depend on the existence of shortcodes. Divi 5 could equally parse the new storage format and get essentially all the same information, and pass it to the same "et_pb_module_shortcode_attributes" filter. If they do that then the example may continue to work as is. Even if they don't, it's very likely they'll add some similar filter, perhaps with a new name and slightly different arguments, that the example could be modified to use without too much work. I don't believe they have yet added such a filter into the dev beta version of Divi 5, but the question was just just put to them today in the Divi 5 beta discord channel, so hopefully we'll get some clarity on what they plan to do soon. I hope that helps!