
Adjusting the width of buttons on your Divi pages can enhance visual appeal and improve user experience by making actions more noticeable and interactive. In this guide we show you the different ways in which you can increase the width of a Divi button module button.
Increase Divi Button Module Width by Adjusting the Button Padding
This method demonstrates how to increase a button's width by directly setting custom padding values within the Divi Button Module settings. It provides a straightforward way to make your button wider without custom code, but note that the padding will be added to the width of the button text itself.
Add and Configure a Button Module in Divi Builder
Start by opening your page in the Divi Builder. Add a Row with a single column, then insert a Button Module into that row. This is your starting point for customizing the button size.
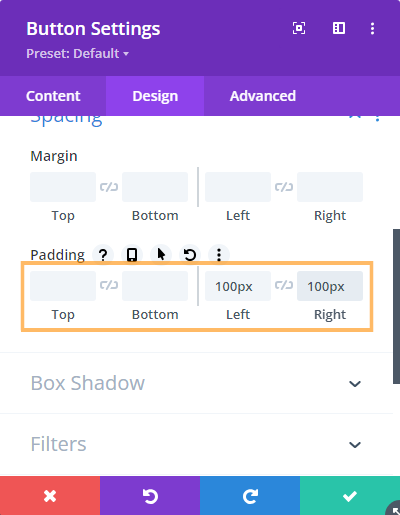
Open the Design Tab and Adjust Button Padding
With the Button Module settings open, click the Design tab, then find and expand the Spacing section. Here, you'll see options to adjust the padding for each side of your button. To make the button wider, enter values such as '100' for both the Left and Right padding fields. This will give your button a uniform, wider appearance.
Save and Publish Your Changes
Once you've set your desired padding, save the Button settings by clicking the green checkmark. To apply the changes to your page, open the Divi Builder bottom bar and hit the Publish button. Exit the Visual Builder when you're ready.

View Your Wider Button on the Front-End
After exiting the Visual Builder, view your page to confirm the button is now wider, reflecting the padding values you entered.

Set a Minimum Width for Divi Button Modules Using Custom CSS
This method demonstrates how to apply a minimum width to a Divi button module using the built-in Custom CSS options within the Divi Builder. By adding a simple CSS rule, you can ensure your buttons maintain a consistent minimum width for a polished, professional look.
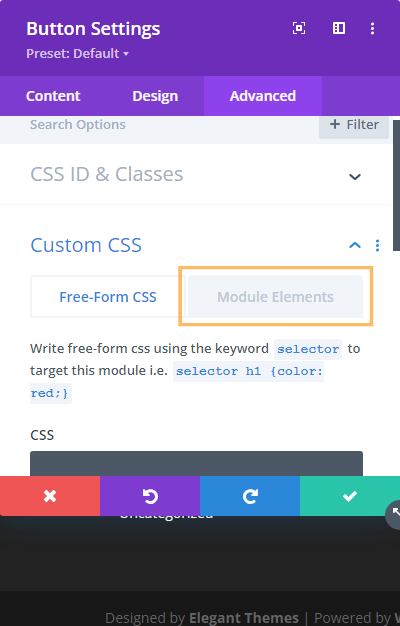
Add a Button Module and Open Advanced Settings
Add or select your Button Module in the Divi Builder. Click into the module's Advanced tab and expand the Custom CSS section. Then select the Module Elements tab within this section.
Apply Minimum Width in the Main Element
In the 'Main Element' editor box, enter the following CSS to set a minimum width and center the button text:
min-width: 400px;
text-align: center;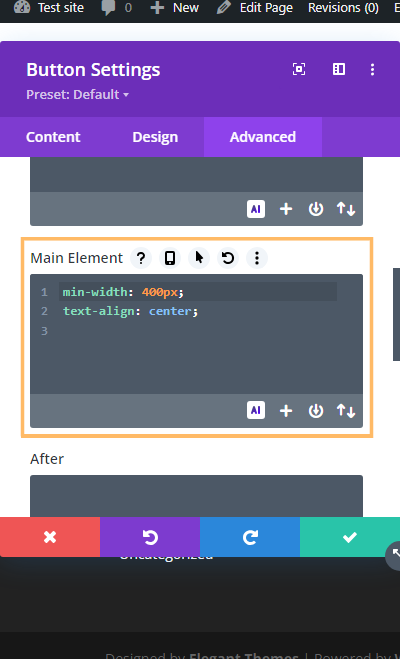
Save, Publish, and Confirm Changes
Click the green checkmark to save, publish changes to your page using the Divi Builder bottom bar, and exit the Visual Builder. Then, preview your page to see your button respecting the minimum width you set.

Set a Minimum Width for All Divi Buttons Using Divi Booster
This method demonstrates how to establish a minimum width for all Divi buttons by using the Divi Booster plugin’s dedicated setting. By enabling and configuring this option, you ensure a consistent button width site-wide—not only on button modules, but also within other modules which add Divi-style buttons, such as the call-to-action and slider modules.
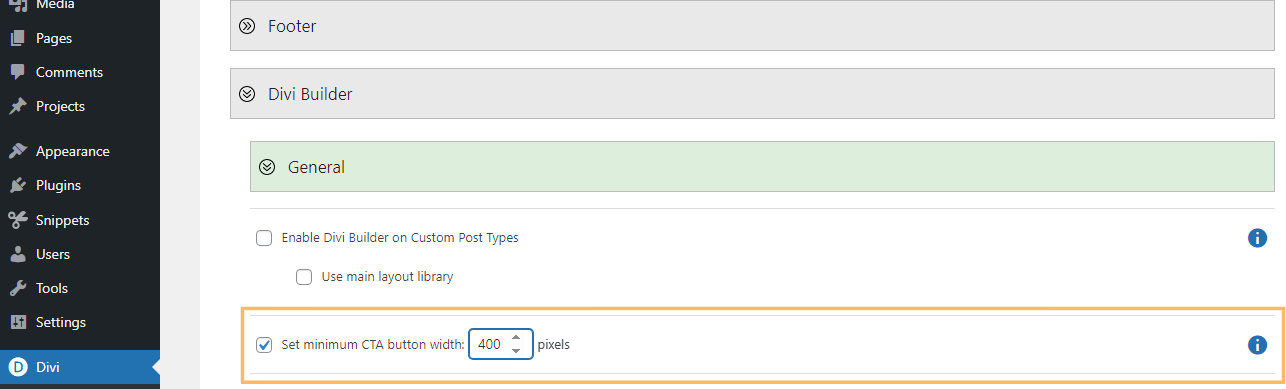
Configure Minimum Button Width in Divi Booster
Navigate to the Divi Booster settings by opening the 'Divi' menu in your WordPress admin sidebar and selecting 'Divi Booster.' Expand the Divi Builder section, then the General panel. Enable the 'Set minimum CTA button width' option and enter your desired width value, such as '400'.
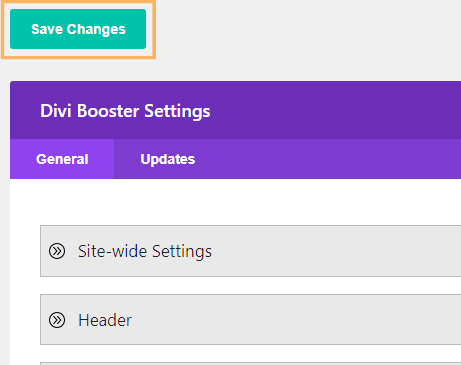
Save Divi Booster Settings
Scroll to the top of the page and click 'Save Changes' to apply your settings. This will ensure all Divi buttons reflect the minimum width site-wide.
Add a Button Module and Verify the Minimum Width
When you next add a Button Module to your page and publish it, the button will automatically adopt the minimum width you set via Divi Booster. Preview the page to confirm the new, consistent button width.
Conclusion
With these easy steps, you can quickly set custom or minimum widths for your Divi buttons, helping you achieve a consistent, attractive look across your entire website.


How to set button width and height?
Hi Douglas, I've just updated the post to include details on setting the height, and additional details on setting the width via padding. Hope it helps!
This is a super tip!!!
Thank you. Very helpful