One feature missing from the Divi Theme which can be found in some other themes is the ability to have a full-width image displayed right at the top of the page, above the main header bar. We can add such a "banner" image to Divi in the several ways:
Adding an Image above the Header with Divi Booster
To add the image above the header in Divi Booster, do the following:
Step 1: Locate the Divi Booster Option
First open the Divi Booster settings page ("Divi » Divi Booster" from your WordPress dashboard).
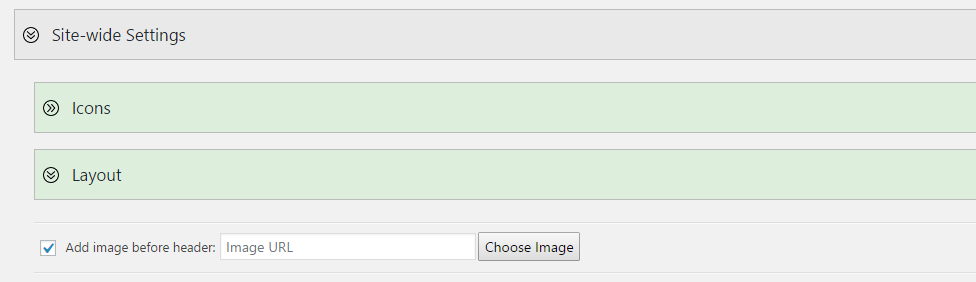
Then look under "Site-wide Settings » Layout". You should see an option to "Add Image before Header", like so:
Step 2: Select your Image
Click "Choose Image" and the WordPress media library will appear. Upload or select you header image.
Important: Be sure to set the image size to "Full Size" prior to clicking "Use Image", as shown:
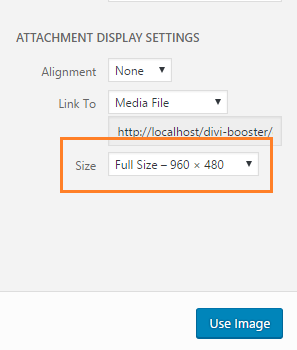
This prevents the image from being added at a smaller size and becoming in blurry / pixelated when scaled up to fit the screen.
Step 3: Save the Divi Booster Settings
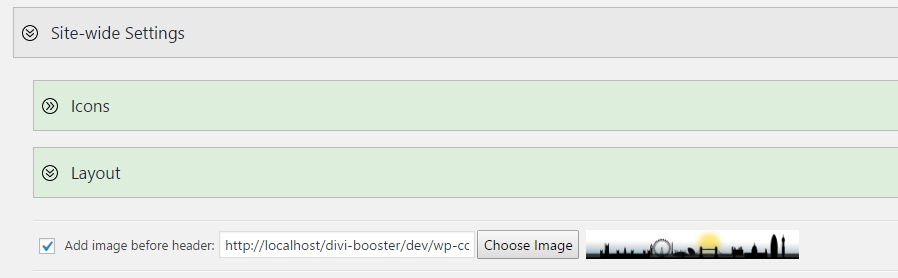
You should now be back at the Divi Booster settings page, and will see a thumbnail of your chosen image along with its URL, like so:
Scroll to the bottom of the Divi Booster settings page and click "Save Changes".
Now when you view your site, your chosen header image should display above the Divi header. Be sure to clear your site / browser cache if you do not see the image right away.
Tips and Tricks
Here are some CSS snippets that may be useful in customizing the image to your liking, whether you are using Divi Booster, or the manual method (below).
Show the Image only on the home page
You should be able to hide the header image on all pages except the homepage with one of these CSS snippets:
body:not(.blog) #wtfdivi004-page-start-img,
body:not(.blog) #myprefix-page-start-img {
	display: none! important;
}OR
body:not(.home) #wtfdivi004-page-start-img,
body:not(.home) #myprefix-page-start-img {
	display: none! important;
}
Which one works will depend on whether you are using the standard Divi home page, or using a separate page.
Just add one (not both) into the Custom CSS box at Divi > Theme Options > General > Custom CSS.
Show the Image only on Posts
To show the image only on posts, add the code below into the Custom CSS box at Divi > Theme Options > General > Custom CSS.
body:not(.single) #wtfdivi004-page-start-img,
body:not(.single) #myprefix-page-start-img {
	display: none! important;
}
Show the Fullwidth Image on Mobiles
To show the image on mobiles and tablets (as well as desktops), you can use this CSS:
@media only screen and (max-width: 980px) {
    #wtfdivi004-page-start-img, #myprefix-page-start-img {
        display: block !important;
        width: 100%;
    }
    #top-header,
    #main-header {
        position: relative !important;
        top: 0 !important;
    }
    #page-container {
        padding-top: 0 !important;
    }
}
You can add this code in the "WP Admin > Divi > Theme Options > General > Custom CSS" box.
If you'd like to "zoom" the image in a bit on mobile, so that it is taller but some of the left and right of the image is hidden off to the sides, you can use this CSS instead:
@media only screen and (max-width: 980px) {
    #wtfdivi004-page-start-img, #myprefix-page-start-img {
        display: block !important;
        width: 140%; /* increase width to enlarge */
        max-width: none; /* remove max-width limiting */
        object-fit: cover; /* cover to maintain aspect ratio */
        position: relative;
        left: 50%; /* move it to the center horizontally */
        transform: translateX(-50%); /* shift it left by half of its width to center it */
    }
    #top-header,
    #main-header {
        position: relative !important;
        top: 0 !important;
    }
    #page-container {
        padding-top: 0 !important;
    }
    body {
        overflow-x: hidden;
    }
}
Manually Adding an Image Above the Header
Step 1: Include the image into the page
We first begin by adding the image to the HTML page and moving it into the correct location. To do so, add the following HTML code into the Divi theme footer.php (or your child theme footer.php) file just before the final </body> tag:
<div style="display:none">
    <img id="myprefix-page-start-img" src="http://www.mysite.com/my-image-url.jpg"/>
</div>
<script>jQuery("#myprefix-page-start-img").prependTo(jQuery("body"));</script>
Change the src="…" part to the URL of your image. If you don't yet have a URL for your image you can get one by uploading the image to your WordPress media library, and then viewing the information for the uploaded image.
Style tip: The image will be stretched to fit the width of the screen, so wide images will generally look better than tall ones.
Step 2: Adjust the page layout to accommodate the image
The above code puts the image into the right place in the page. But it doesn't do anything to make sure it looks good. We can fix this by adding the CSS below. The CSS achieves several things:
- It makes the image full width on full-size screens.
- It hides the image on mobiles, defaulting to the standard Divi mobile layout.
- It fits the image to the width of the "box" when box mode is used.
- As the header is now lower down the page, it delays making the header "float" until the user has scrolled down far enough.
- It fixes up the padding and margins so there are no unsightly gaps.
While it looks complicated, you don't need to understand it to use it, just copy it into the end of the Divi theme style.css (or your child theme style.css) file and it should work.
/* Change header to float correctly wherever it is in the page */
@media only screen and ( min-width:981px ) {
	#main-header { position:relative !important; top:0px !important; } /* inline */
	#main-header.et-fixed-header { position:fixed !important; margin-bottom:0px; top:0px !important; } /* floating */
	body.admin-bar #main-header.et-fixed-header { top:32px !important; } /* adjust for WP admin bar */
	#page-container { overflow:hidden; } /* prevent sub-menus from breaking scrolling */

	/* Handle top header */
	#top-header { position:relative !important; top:0px !important; } /* inline header */
}

/* Style the image for full screen layouts */
@media only screen and ( min-width:981px ) {

	#myprefix-page-start-img { margin-bottom:0px; width:100%; }

	/* Override Divi JS padding adjustment */
	div#page-container[style] { padding-top:0 !important; }

	/* Remove gap between heading and menu caused by line height */
	body { line-height:0 !important; }
	body * { line-height:1.7em }
}

/* Style the image for box layout */
@media only screen and (min-width: 1200px) {
	.et_boxed_layout #myprefix-page-start-img {
		width:1200px;
		-moz-box-shadow: 0 0 10px 0 rgba(0,0,0,0.2);
		-webkit-box-shadow: 0 0 10px 0 rgba(0, 0, 0, 0.2);
		box-shadow: 0 0 10px 0 rgba(0, 0, 0, 0.2);
		display:block !important;
		margin-left:auto;
		margin-right:auto;
	}
}

/* Hide the image on smaller screens */
@media only screen and ( max-width:980px ) {
	#myprefix-page-start-img { display:none !important; }
}

Thanks for this, the header image is distorting when viewed as webpage. Any tips on that? Header image size is 1024 x 100
Hi Alison, by default the image is expanded to fill the full width of the page. You should be able to disable this behavior (and center the image), by adding the following after the above code:
@media only screen and (min-width: 981px) {
    body { text-align: center; }
    #myprefix-page-start-img { width: auto !important;  }
}
Hopefully that fixes it for you, but if not, is there any chance you could send me a link or screenshot so that I can see how it is being distorted?
Hey Dan,
very helpful guide! I am experiencing one problem though. The secondary menu bar(or rather top bar with phone, email, social) is showing up below the added image, above the nav, instead of above everything.
Can this be fixed?
Hi Matt,
The following seems to work, though it needs more testing.
Change this:
<script>jQuery("#myprefix-page-start-img").prependTo(jQuery("body"));</script>
To this:
<script>jQuery("#myprefix-page-start-img").insertAfter($("#top-header"));</script>
And add this CSS:
#wtfdivi004-page-start-img { margin-bottom: -6px; }Hope that helps,
Dan
Hi Dan,
With the Divi-booster plug-in I added an image on top of the header on the site I'm prototyping localy on my laptop with xampp. Unfortunately the image is not displayed when I view the site. I use an image from the media library. Any idea why? and how to fix it?
Thanks,
Jerome
Hi Jerome, two possibilities spring to mind.
Firstly, some people are having an issue where, after adding an image from the media library, the image URL does not show up in the input box on the Divi Booster setting. I'm still trying to track down the cause of this but, if this is happening to you, you can work around it for now by copying and pasting the image URL into that input box and saving the settings.
Secondly, as the feature relies on JavaScript, any JavaScript errors in the page (possibly from other plugins, etc) can cause the image not to show. To determine if this is the case go into your browser's JavaScript console, reload the page, and see if any errors show up. If so, these should point to the source of the error. Fixing this should fix the problem with the image not displaying.
Let me know if you continue to have problems.
Hi Dan,
I updated the Divi Booster version and now it works!
Jerome
trying to add an image above header and it allows me to select the image but every time i click on insert into post to dialogue box closes but url is empty and image is not displayed
Hi Lee, I've just sent you an email asking if you'd be willing to let me log in to your site and take a look.
Other than that, I would suggest looking in the JavaScript console (see here for details of how to open the console http://webmasters.stackexchange.com/questions/8525/how-to-open-the-javascript-console-in-different-browsers). It's possible that something, possibly another plugin, is triggering a javascript error. If so, it'll appear in the JavaScript console either when you load the page or when you try to add the image. If you do see any errors there, please let me know what they say.
In the meantime, you should still be able to add the header by copying and pasting the image's URL into the Divi Booster setting's input box.
Getting exact same problem – no url sent to dialog box.
Nothing coming up on js console either
Hi Richard, I'm still stumped by this one – especially as there don't seem to be any JavaScript errors and it isn't happening on any of my test sites… I'll keep investigating and hopefully can get it sorted soon. In the meantime, you should be able to copy and paste the image URL into the input field to work around the problem.
Hey guys, the latest update (v2.0.4) should fix this, and introduces a simpler, cleaner image selector. Thanks so much Richard for you help tracking this down.
Hi Dan
Just thought I let you know, one of your last updates set the hock in front of "Add image before header:" which did mess up the site. No problem, but maybe a bug…
A belated thank you for this great plugin "28th January = Thank a plugin author day"
Cheers
Jakob
Hi Jakob, thanks! I hadn't even realized that it was thank a plugin author day! Ha ha :)
Quick question – is "hock" a typo? I'm not quite sure what was set…
Thanks again!
Hi Dan
Under "Site-wide Settings-Layout-Add image before header:" the check box was tagged (I didn't do it for sure) so may happen with one of the updates.
I still do not get any email notification when you/someone replies to my post on your site.
Cheers
Jakob
Thanks for letting me know, Jakob. I had a suspicion that the check box might have been getting enabled for some people, but I hadn't had confirmation. I'm still trying to track down the cause…
Sorry about the email notifications – I was using a plugin to send out the notifications, but it started misbehaving and sending out update notifications when no new comments had been posted. I had to disable it as a result, but will try to get a replacement sorted out as soon as possible.
Hi Dan,
I am having some trouble with Divi Booster upon resizing and reload. I am able to duplicate it in Chrome and Safari on my Macbook Pro. Here are the steps.
1. Open a browser that is "normal" width.
2. Visit http://www.getfitwithbruce.com
3. Make the browsers narrower until it goes into "mobile" mode.
4. Right click in the content area and select "Reload page".
Now, for some reason, the image and the main header are on top of each other.
Not sure how to fix this. It also happens when I go to the website on my phone and then turn the phone sideways in landscape mode.
Any help would be appreciated.
Thanks,
–Bruce
Added the following to my style.css and it works.
@media all and (max-width: 981px) {
#wtfdivi004-page-start-img { display:none !important; }
}
Perhaps you are just missing the !important in the wp_head_style.php?
Cheers,
–Bruce II
Hey Bruce, spot on! It looks like Divi has started setting a default value for "display" on images which was overriding this rule. Adding !important does indeed fix that. I've updated the plugin and this post accordingly. Thanks for both spotting and fixing the error!
Hi Dan,
Thanks so much for creating this plugin.
I'm wondering if there's a way to show different images on different pages above the header? I need some pages without the image up top and some with.
Hey Darci, as I mentioned in my email, there's no easy way to set different images on different pages (at the moment), other than by modifying the code above. It is however, quite easy to disable the image on certain pages. For example to disable the image on a page with a post id of 123, you can do:
.post-123 #wtfdivi004-page-start-img { display:none; }While for the homepage, you can do:
.home #wtfdivi004-page-start-img { display:none; }Note that this code works for Divi Booster, not for the code taken from this post (which uses a different CSS id).
Before/after images and examples would be helpful on all the tips/tricks – visual person :) Thanks for sharing
I'm planning on revamping all the posts with more images and examples as soon as I can :)
Hi Dan
I'm not a programmer and I think this tutorial is not well explained for dummies like me :)
Could you write it more precisely, in points?
For example:
1. Open file.php
2. Find line 123 and paste this "code" etc.?
Regards
Hey theodorov, I've updated the post hopefully making it easier to understand. Let me know if it still doesn't make sense to you.
Its cutting off part of my image. Ive had a play around with the css but cant seen to crack it.
Hi David,
I've rewritten the CSS code to improve the layout. I'm not sure if this will fix the problem you were having (as I'm not sure how your image was being cut off). Have a shot and if the issue is still happening, drop me a link to a page showing the issue and I'll see if I can figure it out.
Hi Dan,
I’m trying to add a full-width image above the header but when I go open to the Divi functions.php file its saying:
Fatal error: Out of memory (allocated 30932992) (tried to allocate 262144 bytes) in /homepages/24/d538610013/htdocs/Play By Play Site/wp-admin/includes/misc.php on line 318
Any ideas?
Cheers, James
Hi James, the error means that WordPress (and its plugins) are using up all of the 32MB of memory available to it. It's trying to use use a bit more memory, but being denied. The easiest thing you can do is allocate more memory to WordPress by adding the following to your wp-config file:
define('WP_MEMORY_LIMIT', '64M');Dan
Thanks for this. Finally got it working. Two things I wonder if you can help with (I'm pushing it I know but will be so stoked if I get this working!).
1. The header above the nav bar is working but its sometimes saying:
Warning: Cannot modify header information – headers already sent by (output started at /homepages/24/d538610013/htdocs/Play By Play Site/wp-content/themes/play-by-play-child/functions.php:32) in /homepages/24/d538610013/htdocs/Play By Play Site/wp-includes/pluggable.php on line 1173
Not really sure why!
2. What do I need to do to anchor the nav bar to the bottom of the viewing window (regardless of what size you make the window) until you scroll down….? (As has been done on http://www.brewlife.com)
Thank you so much for your help / advice!
Hey James, this is quite a common error, and fairly easy to fix. It is generally caused when you have spaces or newlines outside the PHP tags (<?php and ?>) in functions.php (on or before line 32). You just need to track down and delete this "blank space". Let me know if you need a hand doing this.
The brewlife effect is cool, and it looks like they're using Divi so it's certainly possible to achieve the effect. It looks like it's not trivial though, so when I get a chance I'll try and replicate it and get back to you!
Just a short note that everything works fine as what Dan has outlined at above for adding an Image above header…You should copy and paste the given code to footer.php and not functions.php.
Thanks makros. Yes, that's right, the two code blocks above should be added into the footer.php and style.css files respectively. An old version of the code needed to be added to functions.php so there are some references to this file in the comments, but that information is now out of date and should be ignored.
Also, I've just reversed the comment order to show the newest comments first, so hopefully you're comment will be seen first, makros!
yea….uh…doesnt work buddy..probably because it's not explained well…
Sorry to hear that, Titanius. Did you put both sections of code into your functions.php file and change the image URL to your target image? Did the image display incorrectly or not at all, and were there any error messages? If you can share a link to the site with the code on it, I'll try and see if I can spot the problem.