Background Image Overlays for CTA Modules

Written by Dan Mossop

The Divi Theme's Call to Action (CTA) module comes with built-in options to set either a background image or a solid background color. Useful as this is, something that doesn't seem to be possible with these options alone is to combine them and have the background image showing through a semi-transparent background overlay color.

Fortunately, by enlisting the help of a Divi Builder row, we can fake this effect. We simply set the background image on the row instead and give the CTA a solid background color (with transparency). Follow that with a little bit of padding adjustment and we're done. Here's how…

Step 1: Set up your CTA Module

This is a Call to Action!

Hey, here's all the reasons why you should do something:

Because celebrities are doing it.
Because people will think you're amazing.
Because someone on the Internet told you to.

Just click on the button to do the thing.
(Actually, it doesn't do anything other than reload this page, so maybe don't bother).

I'll assume you're sufficiently familiar with Divi to create a CTA module, adding a title, text, button, etc., as necessary. Go ahead and do that now.

I've given mine (above) a solid blue background for now, mainly so the text is visible. The next step deals with setting up the CTA background fully.

Step 2: Give the CTA a Semi-Transparent Background

While in the CTA Module's settings, we'll set its background color and transparency.

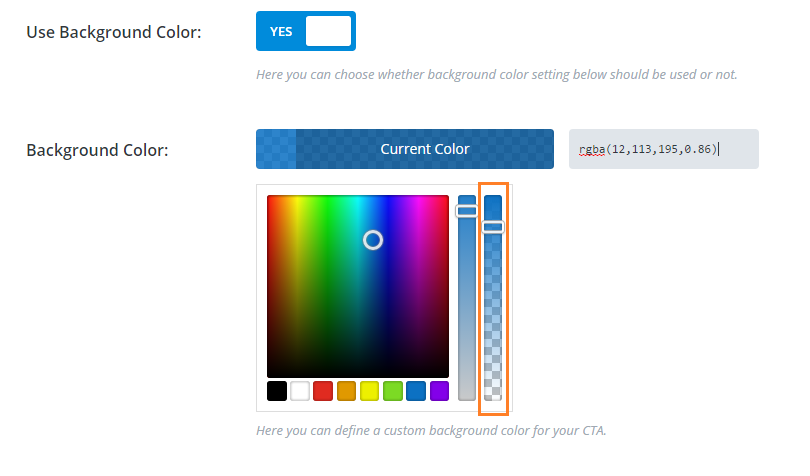
Make sure you are in the "General Settings" tab, and then locate the "Use Background Color" option. Set this to "YES".

Now select your color from the "Background Color" option. This will (eventually) be the color which overlays your background image, so choose a color close to what you want – you can always tweak this later when you have the background image in place.

Finally, we want to make this background color slightly transparent. This can be done using the bar on the right of the color picker (marked in orange, above).

If set to the very top, the background color will be fully visible and not transparent at all, while when set to the bottom, the background will be fully transparent and essentially invisible. So pick something in between these two extremes. The closer to the top, the less the background image will show through. Again you can tweak this when you have the background image in place.

Step 3: Give the CTA Module its own row

If you've played around with the CTA module's background settings, you've probably noticed that there is no easy way to create a background image with a semi-opaque overlay color. To get around this, we'll use a bit of a trick – setting the background image on the row itself and then giving the CTA module a semi-transparent background color so that the row's background image shows through.

So let's put the CTA module into a row of its own, as shown above. Note that the need to use a separate row means that we can only really use this technique on CTAs in a single column row layout.

Step 4: Add a background image to the row

Now we'll go ahead and add a background image to the row containing the CTA module.

You'll find the option to add a background image in the row's settings, on the "Advanced Design Settings" tab. Pick the image you want to use for your background.

Step 5: Remove the row padding

Now switch to the "General Settings" tab. In order to make sure that the background image is the same size as the CTA module, we need to remove the padding on the row. We can do so, by setting all the padding to "0px", as shown above.

The Result

This is a Call to Action!

Hey, here's all the reasons why you should do something:

Because celebrities are doing it.
Because people will think you're amazing.
Because someone on the Internet told you to.

Just click on the button to do the thing.
(Actually, it doesn't do anything other than reload this page, so maybe don't bother).

Now preview your page / post. You should now see something similar to the CTA above, with the background image partially showing through your CTA's background color.

Want get more out of Divi?

Hundreds of new features for Divi
in one easy-to-use plugin

0 Comments

Submit a Comment

Comments are manually moderated and approved at the time they are answered. A preview is shown while pending but may disappear if your are cookies cleared - don't worry though, the comment is still in the queue.

Your email address will not be published. Required fields are marked *.

Boost Your Divi Posts with AI-Powered CTAs

Elevate your WordPress site's engagement with WP Magic CTAs. This AI-driven plugin effortlessly generates tailored call-to-actions for each of your posts, helping you capture more attention and increase conversions. Ideal for highlighting offers, growing your subscriber list, and guiding traffic to key pages.

About Dan Mossop

Dan is a Scottish-born web developer, now living in Brisbane with his wife and son. He has been sharing tips and helping users with Divi since 2014. He created Divi Booster, the first Divi plugin, and continues to develop it along with 20+ other Divi plugins. Dan has a PhD in Computer Science, a background in web security and likes a lot of stuff, 

0 Comments

Submit a Comment

Comments are manually moderated and approved at the time they are answered. A preview is shown while pending but may disappear if your are cookies cleared - don't worry though, the comment is still in the queue.

Your email address will not be published. Required fields are marked *.

We may earn a commission when you visit links on our website.

Latest Posts

Hide the Page Title in the Hello Elementor Theme

Hiding the page title in the Hello Elementor theme allows you to create a cleaner and more customized page layout, free from default headings that may not fit your design. This is particularly useful for landing pages or custom content layouts where the default page...

How to Hide a Divi Module When Scrolling Up or Down

In this quick tutorial, I’ll show you how to hide a Divi module when scrolling in a specific direction (up or down), so that the module only shows when you want it to. This is especially useful when using Divi’s Scroll Effects feature and you have a effect you want to...

Fade a Divi Image Module Edge into the Background

Want to create a stylish fade effect on your Divi image module—where one side fades smoothly into the background? With a bit of CSS, you can make any edge (or corner) of the image fade out: top, bottom, left, right, or even diagonally.Fade a Divi Image Module Edge...

Hide the Header and Footer in the Hello Elementor Theme

Removing the default header and footer from your Hello Elementor theme allows for a streamlined and distraction-free website design. This is especially useful when creating unique landing pages, full-width layouts, or custom headers and footers with a page builder. In...

Setting up the Divi Password Box Module

Setting up password protection on a page can help you control access to sensitive or private content in WordPress, allowing only authorized visitors to view certain sections. With the Divi Password Box module, you can replace the plain Divi password form with a fully...

Random Posts