
The Divi Menu Module offers an easy way to add a menu to your custom Divi header, as well as to other areas of your site such as the footer. Given the prominent position the menu module often occupies on a site, it's important to ensure it looks good and is easy to read. This tutorial will show you how to adjust the menu item spacing in the Divi Menu Module and make this all-important element look the way you want it to.
Divi doesn't include a built-in option to adjust the Divi Menu Module link spacing. However, you can easily add a link spacing option using the Divi Booster plugin. Alternatively, you can adjust the spacing between Divi Menu Module links using custom CSS.
This post covers changing the spacing between menu items in the Divi Menu Module. If you want to adjust the spacing in the standard Divi header menu, please see our post on changing the space between Divi header menu Items instead.
Before
Before we start, here's an example of how the Divi Menu Module normally looks. As you can see, the menu items are packed quite tightly together.

After
Now here's an example with increased space between the menu items. As you can see, the increased whitespace between the menu items creates a different feel to the menu. By taking control over the menu item gap, you can make sure that the look and feel of the menu spacing suits your design perfectly.

Set the Divi Menu Module Link Spacing using Divi Booster
A simple way to increase the menu item spacing is using the Divi Booster plugin. Divi Booster adds a wide range of new settings to Divi, including the option to set the Divi menu module item spacing. This will lets us increase the space between menu items easily, without the need for code.
Open your Page for Editing in the Visual Builder
Browse to the page you want to apply the change to. Then, in the WordPress admin bar at the top of the page, click the "Enable Visual Builder" button to open the page for editing in the Divi Builder.

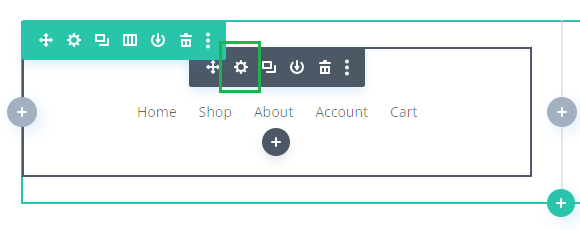
Open your Menu Module's Settings
Locate the menu module you want to modify, or add it to your layout if you haven't already. Then, hover over the module to reveal the module buttons. If your Divi Builder is set to use "Click" mode, you may need to click on the module instead of hovering. Click the "Gear" icon to open the module's settings.
Adjust the "Link Spacing" Setting
In the Divi Menu Module, navigate to the "Design" tab and then expand the "Layout" settings section. Here you'll find the "Link Spacing" option added by Divi Booster.
Set the "Link Spacing" to the size of the gap you'd like between each menu item.
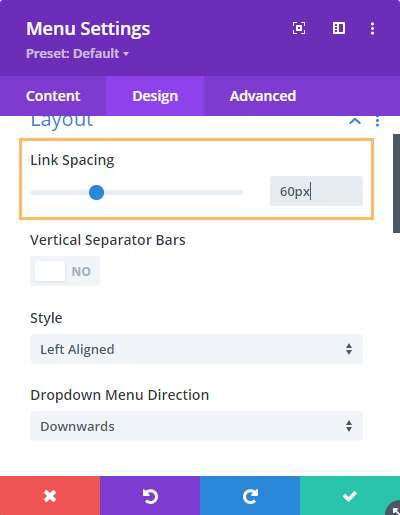
The option is available in Divi Booster v3.6.0 onwards. Note that the change doesn't show up in the visual builder preview – but it will on the front-end.
Save the Module Settings
To save the changes to the module, click the green check mark button at the bottom of the module settings.

Save the Page
When you are ready, save the whole page by opening the Page Settings toolbar, by clicking on the round purple "three-dots" button at the bottom of the visual builder are, and clicking on the "Save" button.

View the Result
Now take a look at the menu module on the front-end of your site. You should see that the spacing has been adjusted inline with the value you entered in the "Link Spacing" setting added by Divi Booster.
Set the Divi Menu Module Link Spacing using CSS
If you are comfortable working with code, you can manually increase or decrease the spacing between the menu items in the Divi Menu Module with CSS code.
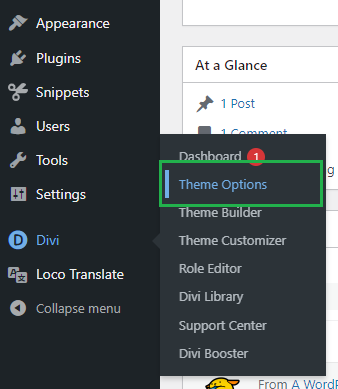
Open the Divi Theme Options
Divi's Theme Options include various settings for configuring Divi's overall behavior. To open the theme options, from your WordPress dashboard, click on "Divi" in the sidebar menu, then the "Theme Options" sub-menu item.
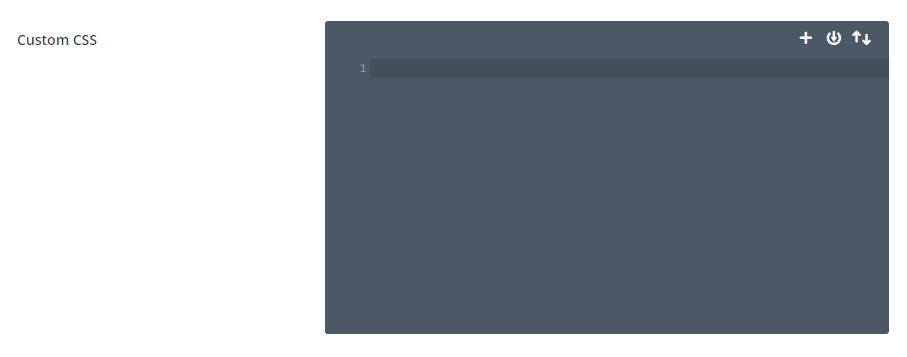
Navigate to the "Custom CSS" Setting
Now click on the "General" tab in the Divi Theme Options, which brings us to Divi's main site-wide settings. Scroll to the bottom and you should see a box called "Custom CSS" which allows you to add your own CSS code alongside that already added by Divi:
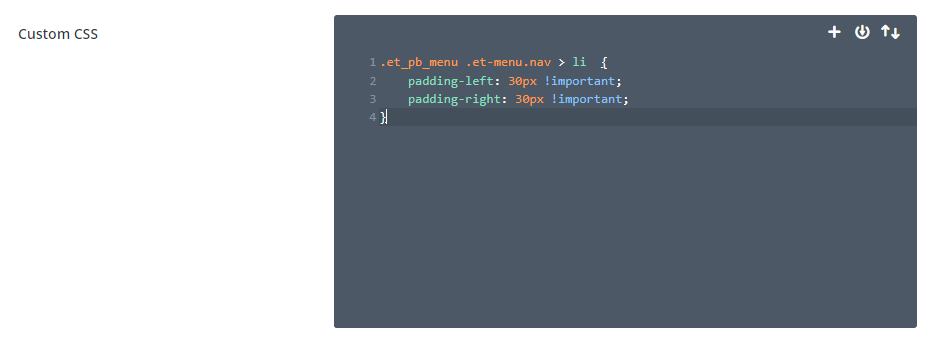
Enter the Divi Menu Module Spacing CSS
Now paste the following CSS code into the custom CSS box, to adjust the Divi menu module menu link spacing:
.et_pb_menu .et-menu.nav > li  {
    padding-left: 30px !important;
    padding-right: 30px !important;
}
Related Post: Adding CSS to the Divi Theme
The code adjust the left and right padding on each menu item, controlling the space between it and its neighbors. The padding in the code is set to 30px on either side, giving a 60px gap between each menu item. Feel free to adjust the padding to suit your needs.
To apply the spacing to some Divi menu modules, but not others, you can use the code below instead. Then give your menu module a CSS class of "menu-module-reduced-padding" in the menu module settings, under "Advanced > CSS ID & Classes > CSS Class".
.et_pb_menu.menu-module-reduced-padding .et-menu.nav > li {
padding-left: 30px !important;
padding-right: 30px !important;
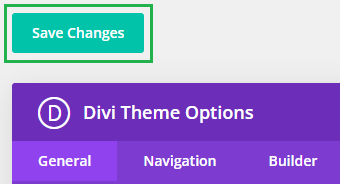
}Save the Divi Theme Options
To apply the changes, we need to save the Divi Theme Options. This can be done by clicking the "Save Changes" button at the top or bottom of the Divi Theme Options area:
View the Result
Now take a look at the menu module on the front-end of your site. You should see that the spacing has been adjusted inline with the padding value you set in the custom CSS.
Conclusion
So there we have it. We've seen two ways to increase the spacing between Divi menu items in the Divi Menu module, using Divi Booster and using custom CSS. I hope the guide has been helpful, but if you have any questions, please ask in the comments.


Hello,
Thanks for sharing.
I tried using the code but my menu is being replaced for another menu I have.
Do you have any info why this is happening? Any help is really appreciated.
Thank you! – Have a great day!
Hi Maria, the code shouldn't be able to affect which menu is applied – it's CSS code which is applied in the browser after the page has been generated (and the menu loaded). I can see that the CSS seems to be applying correctly in your page, so I suspect something else is causing your issue with the menus. The menus on that page look like they are added using two Divi menu modules within the header and footer of the theme builder template in use on the page, so I'd first of all check that the correct menu is still selected within these menu modules. If the correct menus are set in the menu module settings, but the wrong menu is showing on the front end, try clearing any caches and refreshing the page. If that still doesn't solve it, let me know and we'll take it from them. Thanks
Any thoughts on how I can reduce the default link spacing, rather than add to the default spacing, in a specific Divi menu module rather than across all menu modules on my site? My university does not allow use of Divi Booster. Thanks for any help.
Hey John,
First, give your module a CSS class of "menu-module-reduced-padding" in the menu module settings ("Menu Settings > Advanced > CSS ID & Classes > CSS Class").
Then add this CSS into the "Divi > Theme Options > General > Custom CSS" box:
.et_pb_menu.menu-module-reduced-padding .et-menu.nav > li  {
    padding-left: 4px !important;
    padding-right: 4px !important;
}
The default padding is 11px each side, so anything less than that should reduce it.
You can apply the same class to multiple menu modules if you need to.
Hope that helps!
Hello!
I am trying to reduce vertical menu spacing within the menu modules in the footer. I tried tweaking the above comment code (and using the class it had that I got from you to get the arrows)
.et_pb_menu.pa-vertical-menu .et-menu.nav > li {
padding-top: 4px !important;
padding-bottom: 4px !important;
}
But it's not taking any edits. Help, please! The website is in development, so it's pw protected currently. *Password removed*
Thanks!
Hi Kristen,
I can see that CSS taking effect on the page. If you modify it to set the padding to 0px it should reduce the vertical spacing slightly. However, there is also some margin separating the list items. You could get rid of both the margin and padding with the following CSS:
.et_pb_menu.pa-vertical-menu .et-menu.nav>li {
 padding-top: 0px !important;
 padding-bottom: 0px !important;
 margin-top: 0px !important;
 margin-bottom: 0px !important;
}
That will be probably reduce the space between items too much, so increase the padding or margin a bit to get the spacing you want.
Hopefully I've understood what you need, but give me a shout if not or if you have any further questions about it. Thanks!