
Divi's Dynamic Content is a powerful feature that lets you populate your Divi modules and theme builder templates with data pulled in various sources, such as custom fields. This allows for efficient organization and maintenance of your sites.
Unfortunately, Divi's dynamic content feature doesn't work on the product selector in the Divi WooCommerce modules. However, you can enable dynamic content on the woo modules' product field using the Divi Dynamic Content Extended plugin. This allows you to dynamically select products based on a custom field.
This tutorial explains how to enable Divi dynamic content on the product selector in woo modules, allowing you to dynamically select the product shown.
Enable Divi Dynamic Content in the Woo Modules Product Selector using Divi Dynamic Content Extended
The Divi Dynamic Content Extended plugin makes a wide range of improvements to Divi's dynamic content feature to make it more powerful and more useful. One such improvement is the addition of support for dynamic content in the "Product" field of many Divi WooCommerce modules. It was added in Divi Dynamic Content Extended v1.3 and works in any module which has the "Product" field for the selection and display of information about a single product.
Here are the steps to setup and use dynamic content in the Woo product. In this example, we'll use dynamic content to select the product to be displayed in the Woo Product Gallery module based on the value of an existing custom field.
Get Divi Dynamic Content Extended
Divi Dynamic Content Extended enhances Divi's dynamic content with more content sources and support for dynamic content on more fields. This includes adding the feature we need here.
If you haven't already done so, grab your copy of Divi Dynamic Content Extended now.

Upon purchase, you'll be provided with a copy of the divi-dynamic-content-extended.zip plugin file. Download the plugin zip file to your computer, ready for installing in the next step.
If you have already purchased Divi Dynamic Content Extended, you can obtain the plugin zip file from within your Divi Booster account.
Install the Plugin
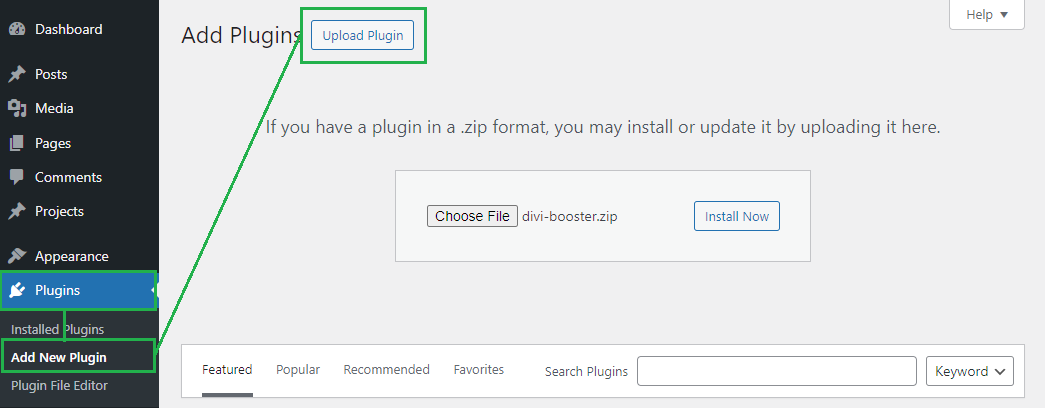
The plugin zip file can then be uploaded to your own site at:
WP Admin > Plugins > Add New Plugin > Upload Plugin
There, click "Choose File", locate and select the plugin zip file and then click "Install Now". Once uploaded, click to activate the plugin. The plugin features will now be available on your site.
Open your Page for Editing in the Visual Builder
Browse to the page you want to apply the change to. Then, in the WordPress admin bar at the top of the page, click the "Enable Visual Builder" button to open the page for editing in the Divi Builder.

Open the Woo Product Gallery Module's Settings
Locate the woo product gallery module you want to modify, or add it to your layout if you haven't already. Then, hover over the module to reveal the module buttons. If your Divi Builder is set to use "Click" mode, you may need to click on the module instead of hovering. Click the "Gear" icon to open the module's settings.

Click on the Dynamic Content Icon on the Product Picker
In the module settings, locate the "Product" field. If you now hover over it, the dynamic icon should appear – it's the "database" icon with a small "+" in the corner. Click on this icon.

Select your Custom Field from the Dynamic Content Menu
The dynamic content menu should now be displayed, showing the available dynamic values. Locate the one which contains your product ID. In this case, I've added a custom field to my page called "Product ID". Once located, click on it to select it.

Please note that your custom field or other dynamic value should return the ID of the product (i.e. the product's WordPress post ID), and nothing else.
See the Selected Dynamic Content Field
You should now be returned to the module settings. If you are shown the dynamic content field settings with the option to set text before / after the dynamic content value, just accept the defaults. At this point you now see that your custom field, or chosen dynamic content source, has been set as the "Product" value. This will ensure the module uses the information for the product set in that custom field.

Save the Module Settings
To save the changes to the module, click the green check mark button at the bottom of the module settings.

Save the Page
When you are ready, save the whole page by opening the Page Settings toolbar, by clicking on the round purple "three-dots" button at the bottom of the visual builder are, and clicking on the "Save" button.

View the Results
Now, if you view your page on the front-end of your site, you should see that the WooCommerce module loads the product information (the image in this example), based on the ID set in the custom field. If you change the ID in the custom field, the displayed product should automatically change. Likewise, if you use the same Divi WooCommerce module on multiple posts / pages (e.g. by adding it to a Divi Theme Builder template), the displayed product will match the ID set in the custom post on the corresponding post / page.
Conclusion
So there we have it, a straight-forward way to enhance Divi's dynamic content to allow us to work with dynamic selected products. This allows us to take advantage of more flexibility and better organization when setting up a store using WooCommerce and Divi's WooCommerce modules. Please feel free to ask in the comments if you have any questions, etc.


0 Comments