The Divi Theme comes complete with a built-in full-width slider module. Here's a quick guide to setting it up (and avoiding one of its biggest pitfalls).
Note: see this post if you'd like to set up a fullscreen Divi slider with menu / logo overlay.
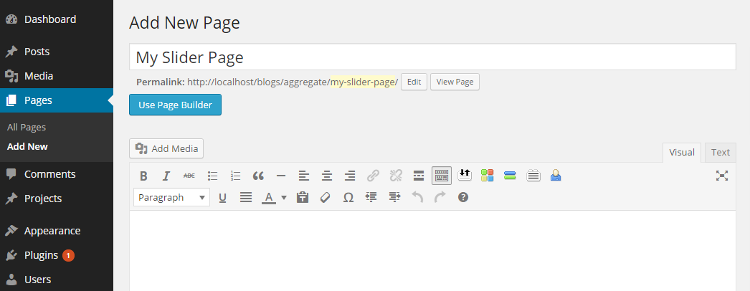
Step 1: Create a New Page
First create a new page, onto which we'll put the slider. Give the page a title.
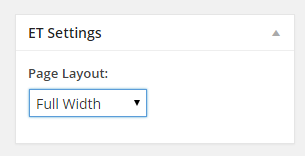
Step 2: Change the Page to Full-Width Mode
Next, we'll set the page to be full width, meaning that it won't have any sidebars. To do so, locate the "ET Settings" box to the right of the post editor and change the Page Layout setting to "Full Width":
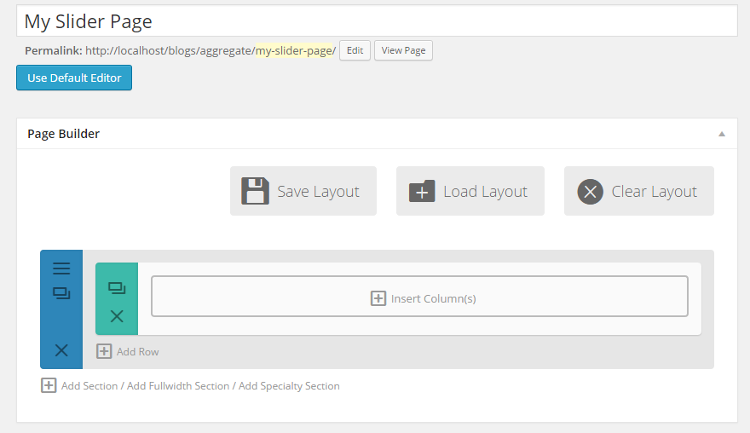
Step 3: Switch to Page Builder Mode
Click on the blue "Use Page Builder" button (located below the page title and above the page editor), you'll then see the Divi Page Builder appear, like so:
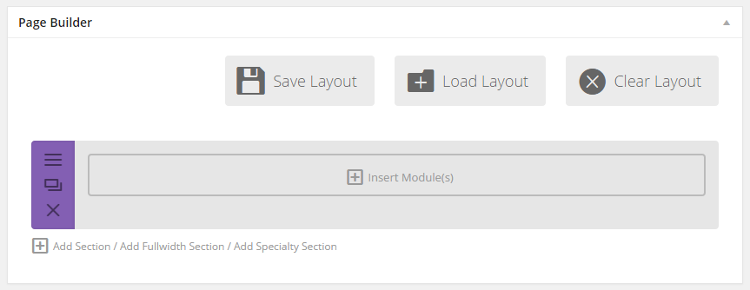
Step 4: Change to a Full Width Section
By default the Page Builder starts with a regular, non-fullwidth section. So we need to replace this with a full width section. To do so, click on the grey "Add Fullwidth Section" link at the bottom of the Page Builder. This will add a full width section with a purple toolbar. Now delete the default section by clicking on the "X" in that section's blue toolbar. You're page builder should now look like this:
Step 5: Insert the Full Width Slider Module
Now we want to add the slider module to our full width section. To do so, click the grey "Insert Module(s)" link in the middle of the full width section box. This will bring up a choice of modules, like so:
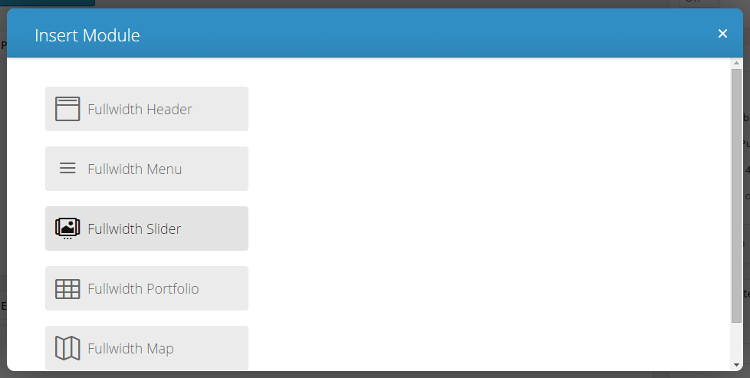
Click on the Fullwidth Slider option to add the slider to the page.
Step 6: Configure the Full Width Slider
You'll now be presented with the slider module settings screen, like so:
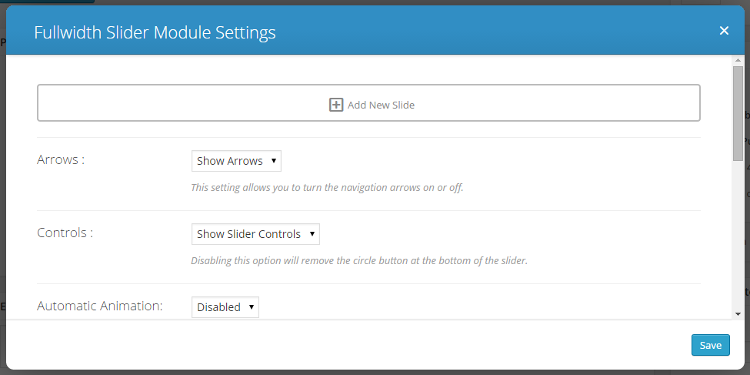
You can play around with the various options later. For now, we'll just leave everything as it is. We do however need to add some slides.
Step 7: Adding Slides to the Full Width Slider
Click on the "Add New Slide" link at the top of the Full Width Slider Module Settings. You'll now be presented with the settings for your new slide.
There are quite a few options, not all of which we need to worry about.
Perhaps the main thing we are likely to want to do is actually add a background to our slide. To do this, go to the "Content" tab and locate the "Background" subheading. There you'll see the option to set various types of backgrounds, as shown:
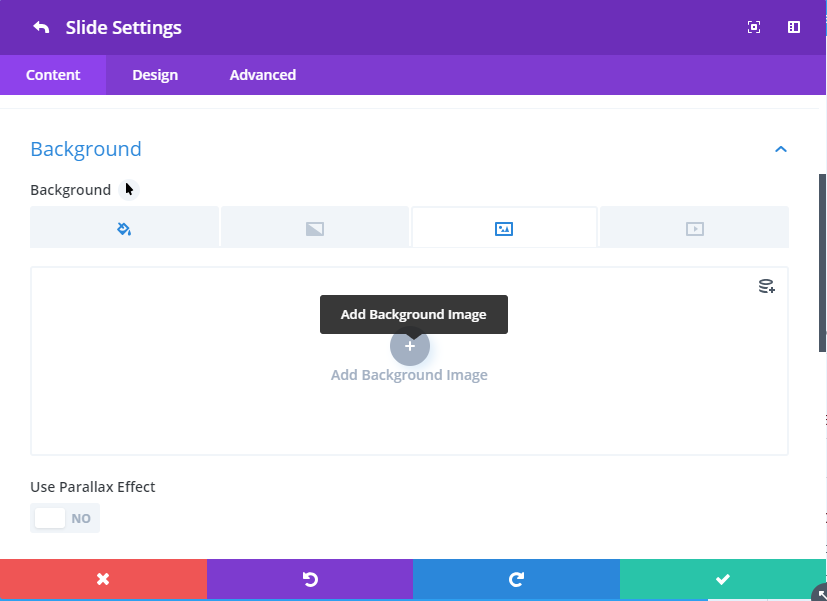
The four tabs, from left to right, are for a 1) solid background color, 2) gradient background, 3) background image, and 4) video background. Click on the tab and you'll be able to configure the type of background you want for your slide.
Note that in earlier versions of Divi, there were separate "Background Image" and "Background Color" options (before this tabbed background option was added).
Another option you can set on a slide is the "Slide Image". Not to be confused with the background image, this is a smaller image which sits next to the text of your slide. You'll find the "Slide Image" setting on the "Content" tab under the "Image and Video" subheading.
At this point you may also like to add a Heading and some Content to your slide.
When you are done editing your slide settings, click "Save". You'll be taken back to the slider module settings from where you can either choose to add more slides, or click "Save" to finish editing the slider module.
Step 8: Enhance your Full Width Slider with Divi Booster
My Divi Booster plugin adds several options which can be used to enhance your full width slider.
These include:
- Set slider height (on individual sliders)
- Set at "Fullwidth Slider Settings > Design > Sizing > Height"
- Add second button to slides (on individual slides)
- Set button text at "Slide Settings > Content > Text > Button #2 Text"
- Set button URL at "Slide Settings > Content > Link > Button #2 Link URL"
- Add background link URL to slides (on individual slides)
- Set at "Slide Settings > Content > Background > Background Image URL"
- Set at "Slide Settings > Content > Background > Background Image URL"
Step 9: View Your Full Width Slider
You're now ready to click "Preview" to see your full width slider in action. All being well, it should look something like this:

In this example, the beach image was added using the Background Image field, while the people where added using the Slide Image field.


Thank you so much..
You're welcome, Basant :)
Thank for share sir
Got it – hidden plugin!
I'm so frustrated! I want to change the banner on a page – it's set as a background image on a fullwidth slider. It says "If defined, this image will be used as the background for this module. To remove a background image, simply delete the URL from the settings field." Well, I would love to know where that "Settings" field is.
Hi Kristine, the wording is a bit confustion, but in this description, Divi is actually referring to the "Background Image" field. In the "Background Image" field you should see the URL of the image currently in use. Simply delete that URL and save and the background image will be removed. You can also replace it by simply clicking on the "Upload Image" button to the right of the "Background Image" field and selecting your new image.
There is no "Settings" field. Rather, the whole set of options available for the slider are collectively referred to as the module's "Settings". By saying "settings field", Divi is just trying to refer to the particular option, or field, to which the description applies – i.e. the "Background Image" field.
I hope that makes sense!
Wow you helped me. I missed the part about the background image.
You made it clearer.
thank- you!
Bullshit !! Full width and Fulls screen slider are not responsive ! I have bought DIVI shame on them !!
Just spent 3 hours wondering why my slides were so small! Boy, is this ever counterintuitive but you're right, the slides are really the "background image" and not the slide image. Who'd a thunk it?
Hey Mark, I'm glad you got the image showing. I think the problem with that additional CSS might be that it has two closing braces "}", while it only needs one (unless it is part of some larger code block). If you remove one of the braces, I think you should be able to use both that code and the header together.
I don't currently have a good way to get the header to remain visible on scroll, I'm afraid, but if I'm ever able to come up with anything I'll let you know.
Hi !
Somehow all the images I put as a background are really zoomed in a lot. I've selected "fit the screen", "cover", "actual size"…. nothing seems to make my images be loaded with their actual size / and resolution.
Hey Rastouil, is there any chance you able to share a link to the page you're working on so that I can take a look?
Aloha!
I've gone through all steps, plus watched a video, and my sliders still refuse to slide. Anything you can think of that I might be missing? I have 5 slides with captions set up, and when I switch to manual navigation I don't get the arrows, either. Its not a part of my site yet, but at: http://kauaiadventurephoto.com/slider-page/
Thank you!
Melissa
Hi Melissa, it looks like you're affected by the following Divi bug:
https://divibooster.com/fix-divi-sliders-and-images-not-working-with-wp-4-5/
If you update to Divi 2.7.3, I think your sliders should start working.
My current "munchkin": how to change the Admin Labels on the individual slides? The module itself can be renamed, whoop de do, I only have one module. The slides themselves all say "New Slide". Temporarily giving them titles with font color matching background, to "hide" them. Silly workaround. but I don't want text in most of my slides. I DO want to be able to scan down the list of 30 slides and not have to keep clicking on them, scrolling to the bottom to see what image I'm on… ?? I thought a bugfix was coming for this ages ago. Maybe i'm way behind on updates. Thank you so much!
! :-)
Never mind, found it! Sure enough. Waaaaay down the bottom. I am now very happily labeling all my slides. Whee :-)
Ha ha! Yeah, it's tucked away quite well – I'm glad you found it nissa! Have fun labeling! :)
How do you switch it back to 3-4 if you change your mind and no longer want it 4-4. Can't find the ET Settings box for it and no Layout menu options either. Could begin a new section in Standard and rebuild it but, ugh… Thanks :-)
Hi nissa, I don't think there's a way to convert a full-width section to a standard section. But what you can do is add a standard section, set up the 3-4 columns and then drag and drop your slider from the the full-width section to the standard section. Then you can delete the unneeded full-width section. Hopefully that makes sense, and that I've understood what you're asking.
yes, thank you that makes sense. Good explanation :-) Unfortunately the drag-and-drop function doesn't work on any of my workstations, in many areas of WP :-(
And, I'm also apparently unable to save my original slider to the library (in order to then insert it into the module). So I guess I'm stuck with either the 4-4 or rebuilding the thing. Oh well. Thanks for the guidance!
Hi nissa, one other option is to use the Divi Builder's "Cut" and "Paste" options – just right click on the module to bring up the menu.
By the way, it sounds as though there may be a JavaScript error in the page which might be stopping these functions from working. There are two ways to track down the source of any such error. One is to disable all your plugins and test if the drag-and-drop, etc, is working again. If so, then start enabling the plugins again, one at a time, until you find the plugin that is causing it. Then you can contact the plugin author for a fix. The other way to do it is a bit more technical – if you know how to, you could open the JavaScript console in your browser and look for any JavaScript error messages. This would probably point you to a particular plugin after, and again you could contact the author for a fix. If you're unsure what an error message means, feel free to post it hear and I'll try to offer some advice.
I'm having the same problem as Denise. I tried following your suggestions, Dan, but f12 only turns up my volume (I have a Mac). Is there any other way to see the console? The problem occurs in both Firefox and Chrome. "add new slide" is visible but nothing happens when I click it.
Hi Shannon, I think on Macs you can bring up the console using "Command + Option + J" (in Chrome).
thanks Dan! yes I can noodle around in the JS. good idea. I've got other things above that on my call stack at the moment but wrote down your advice and will follow up. Interestingly my WP coach here does not encounter any problem on her machine. So it appears somehow local to my workstations–a Mac running Safari and two HPs running Mozilla on Vista and Win7.
What about if I do all the steps but I can't add any slide? I´m not given the "slide settings" option?? Help me please!!!
So you can see the "Add new slide" link, but when you click on it nothing happens? Is that right? If so, maybe you have a JavaScript error on the page. To check this, try to set up the slider in Google Chrome. Then before you click "Add new slide", press "F12" and then click on "Console". Now click "Add new slide" and see whether any errors appear in the "console" box. If so, let me know what they say. It could be that some plugin is causing an error and conflicting with Divi. Or maybe you're not seeing the "Add new slide" link at all…?