The standard header in Divi includes a menu for your main site navigation links. Given their prominent position on the page, it's important to ensure they are look good and are easy to read. This tutorial will show you how to adjust the menu item spacing and make this all-important element look the way you want it to.
Divi doesn't include an option to adjust the Divi menu item spacing. For the standard Divi header, it can be done using either the option added by the Divi Booster plugin, or using custom CSS code added into the Divi Custom CSS area. If you're using the menu's vertical format, different CSS code is required.
This post covers changing the spacing between menu items in the standard Divi header menu. If you want to adjust the spacing in the Divi menu module (e.g. in a custom header / footer), please see our post on changing the spacing between menu module links instead.
Before
Before we start, here's an example of how the standard Divi header menu normally looks. As you can see, the menu items are packed quite tightly together.

After
Now here's an example with increased space between the menu items. As you can see, the increased whitespace between the menu items creates a different feel to the menu. By taking control over the menu item gap, you can make sure that the look and feel of the menu spacing suits your design perfectly.

Change the Divi Menu Item Spacing with Divi Booster
A simple way to increase the menu item spacing is using the Divi Booster plugin. Divi Booster adds a wide range of new settings to Divi, including the option to set the Divi menu item spacing. This will lets us increase the space between menu items easily, without the need for code.
Get Divi Booster
Our popular Divi Booster plugin adds hundreds of new features to Divi, including the one we need here.
If you haven't already done so, grab your copy of Divi Booster now. You'll then be provided with a copy of the divi-booster.zip plugin file.
If you have already purchased Divi Booster, you can obtain the Divi Booster plugin zip file from within your Divi Booster account.
Download the plugin zip file to your computer, ready for installing in the next step.
Install Divi Booster
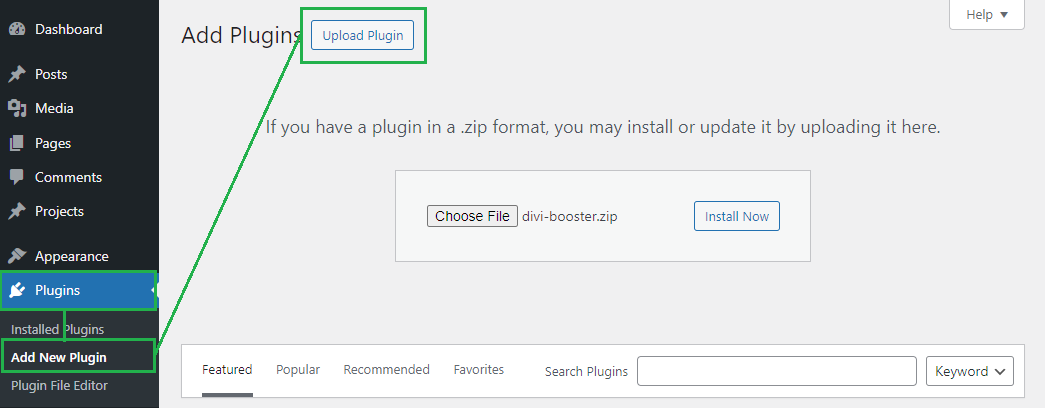
The plugin zip file can then be uploaded to your own site at:
WP Admin > Plugins > Add New Plugin > Upload Plugin
There, click "Choose File", locate and select your divi-booster.zip file and then click "Install Now". Once uploaded, click the button to activate the plugin and the feature will be added to Divi.
Open the Divi Booster Settings Page
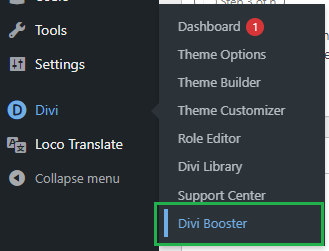
Now, in your WordPress dashboard, look for the "Divi" option in the left-hand menu, then click on it. Under the Divi menu, you'll find "Divi Booster” – select it to open the Divi Booster settings page. This will bring up Divi Booster's main settings that can be applied globally to Divi.
Adjust the "Space between menu items" setting
On the Divi Booster settings page, expand the "Header" settings section, and then the "Main Header" sub-section. Here you'll find an option called "Space between menu items" which can be used to set a custom spacing between items in the main Divi menu. Check the setting to enable it and then enter the space (in pixels) that you'd like to have between each menu item.

Note that the default Divi menu link spacing is 22px, so anything bigger will increase it, while anything smaller will decrease it.
Save the Divi Booster settings
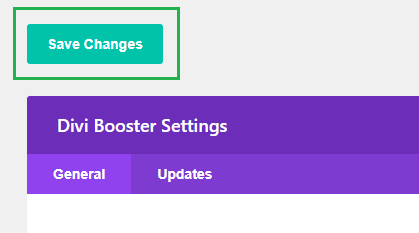
Now, save your Divi Booster settings by clicking the "Save Changes" button at the top of the settings page. This will apply the Divi menu spacing adjustment to your site.
View your Divi Menu's Modified Spacing
If you now view your site on the front-end you should see the result of applying the "Space between menu items" setting. The gap between menu items should have increased or decreased depending on the value you set for the spacing.

Change the Divi Menu Item Spacing with CSS
If you are comfortable working with code, you can manually increase or decrease the spacing between the menu items in the Divi Theme's main navigation menu with CSS code.
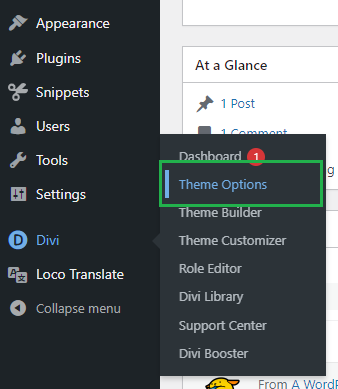
Open the Divi Theme Options
Divi's Theme Options include various settings for configuring Divi, including the option to add custom CSS code. To open the theme options, from your WordPress dashboard, click on "Divi" in the sidebar menu, then the "Theme Options" sub-menu item.
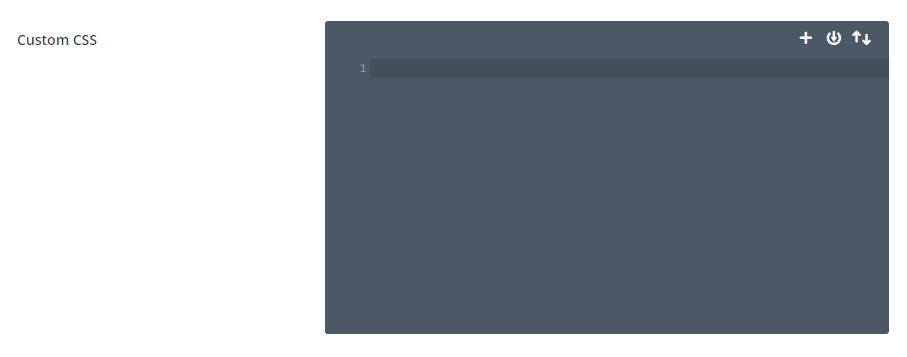
Navigate to the "Custom CSS" Setting
Now click on the "General" tab in the Divi Theme Options, which brings us to Divi's main site-wide settings. Scroll to the bottom and you should see a box called "Custom CSS" which allows you to add your own CSS code alongside that already added by Divi:
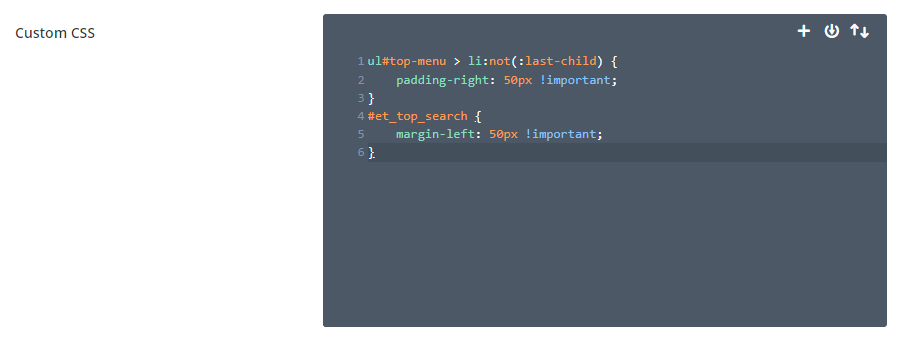
Add Divi Menu Item Spacing CSS into the "Custom CSS" Setting
Let's go ahead and add the CSS code snippet that will let us increase the space between Divi menu items. Here's the CSS you'll need:
ul#top-menu > li:not(:last-child) {
    padding-right: 50px !important;
}
#et_top_search {
    margin-left: 50px !important;
}
Related Post: Adding CSS to the Divi Theme
It simply adjusts the spacing (using margin and padding) between menu items and also the search icons, to give a consistent, adjusted spacing amount. The default spacing is 22px, so anything bigger will increase it, while anything smaller will decrease it. Here I've set it to 50px.
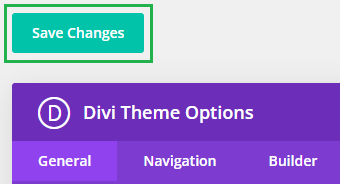
Save the Divi Theme Options
To apply the changes, we need to save the Divi Theme Options. This can be done by clicking the "Save Changes" button at the top or bottom of the Divi Theme Options area:
View your Divi Menu's Modified Spacing
If you now view your site on the front-end you should see the result of applying the Divi menu spacing CSS code. The gap between menu items should have increased or decreased depending on the value you set for the spacing.
Change the Divi Vertical Menu Item Spacing with CSS
Divi includes a feature to change the normally horizontal header / navigation menu into a vertical menu. If you use (or want to use) this vertical header format, you can adjust the vertical gap between the menu items using custom CSS added to your Divi site.
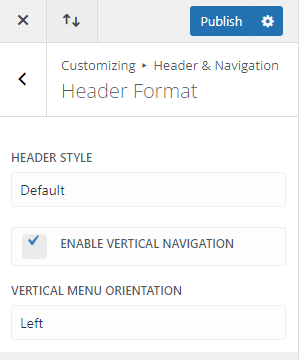
Enable Divi's Vertical Navigation Header Format
To enable Divi's vertical navigation format, check the "Header & Navigation > Header Format > Enable Vertical Navigation" option in the theme customizer. This will convert Divi's standard horizontal header into a vertical equivalent.
Open the Divi Theme Options
Divi's Theme Options include various settings for configuring Divi, including the option to add custom CSS code. To open the theme options, from your WordPress dashboard, click on "Divi" in the sidebar menu, then the "Theme Options" sub-menu item.
Navigate to the "Custom CSS" Setting
Now click on the "General" tab in the Divi Theme Options, which brings us to Divi's main site-wide settings. Scroll to the bottom and you should see a box called "Custom CSS" which allows you to add your own CSS code alongside that already added by Divi:
Add Divi Menu Item Spacing CSS into the "Custom CSS" Setting
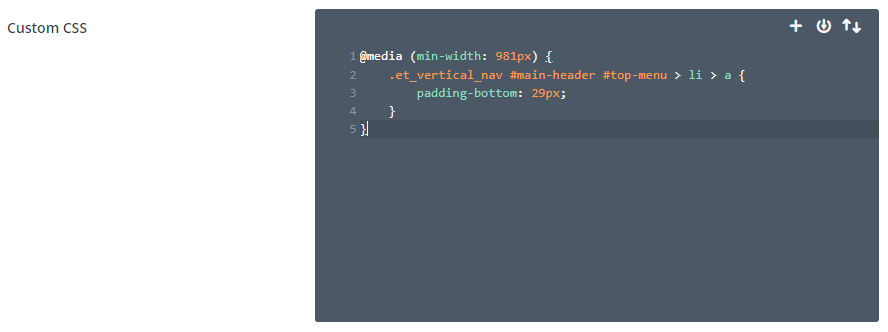
Let's go ahead and add the CSS code snippet that will let us increase the space between Divi menu items. Here's the CSS you'll need:
@media (min-width: 981px) {
	.et_vertical_nav #main-header #top-menu > li > a {
		padding-bottom: 29px;
	}
}
Related Post: Adding CSS to the Divi Theme
It simply adjusts the bottom padding on the menu items to increase or decrease the vertical spacing between the menu items, to give a consistent, adjusted spacing amount. The default spacing is 19px, so anything larger will increase it, while anything smaller will decrease it. Here I've set it to 29px.
Save the Divi Theme Options
To apply the changes, we need to save the Divi Theme Options. This can be done by clicking the "Save Changes" button at the top or bottom of the Divi Theme Options area:
View your Divi Menu's Modified Spacing
If you now view your site on the front-end you should see the result of applying the Divi vertical menu spacing CSS code. The vertical gap between menu items should have increased or decreased depending on the value you set for the spacing.
Conclusion
So there we have it. We've seen two ways to increase the spacing between Divi menu items in the standard header, using Divi Booster and using custom CSS. We've also seen how to use custom CSS to increase the spacing when the Divi header is set to a vertical layout. I hope the guide has been helpful, but if you have any questions, please ask in the comments.


Thanks, Man
This is the solution which I'm looking for…
Hey Dan,
I pasted this CSS in the General tab of the Divi options and saved.
Nothing happened. I read you advise to clear the cache, I did it, even tried on different browsers.
No effect.
I'm currently in localhost, using mamp.
Any ideas?
Thanks for your help!
Hey Slaty,
Quick question – are you using a menu module? The code in this post is designed for (and only works on) the default Divi header. It won't work, for example, on custom headers built in the Theme Builder using the menu module. If that's the case, let me know and I'll try to come up with a solution that will work for you.
If you're on the default Divi header, can you try the code in the post now? I've just updated it to make it a bit more general. It seems there were some types of menu link that it wasn't taking effect on. Hopefully that helps, but if not, can you let me know what header format you're currently using. Thanks!
Hi Dan,
I take this message to ask you the solution using the custom headers built using the menu module in the Theme Builder. :)
Thanks!
Hey Ed, I've just updated the post with a section on how to adjust the space between menu items in the menu module using CSS. Hope it helps!
Dan,
I am trying to do this in a custom header built in the Theme Builder using the menu module. Would you know how to do this in this case, if it's not too much trouble?
Thanks!
Hey Ed, I've just updated the post with a section on how to adjust the space between menu items in the menu module using CSS. Hope it helps!
Hey thanks man, I'm just finding the solution And I finally get the solution in your article.
You're welcome, Faruksadar :)
Hi genius. Could you tell me how to add a border or box to the main menu items? Thank you
Hey Nicolás, here's one way to do it:
https://divibooster.com/add-border-box-to-main-menu-items/
Let me know if that doesn't do what you need. Thanks!
Hi there! I am trying to add a bigger margin (top and bottom) on both the primary and secondary menu. Can I add that to CSS too? I cannot find settings to change it in Divi.
Hi Almari,
You can increase the height of the primary menu using the menu height setting found at "Divi > Theme Customizer > Header & Navigation > Primary Menu Bar > Menu Height". It's not technically adjusting the margins – it's really adding padding to the main menu links – but the visual effect should be the same in most cases.
For the secondary menu, see if this helps: https://divibooster.com/increase-the-height-of-the-secondary-header/
If either of these doesn't do what you need, let me know. Thanks!
Hi Dan, I have a vertical menu. But how can I make my drop-down submenu act vertically as well, and not horizontal?
Thank you!
Hi Nicolas, here's a way to do it using CSS:
https://divibooster.com/inline-vertical-menu-dropdown-sub-menus/
I hope that helps!
How would I do this for the logo in the menu bar only? Say I like the buttons the way they are but I would just like them to be further away from the logo which is in the middle.
Hey John, you should be able to do it by adding some margin to the logo wrapper, like so:
.centered-inline-logo-wrap {
    margin-left: 20px !important;
    margin-right: 20px !important;
}
You can add this into the "Divi > Theme Options > General > Custom CSS" box. I hope it helps.
To make the spacing variable (so it shrinks on smaller screens before going to the mobile menu view) use vw (viewport width) instead of px.
I have used 5vw but with more (or fewer) menu-items you can change this to suit.
ul#top-menu li.menu-item:not(:last-child) {
padding-right: 5vw !important;
}
#et_top_search {
margin-left: 5vw !important;
}
Nice tip! Thanks Torkild :)
I have a divi site and I am trying to fix the spacing on my submenu for longer titles. I would like the wrapping of my submenu title to have a smaller space. Some of my titles are a little long EX "CSBG Tribal Directory". My Primary menu is also a vertical side menu.
http://www.csbgtribalta.com/
Hi Zetter, you should be able to do it with this CSS:
.sub-menu .menu-item a {
    line-height: 1.5em;
    padding-top: 9px !important;
    padding-bottom: 9px !important;
}
The "line-height" controls the gap between wrapped lines. However, it also affects the gap between menu items so the padding is added to offset this.
Also, if you haven't considered it, an alternative would be to increase the width of the menus so that no wrapping occurs, e.g. with:
.sub-menu,
.sub-menu .menu-item,
.sub-menu .menu-item a {
    min-width: 330px;
}
You can add either CSS snippet into the "Divi > Theme Options > General > Custom CSS" box.
My content on each page hides behind top menu bar, how can I lower it below the menu
Hi Lewis,
Divi has a feature where setting a semi (or fully) transparent background color for the header causes the page to be moved up behind the menu bar. It sounds like maybe this is what's going on for you..?
One way to fix this is to change the header background color back to fully opaque. To do this, go to Divi > Theme Customizer > Header & Navigation > Primary Menu Bar, and locate the "Background Color" option. Click on it, and move the rightmost slider (which controls the transparency) all the way to the top. If you now save this and view your site, the page should hopefully be moved lower down. If you like, you can still set a transparent background for the fixed menu, so that the menu bar is transparent when you scroll down.
Hopefully that makes sense and helps you, but let me know if not.
Hello Dan,
Can I put this code in appearance>editor ?
Thanks,
Jesson
Hi Jesson, while technically you can, it's best not to. The code accessible via the editor can be overwritten if you update Divi and that'll mean your changes get lost. Also, there's a risk of causing your site to break if you make a mistake.
This post summarizes the best options for adding the CSS code above to Divi:
https://divibooster.com/adding-css-to-the-divi-theme/
I just uploaded and activated the Divi builder and I cannot seem to accomplish this task for spacing out my menu items.
Zac
Hi Zac, I've just updated the code above – it seems it now needs to have the !important part to override the padding in the latest version of Divi.
Also, which theme are you using? The code above is for the Divi Theme only, not themes using the Divi Builder.