Hide the Header and Footer in the Hello Elementor Theme

Written by Dan Mossop

Removing the default header and footer from your Hello Elementor theme allows for a streamlined and distraction-free website design. This is especially useful when creating unique landing pages, full-width layouts, or custom headers and footers with a page builder. In this guide, we show you how to disable the built-in theme header and footer for a cleaner look and greater design flexibility.

Hide the Header and Footer in the Hello Elementor Theme using Hello Settings

This method demonstrates how to hide the Hello Elementor theme's header and footer by adjusting the built-in settings found within the WordPress admin area. It is an easy and effective way to remove the default header and footer without any coding, allowing you greater control over your site's layout.

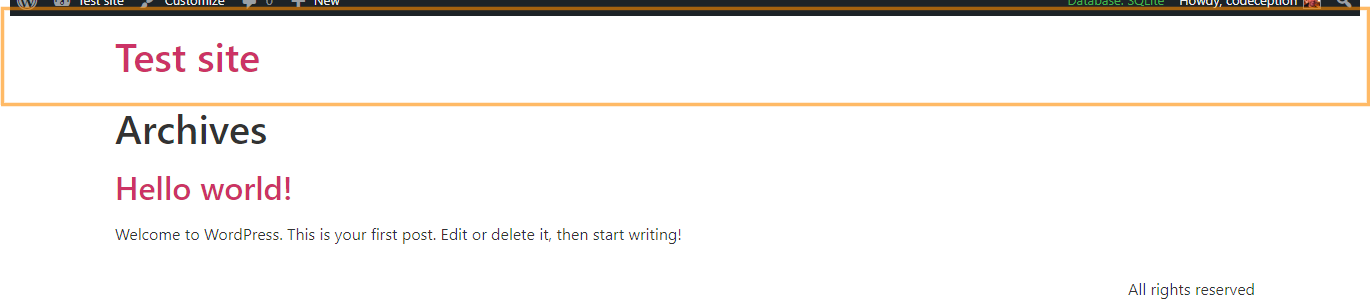
Check Your Site for the Default Header and Footer

Before you begin, take a quick look at your homepage to see the default Hello Elementor header (with your site title) at the top and the footer (such as 'All rights reserved') at the bottom. This step helps you confirm what will be changed.

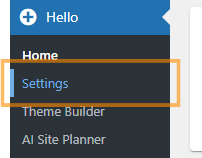
Access the Hello Theme Settings

To remove the header and footer, head to your WordPress Dashboard. In the left sidebar, look for the 'Hello' menu and click on 'Settings' underneath it. This will open up the Hello theme's customization options.

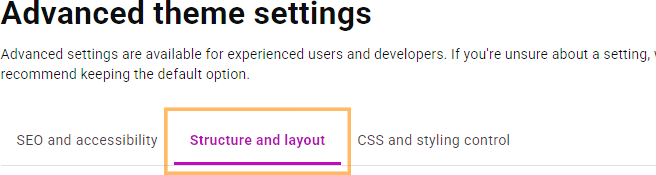
Go to the 'Structure and layout' Tab

Once on the settings page, navigate to the top and click the 'Structure and layout' tab. This tab contains layout options specifically for your theme.

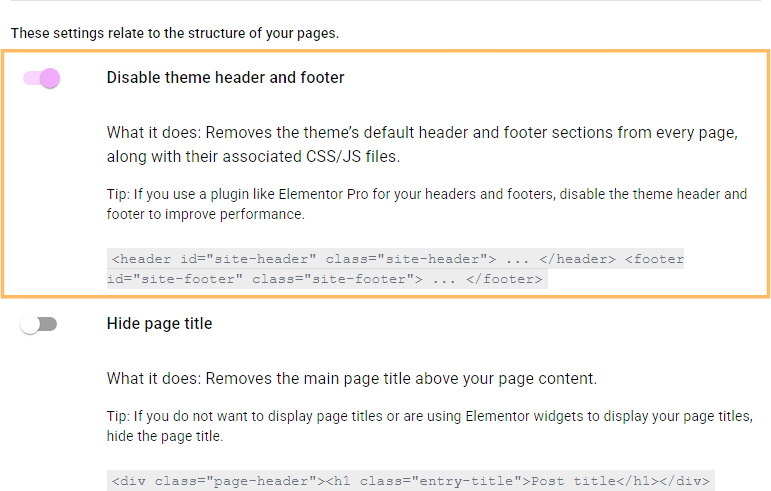
Disable the Theme Header and Footer

Find the option labeled 'Disable theme header and footer' and click its toggle switch. This will immediately remove both the header and footer from your site's design.

View Your Changes

Return to your homepage to see the updated look—your site should now be free of the default header and footer for a simple, clean starting point.

Conclusion

With just a few clicks, you've removed the Hello Elementor theme's header and footer, giving you full creative control over your site's appearance.

Supercharge Your Posts with AI-Generated CTAs

Transform your WordPress site with WP Magic CTAs. Our AI-driven plugin creates customized, highly-targeted call-to-actions for each post, helping you increase engagement and conversions effortlessly. Perfect for promoting offers, growing your email list, and directing traffic where you need it most.

About Dan Mossop

Dan is a Scottish-born web developer, now living in Brisbane with his wife and son. He has been sharing tips and helping users with Divi since 2014. He created Divi Booster, the first Divi plugin, and continues to develop it along with 20+ other Divi plugins. Dan has a PhD in Computer Science, a background in web security and likes a lot of stuff, 

0 Comments

Submit a Comment

Comments are manually moderated and approved at the time they are answered. A preview is shown while pending but may disappear if your are cookies cleared - don't worry though, the comment is still in the queue.

Your email address will not be published. Required fields are marked *.

We may earn a commission when you visit links on our website.

Latest Posts

Fade a Divi Image Module Edge into the Background

Want to create a stylish fade effect on your Divi image module—where one side fades smoothly into the background? With a bit of CSS, you can make any edge (or corner) of the image fade out: top, bottom, left, right, or even diagonally.Fade a Divi Image Module Edge...

Setting up the Divi Password Box Module

Setting up password protection on a page can help you control access to sensitive or private content in WordPress, allowing only authorized visitors to view certain sections. With the Divi Password Box module, you can replace the plain Divi password form with a fully...

Open Divi Social Media Icons in a New Tab

Ensuring your website's social media icons open in a new browser tab creates a seamless user experience and keeps visitors engaged with your site while allowing them to explore your social media presence. This approach prevents users from navigating away from your...

Set Hover Color for Menu Links in the Divi Menu Module

Customizing the hover color of menu links lets you enhance the user experience and maintain visual consistency with your website’s brand. By setting a specific hover color, you can guide visitors' attention and improve navigation feedback. In this guide we show you...

Enable Automatic Looping for YouTube Videos in the Divi Video Module

Enabling automatic looping for YouTube videos in your Divi video module ensures that content plays seamlessly and continuously without interruption. This feature can enhance user engagement, highlight key information, or create dynamic visual effects on your website....

Random Posts