Show Currency in LearnDash Course List Ribbons

Written by Dan Mossop

LearnDash, coupled with the Course Grid Add-on, lets you display a list of courses. Items in this course list include an overlaid "ribbon" of text which provides the user with some information on the course status (e.g. "Enrolled"). In the case of a premium course which the user has not yet purchased, it will display the price. However, you may find that only the price number is displayed, e.g. "100", with no currency symbol. Here's how to display the currency alongside the price in the Course List ribbon.

Note: if you are using LearnDash on the Divi Theme, this tip also applies to the Course List module added by Divi LearnDash Kit.

Set the Default Currency in the LearnDash Settings

You can add the currency to the ribbon by setting the default currency in the LearnDash settings, at:

WP Dashboard > LearnDash LMS > Settings > Default Payments Configuration > Currency

Like so:

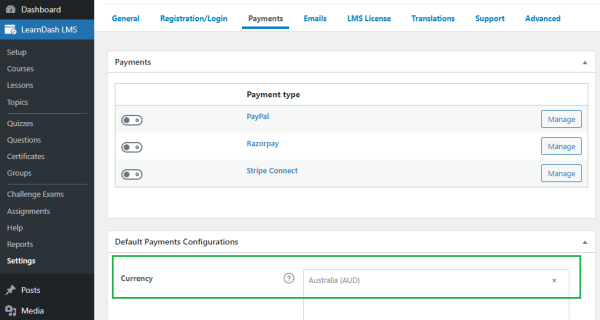
Depending on your LearnDash configuration, this currency field will either set the currency to a symbol (e.g. "A$") or a three-letter currency code (e.g. "AUD"). This will then show in the ribbon like so:

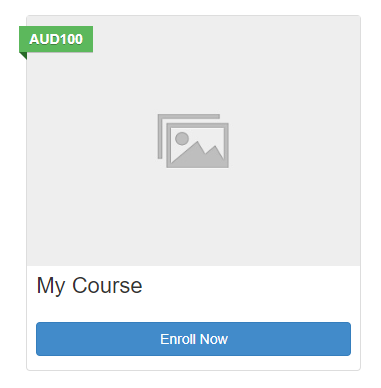
Note that there doesn't currently seem to be a way within the LearnDash settings to control the specific symbol displayed in the ribbon. 

Set the currency symbol using PHP

You can gain more control over the currency is displayed in the course list ribbon by setting it via some custom PHP code like this:

add_filter( 'learndash_course_grid_currency', 'my_custom_currency_filter', 10, 2 );

function my_custom_currency_filter( $currency, $post_id ) {
    return '$';
}

In the example above, the currency will be set to "$", causing the course list module ribbon to display prices in the form "$100". Changing the $ in the code above will change the symbol displayed.

We may earn a commission when you visit links on our website.

Enhance Your LearnDash with Divi!

Elevate your LearnDash LMS experience with the Divi LearnDash Kit. Seamlessly integrate custom LearnDash modules into Divi, resolving compatibility issues and tapping into Divi's design capabilities to create a visually appealing course environment.

Latest Posts

Customize Lightbox Title Styling in the Divi Gallery Module

Adjust the appearance of the lightbox title that appears when visitors open images from a Divi Gallery to align with your brand and improve readability. Refining the title’s color, size, and weight enhances visual hierarchy, accessibility, and overall polish. In this...

Center the Lightbox Image Count in the Divi Gallery Module

Centering the image count in a gallery lightbox creates a cleaner, more balanced presentation and makes it easier for visitors to see where they are in the image set. This simple visual tweak can enhance readability, especially with larger images and longer captions,...

Style the Divi Gallery Module Lightbox Image Count

Tailor the appearance of the image counter in the Divi Gallery module lightbox to match your brand and improve readability. By customizing the counter’s color and typography, you ensure it displays clearly and suits your design. In this guide we show you how to style...

Customize the Lightbox Image Background Color in the Divi Gallery

Control the color that appears behind your images when users open in the gallery lightbox, including support for semi-transparent hues. This helps improve contrast for transparent images, align the experience with your brand palette, and create a more polished viewing...

About Dan Mossop

Dan is a Scottish-born web developer, now living in Brisbane with his wife and son. He has been sharing tips and helping users with Divi since 2014. He created Divi Booster, the first Divi plugin, and continues to develop it along with 20+ other Divi plugins. Dan has a PhD in Computer Science, a background in web security and likes a lot of stuff, 

0 Comments

Submit a Comment

Comments are manually moderated and approved at the time they are answered. A preview is shown while pending but may disappear if your are cookies cleared - don't worry though, the comment is still in the queue.

Your email address will not be published. Required fields are marked *.