One feature missing from the Divi Theme which can be found in some other themes is the ability to have a full-width image displayed right at the top of the page, above the main header bar. We can add such a "banner" image to Divi in the several ways:
Adding an Image above the Header with Divi Booster
To add the image above the header in Divi Booster, do the following:
Step 1: Locate the Divi Booster Option
First open the Divi Booster settings page ("Divi » Divi Booster" from your WordPress dashboard).
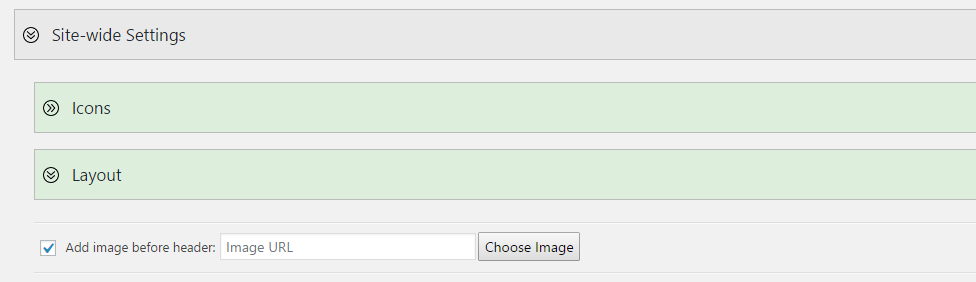
Then look under "Site-wide Settings » Layout". You should see an option to "Add Image before Header", like so:
Step 2: Select your Image
Click "Choose Image" and the WordPress media library will appear. Upload or select you header image.
Important: Be sure to set the image size to "Full Size" prior to clicking "Use Image", as shown:
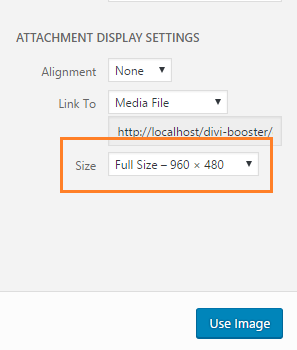
This prevents the image from being added at a smaller size and becoming in blurry / pixelated when scaled up to fit the screen.
Step 3: Save the Divi Booster Settings
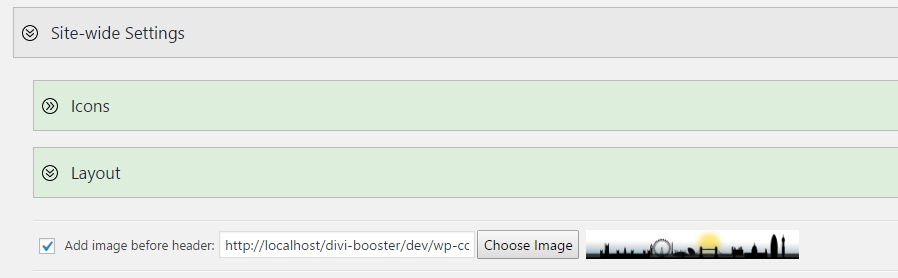
You should now be back at the Divi Booster settings page, and will see a thumbnail of your chosen image along with its URL, like so:
Scroll to the bottom of the Divi Booster settings page and click "Save Changes".
Now when you view your site, your chosen header image should display above the Divi header. Be sure to clear your site / browser cache if you do not see the image right away.
Tips and Tricks
Here are some CSS snippets that may be useful in customizing the image to your liking, whether you are using Divi Booster, or the manual method (below).
Show the Image only on the home page
You should be able to hide the header image on all pages except the homepage with one of these CSS snippets:
body:not(.blog) #wtfdivi004-page-start-img,
body:not(.blog) #myprefix-page-start-img {
	display: none! important;
}OR
body:not(.home) #wtfdivi004-page-start-img,
body:not(.home) #myprefix-page-start-img {
	display: none! important;
}
Which one works will depend on whether you are using the standard Divi home page, or using a separate page.
Just add one (not both) into the Custom CSS box at Divi > Theme Options > General > Custom CSS.
Show the Image only on Posts
To show the image only on posts, add the code below into the Custom CSS box at Divi > Theme Options > General > Custom CSS.
body:not(.single) #wtfdivi004-page-start-img,
body:not(.single) #myprefix-page-start-img {
	display: none! important;
}
Show the Fullwidth Image on Mobiles
To show the image on mobiles and tablets (as well as desktops), you can use this CSS:
@media only screen and (max-width: 980px) {
    #wtfdivi004-page-start-img, #myprefix-page-start-img {
        display: block !important;
        width: 100%;
    }
    #top-header,
    #main-header {
        position: relative !important;
        top: 0 !important;
    }
    #page-container {
        padding-top: 0 !important;
    }
}
You can add this code in the "WP Admin > Divi > Theme Options > General > Custom CSS" box.
If you'd like to "zoom" the image in a bit on mobile, so that it is taller but some of the left and right of the image is hidden off to the sides, you can use this CSS instead:
@media only screen and (max-width: 980px) {
    #wtfdivi004-page-start-img, #myprefix-page-start-img {
        display: block !important;
        width: 140%; /* increase width to enlarge */
        max-width: none; /* remove max-width limiting */
        object-fit: cover; /* cover to maintain aspect ratio */
        position: relative;
        left: 50%; /* move it to the center horizontally */
        transform: translateX(-50%); /* shift it left by half of its width to center it */
    }
    #top-header,
    #main-header {
        position: relative !important;
        top: 0 !important;
    }
    #page-container {
        padding-top: 0 !important;
    }
    body {
        overflow-x: hidden;
    }
}
Manually Adding an Image Above the Header
Step 1: Include the image into the page
We first begin by adding the image to the HTML page and moving it into the correct location. To do so, add the following HTML code into the Divi theme footer.php (or your child theme footer.php) file just before the final </body> tag:
<div style="display:none">
    <img id="myprefix-page-start-img" src="http://www.mysite.com/my-image-url.jpg"/>
</div>
<script>jQuery("#myprefix-page-start-img").prependTo(jQuery("body"));</script>
Change the src="…" part to the URL of your image. If you don't yet have a URL for your image you can get one by uploading the image to your WordPress media library, and then viewing the information for the uploaded image.
Style tip: The image will be stretched to fit the width of the screen, so wide images will generally look better than tall ones.
Step 2: Adjust the page layout to accommodate the image
The above code puts the image into the right place in the page. But it doesn't do anything to make sure it looks good. We can fix this by adding the CSS below. The CSS achieves several things:
- It makes the image full width on full-size screens.
- It hides the image on mobiles, defaulting to the standard Divi mobile layout.
- It fits the image to the width of the "box" when box mode is used.
- As the header is now lower down the page, it delays making the header "float" until the user has scrolled down far enough.
- It fixes up the padding and margins so there are no unsightly gaps.
While it looks complicated, you don't need to understand it to use it, just copy it into the end of the Divi theme style.css (or your child theme style.css) file and it should work.
/* Change header to float correctly wherever it is in the page */
@media only screen and ( min-width:981px ) {
	#main-header { position:relative !important; top:0px !important; } /* inline */
	#main-header.et-fixed-header { position:fixed !important; margin-bottom:0px; top:0px !important; } /* floating */
	body.admin-bar #main-header.et-fixed-header { top:32px !important; } /* adjust for WP admin bar */
	#page-container { overflow:hidden; } /* prevent sub-menus from breaking scrolling */

	/* Handle top header */
	#top-header { position:relative !important; top:0px !important; } /* inline header */
}

/* Style the image for full screen layouts */
@media only screen and ( min-width:981px ) {

	#myprefix-page-start-img { margin-bottom:0px; width:100%; }

	/* Override Divi JS padding adjustment */
	div#page-container[style] { padding-top:0 !important; }

	/* Remove gap between heading and menu caused by line height */
	body { line-height:0 !important; }
	body * { line-height:1.7em }
}

/* Style the image for box layout */
@media only screen and (min-width: 1200px) {
	.et_boxed_layout #myprefix-page-start-img {
		width:1200px;
		-moz-box-shadow: 0 0 10px 0 rgba(0,0,0,0.2);
		-webkit-box-shadow: 0 0 10px 0 rgba(0, 0, 0, 0.2);
		box-shadow: 0 0 10px 0 rgba(0, 0, 0, 0.2);
		display:block !important;
		margin-left:auto;
		margin-right:auto;
	}
}

/* Hide the image on smaller screens */
@media only screen and ( max-width:980px ) {
	#myprefix-page-start-img { display:none !important; }
}

Dear Dan,
I tried this code :
jQuery(function($){
setTimeout(function(){
$(‘#wtfdivi004-page-start-img,#myprefix-page-start-img’).wrap(‘<a href="//blog.faire-part-elegant.fr”" rel="nofollow"></a>’)
},100);
});
on my client blog, to link the image abode header to the home page, but it doesn't seems to work at all. Could you help me on this ?
The address of the blog is : https://blog.faire-part-elegant.fr
Thanks a lot !
Hi Macha, it looks like it's a problem with the quotation marks. Somewhere along the way they've been converted into "curly" quotation marks, while they should be straight ones. I think if you go through and replace each single quote with a straight single quote and each double quote with a straight double quote, it should work for you. Hope that helps.
Actually, try this version:
jQuery(function($){
setTimeout(function(){
$('#wtfdivi004-page-start-img,#myprefix-page-start-img').wrap('<a href="//blog.faire-part-elegant.fr" rel="nofollow"></a>')
},100);
});
It works great !
with the (I almost forgot this one hehe)
Thank you so much Dan, you are a Divi life saver.
Hello Dan,
Thank you for your code that allowed me to put the full width image above the header. I am having trouble however, embedding a link into the image, can you let me know what is wrong with my code? I'm pretty sure I'm doing it correctly, this code is at the end of my footer.php, but for some reason the link does not work when i click on the image.
Hi Steven, thanks for getting in touch and sorry you were having trouble pasting the code in. I've been able to see it on the back end, even though WordPress is hiding it on the front end.
The way you're currently doing it won't work as the line:
jQuery("#myprefix-page-start-img").prependTo(jQuery("body"));Moves the image, but not the link tag that surrounds it. You should be able to fix this by giving the link (i.e. "a") tag an ID and then replacing "myprefix-page-start-img" in the line above with that ID. That would move both the link and the image into the header.
Another way to do it is to add this jQuery code immediately after the line of code above:
jQuery(function($){ setTimeout(function(){ $('#wtfdivi004-page-start-img,#myprefix-page-start-img').wrap('<a href="http://www.example.com"></a>') },100); });Thanks Dan! It works now, I didn't realize it only moved the image but not the link. I just gave the anchor tag the same id of "myprefix-page-start-img" and it works now. I appreciate your help! :)
You're very welcome, Steven!
Awesome! Any way to link that image using divi booster method?
Hi Armando, there isn't an option for this in Divi Booster yet, but it's high on my list to add.
In the meantime, you can add a link using the following code:
<script>
jQuery(function($){
setTimeout(function(){
$('#wtfdivi004-page-start-img,#myprefix-page-start-img').wrap('<a href="http://www.example.com"></a>')
},100);
});
</script>
You can add it by pasting it in the "Divi > Theme Options > Integration > Add Code to the Head of your blog" box. Just replace the http://www.example.com part to your own URL.
Hi Dan,
I just tried this code to make my top-of-page graphic a link, but it doesn't seem to be working. Any ideas?
http://hddsite2.com/
jQuery(function($){
setTimeout(function(){
$(‘#wtfdivi004-page-start-img,#myprefix-page-start-img’).wrap(‘’)
},100);
});
You can add it by pasting it in the “Divi > Theme Options > Integration > Add Code to the Head of your blog” box. Just replace the http://www.example.com part to your own URL.
Never mind. Code copied incorrectly.
Hi Dan.
I've placed an image above the navigation bar, but now when i scroll down, the navigation bar disappears, so it isn't sticky anymore.
Can you tell me how to make it "sticky" at the top again?
Hi Arjan, is there any chance you can send me a link to the site you're working on so that I can see how you have it set up? Thanks!
Placed the site in the message below.
Can you please take a look
HI, Dan, and thanks for the excellent plugin!
I'm working on a bilingual site and, because my image contains text, would like a distinct header image for each language. How would you go about coding this in, please?
Hi Pol, it'll depend a lot on how you're implementing the bilingual functionality as this will determine what code is needed to detect the current language and display the right image. Any chance you can explain how you're implementing it or, better yet, send through a link so that I can take a look. Thanks!
Thanks for the prompt reply, Dan!
The site uses WPML and can be found here: ecoleconduitevisionplus.website.
Since there aren't many pages on the site, perhaps more simply than targeting a language, a particular header could be added on each page?
Regards,
Pol
You're very welcome, Pol.
I think you should be able to do it with this jQuery (in addition to what you already have set up):
<script>
jQuery(function($){
	var src = "YOURIMAGEURL";

	if (/lang=en/.test(window.location.href)) {
		$("#wtfdivi004-page-start-img").attr("src", src);
	}
});
</script>
You can add this using the "Divi > Theme Options > Integration > Add code to the head". Just change YOURIMAGEURL to the URL for your English version of the header. The code checks for the "lang=en" in the URL, so should automatically apply the correct header on each page.
Thanks, Dan! The script took care of it for the desktop version of the site.
If I can impose on you some more, I'm displaying this banner differently on tablet and mobile, through the use of the Divi logo. How could the English image (logo) show on the English language version, please?
You're welcome, Pol. I think you should be able to do it making another copy of that script, but changing $("#wtfdivi004-page-start-img") to $("#logo"), and setting the URL to the URL of the English logo. Hope that makes sense / helps, but let me know if not.
I have encountered a small issue using this feature. I have placed my image above the nav, but when you scroll, the secondary nav disappears – taking with it the woocommerce cart indicator. Do you perhaps have a fix for this?
Would appreciate it greatly.
Thanks so much!
Dev site=: http://mnilife.coppatop.com
Hey Charles, did you figure this out? When I look at the dev site the secondary nav stays in place when you scroll down. Let me know if you're still having problems with it. Thanks!
Hey there
Thanks for the plugin. Saved my ass.
Question, can I add a logo onto my header image as per this page?
http://www.studentvillage.com.au/
Right now I've just integrated it into the image but that makes it scale with different platforms.
Cheers
Patrick
You're welcome, Patrick, I don't currently have a good way to add a logo to the header image, I'm afraid.
One thing that should work is a plugin such as PageBuilder Everywhere which lets you add Divi Builder layouts above the header. You could use it to add, say, a full-width header module with a background image, and a logo image. It should then be possible to create the overlapping menu effect (if you want it) by setting a -ve margin on the main page container.
Hi Dan,
I'm struggling to get a max height on the image before header.
I've got a banner of 1600*300 but i want to display a max height of approx 150.
Can you please help me?
Hi Arjan, I've just sent you an email about this. You should be able to set a max height on the header using this CSS:
/* Set max height */ #wtfdivi004-page-start-img { max-height: 150px !important; } /* Prevent stretching */ #wtfdivi004-page-start-img { width: auto; } /* Center the image */ body { text-align: center; }You can add this CSS into the "Divi > Theme Options > General > Custom CSS" box.
Hi Dan,
Love your plugin, saves me loads of time! At the moment I'm working on a site where I needed to have an image above the menu. That was easy, but I can't get rid of the box shadow left and right of the image. Could you help me out? I've tried everything…
This is the site: http://185.174.190.161/~berghuis/content/
Hi Steven, you should be able to do it with this CSS:
#wtfdivi004-page-start-img { box-shadow: none !important; }You can add it via the custom CSS box at Divi > Theme Options > General > Custom CSS. Hope it helps!
Thans Dan, it did the trick. Not sure why I hadn't tried that myself…
Thanks for your very swift reply!
I use the image above the header.
I need to supress the image on one page – how do I do that?
Hi Heidi, on the edit screen for your page you should see the three-lined "hamburger" menu button at the top right of the purple Divi Builder box. Click on this and you'll see an option to add Custom CSS (which will apply to this page only). In the custom CSS box, add:
#wtfdivi004-page-start-img,
#myprefix-page-start-img {
    display: none! important;
}
That should hide the header image on that one page only.
Really great stuff Dan! Helped me out a ton! Thanks!
I just downloaded the plugin and uploaded my header image, but it's not showing on mobile, only on desktop. Is there any way I can fix this? The image has my site name, so without it, no one will know where they are! Thanks!
Hi Gina, at the moment there’s now way to show it on mobile within the plugin, though I hope to add this option soon.
In the meantime, you should be able to show it on mobiles too, by adding this CSS to Divi:
Seems to work:
@media only screen and (max-width: 980px) {
#wtfdivi004-page-start-img { display: block !important; width: 100%; }
#top-header, #main-header { position: relative !important; top: 0 !important; }
#page-container { padding-top: 0 !important; }
}
This can be added at "Divi > Theme Options > General > Custom CSS".
I hope that helps. Thanks!
Hi Dan, thank you for posting the css code for the mobile version – I had the same issue.
I have one more problem you may be able to help with: adding the css code above makes my header menu, which is now below the image, about 90% in width. I tried everything, but have so far been unsuccessful. Any ideas on how I can make my menu full width (boxed layout) again? There also seems to be a bit of extra space above the header menu.
Please view mobile width: http://dev.cal.net/vividdd_InAlliance/
Many thanks
Hi alex, I'm not exactly sure why it's happening, but you should be able to fix it by adding the following CSS code to your site:
@media only screen and (max-width: 980px) {
#main-header { margin: 0 !important; width: 100% !important; }
#main-header { padding-top: 2px !important; }
}
It should sort out both the 90% width issue and the excess space above the menu. Hope it helps!