One feature missing from the Divi Theme which can be found in some other themes is the ability to have a full-width image displayed right at the top of the page, above the main header bar. We can add such a "banner" image to Divi in the several ways:
Adding an Image above the Header with Divi Booster
To add the image above the header in Divi Booster, do the following:
Step 1: Locate the Divi Booster Option
First open the Divi Booster settings page ("Divi » Divi Booster" from your WordPress dashboard).
Then look under "Site-wide Settings » Layout". You should see an option to "Add Image before Header", like so:
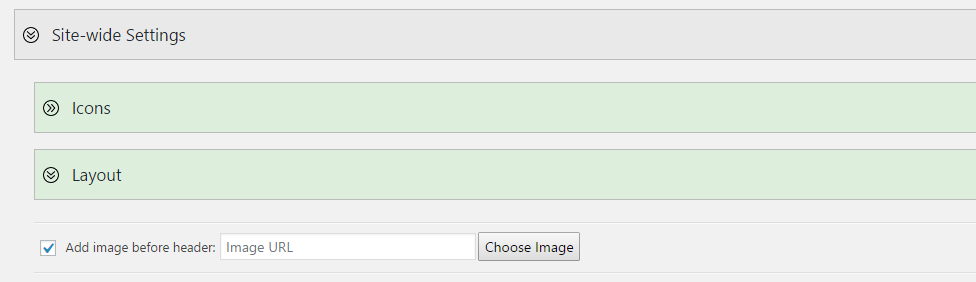
Step 2: Select your Image
Click "Choose Image" and the WordPress media library will appear. Upload or select you header image.
Important: Be sure to set the image size to "Full Size" prior to clicking "Use Image", as shown:
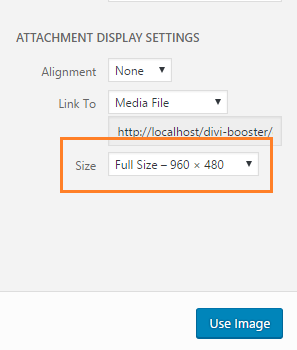
This prevents the image from being added at a smaller size and becoming in blurry / pixelated when scaled up to fit the screen.
Step 3: Save the Divi Booster Settings
You should now be back at the Divi Booster settings page, and will see a thumbnail of your chosen image along with its URL, like so:
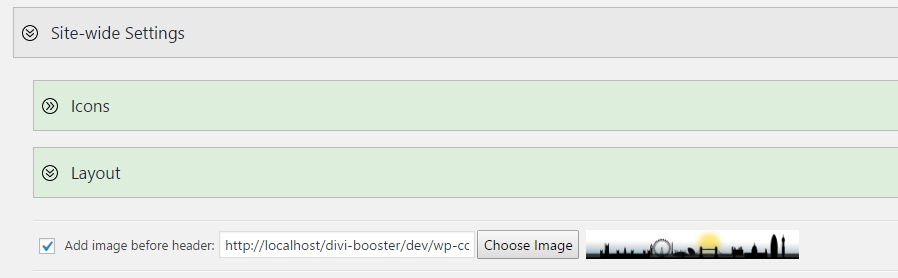
Scroll to the bottom of the Divi Booster settings page and click "Save Changes".
Now when you view your site, your chosen header image should display above the Divi header. Be sure to clear your site / browser cache if you do not see the image right away.
Tips and Tricks
Here are some CSS snippets that may be useful in customizing the image to your liking, whether you are using Divi Booster, or the manual method (below).
Show the Image only on the home page
You should be able to hide the header image on all pages except the homepage with one of these CSS snippets:
body:not(.blog) #wtfdivi004-page-start-img,
body:not(.blog) #myprefix-page-start-img {
	display: none! important;
}OR
body:not(.home) #wtfdivi004-page-start-img,
body:not(.home) #myprefix-page-start-img {
	display: none! important;
}
Which one works will depend on whether you are using the standard Divi home page, or using a separate page.
Just add one (not both) into the Custom CSS box at Divi > Theme Options > General > Custom CSS.
Show the Image only on Posts
To show the image only on posts, add the code below into the Custom CSS box at Divi > Theme Options > General > Custom CSS.
body:not(.single) #wtfdivi004-page-start-img,
body:not(.single) #myprefix-page-start-img {
	display: none! important;
}
Show the Fullwidth Image on Mobiles
To show the image on mobiles and tablets (as well as desktops), you can use this CSS:
@media only screen and (max-width: 980px) {
    #wtfdivi004-page-start-img, #myprefix-page-start-img {
        display: block !important;
        width: 100%;
    }
    #top-header,
    #main-header {
        position: relative !important;
        top: 0 !important;
    }
    #page-container {
        padding-top: 0 !important;
    }
}
You can add this code in the "WP Admin > Divi > Theme Options > General > Custom CSS" box.
If you'd like to "zoom" the image in a bit on mobile, so that it is taller but some of the left and right of the image is hidden off to the sides, you can use this CSS instead:
@media only screen and (max-width: 980px) {
    #wtfdivi004-page-start-img, #myprefix-page-start-img {
        display: block !important;
        width: 140%; /* increase width to enlarge */
        max-width: none; /* remove max-width limiting */
        object-fit: cover; /* cover to maintain aspect ratio */
        position: relative;
        left: 50%; /* move it to the center horizontally */
        transform: translateX(-50%); /* shift it left by half of its width to center it */
    }
    #top-header,
    #main-header {
        position: relative !important;
        top: 0 !important;
    }
    #page-container {
        padding-top: 0 !important;
    }
    body {
        overflow-x: hidden;
    }
}
Manually Adding an Image Above the Header
Step 1: Include the image into the page
We first begin by adding the image to the HTML page and moving it into the correct location. To do so, add the following HTML code into the Divi theme footer.php (or your child theme footer.php) file just before the final </body> tag:
<div style="display:none">
    <img id="myprefix-page-start-img" src="http://www.mysite.com/my-image-url.jpg"/>
</div>
<script>jQuery("#myprefix-page-start-img").prependTo(jQuery("body"));</script>
Change the src="…" part to the URL of your image. If you don't yet have a URL for your image you can get one by uploading the image to your WordPress media library, and then viewing the information for the uploaded image.
Style tip: The image will be stretched to fit the width of the screen, so wide images will generally look better than tall ones.
Step 2: Adjust the page layout to accommodate the image
The above code puts the image into the right place in the page. But it doesn't do anything to make sure it looks good. We can fix this by adding the CSS below. The CSS achieves several things:
- It makes the image full width on full-size screens.
- It hides the image on mobiles, defaulting to the standard Divi mobile layout.
- It fits the image to the width of the "box" when box mode is used.
- As the header is now lower down the page, it delays making the header "float" until the user has scrolled down far enough.
- It fixes up the padding and margins so there are no unsightly gaps.
While it looks complicated, you don't need to understand it to use it, just copy it into the end of the Divi theme style.css (or your child theme style.css) file and it should work.
/* Change header to float correctly wherever it is in the page */
@media only screen and ( min-width:981px ) {
	#main-header { position:relative !important; top:0px !important; } /* inline */
	#main-header.et-fixed-header { position:fixed !important; margin-bottom:0px; top:0px !important; } /* floating */
	body.admin-bar #main-header.et-fixed-header { top:32px !important; } /* adjust for WP admin bar */
	#page-container { overflow:hidden; } /* prevent sub-menus from breaking scrolling */

	/* Handle top header */
	#top-header { position:relative !important; top:0px !important; } /* inline header */
}

/* Style the image for full screen layouts */
@media only screen and ( min-width:981px ) {

	#myprefix-page-start-img { margin-bottom:0px; width:100%; }

	/* Override Divi JS padding adjustment */
	div#page-container[style] { padding-top:0 !important; }

	/* Remove gap between heading and menu caused by line height */
	body { line-height:0 !important; }
	body * { line-height:1.7em }
}

/* Style the image for box layout */
@media only screen and (min-width: 1200px) {
	.et_boxed_layout #myprefix-page-start-img {
		width:1200px;
		-moz-box-shadow: 0 0 10px 0 rgba(0,0,0,0.2);
		-webkit-box-shadow: 0 0 10px 0 rgba(0, 0, 0, 0.2);
		box-shadow: 0 0 10px 0 rgba(0, 0, 0, 0.2);
		display:block !important;
		margin-left:auto;
		margin-right:auto;
	}
}

/* Hide the image on smaller screens */
@media only screen and ( max-width:980px ) {
	#myprefix-page-start-img { display:none !important; }
}

Hi Dan! Thanks for a grate plug-in.
I've added a logo image above the heder (.png) with transparent background and want to get rid of the shadow borders around the image. I have selected the "Remove box layout shadow" in Booster settings but that just works for everything except the top logo image.
Is there a way to remove shadow borders for this "above DIVI-header image"?
Hi Martin, I've included a fix for this in the next version of Divi Booster (2.9.9) which I hope to get out later this week.
In the meantime, you should be able to hide the box shadow on the header image with the following CSS:
#wtfdivi004-page-start-img {
    -moz-box-shadow:none !important;
    -webkit-box-shadow:none !important;
    box-shadow:none !important;
}
You can place this in the "Divi > Theme Options > General > Custom CSS" box or in the style.css file of a child theme.
I hope that helps, but let me know if not. Thanks!
Hi Dan!
Greate! It works perfectly. Thanks!
Awesome, thanks for letting me know, Martin!
Sorry, meant to say that the Extra theme doesn't allow you to add an image above the nav bar.
Thanks for the clarification, Deb. Just to confirm once again – yes, the Divi Booster option to add an image above the header works in Extra too. I hope it helps!
I'm helping a friend out who bought the Extra theme. The one thing that I don't like is the ability to add an image over the nav bar. In reading through your site, I saw that not all features in Divi Booster will be compatible with Extra. Can you (or anyone that's using it with Extra) confirm that this feature will work with Extra? That was the main reason I was thinking of purchasing this now. Thanks in advance!
Hi Deb, yes, the option to add an image above the nav bar works in Extra too :)
Hi, we are looking to achieve this HEADER configuration:
URL: https://ibb.co/b6Rv1ZG
Do you think it will be possible to achieve the same in terms of positioning, and fonts used with DIVI Booster?
Thank you
Mark
Hi Mark. There isn't anything in Divi Booster that will do this for you, but I think it can be achieved relatively easily by doing the following:
1) Add your three menu items to the main Divi menu (at "WP Dashboard > Menus"). Add them in this order (you'll see why in a minute): About, Sign in, Upload.
2) Set "Divi > Theme Customizer > Header & Navigation > Header Format > Header Style" to "Centered Inline Logo". This will put the logo in the center and the menu items either side of it, but close to it.
3) Use the following CSS to push the menu items to the edges of the window:
/* Make the top menu full width */ #top-menu-nav { width: 100% !important; } /* Move the first menu item to the */ #top-menu li:nth-child(1) { float: left; } #top-menu li:nth-last-child(1) { float: right; right: 30px; } #top-menu li:nth-last-child(2) { float: right; } You can add it at "Divi > Theme Customizer > Additional CSS". It will push the first item (nth-child(1)) to the left, and the last item (nth-last-child(1)) and second last item (nth-last-child(2)) to the right. Note that the order of items pushed to the right gets reversed, hence why the last two items were added in reverse order in step 1. The items sent to the right will also not have much space between them, which is fixed with the "right: 30px" bit. You might need to adjust this slightly for your requirements.
4) You can set the font at "Divi > Theme Customizer > Header & Navigation > Primary Menu Bar > Font". The default font is "Open Sans", the same as in your example header, so you may just need to play around with sizing to get it looking the way you want.
I hope that helps, but let me know if you have any problems with it, etc.
Thanks!
Dan
Solved it! added: #wtfdivi004-page-start-img to custom css:
/* Custom page width */
#page-container, #main-header, #wtfdivi004-page-start-img {
max-width: 980px !important;
}
Sorry and thanks…..
Nice one, beth :)
Hi! Thank you for a great Boost. My problem is that i have added a 980px wide header, and have the site set to 980px wide, but for some reason the header only is stretched out over everything to about1240px. can you please tell me how to fix this?
Hello,
My image is about 200px. When it loads there is about 200px of whitespace below the image which disappears after about 3 seconds.
Is there a way to make this not happen or to make it happen faster ?
Hi Steve, it looks like it is taking a while for the CSS to be loaded and kick in and remove padding added by Divi. I'm not sure if this is something specific to your site, or a more general problem – I need to look into it – but in the meantime, I think you should be able to solve the issue in either of two ways:
1) In Divi Booster – by enabling the following Divi Booster setting: "Divi > Divi Booster > Developer Tools > Generated CSS > Use inline CSS".
2) By adding the following CSS inline into the page:
@media only screen and (min-width: 981px) {
	div#page-container {
		padding-top: 0 !important;
	}
}
I see you're using the https://wordpress.org/plugins/custom-css-js/ plugin – that would be a good option for adding the CSS as I believe it lets you add the CSS inline.
Great feature!
Hi Dan!
I just moved a site from a sandbox to the costumer URL and the top picture dosn't show. The divi booster prefrences are the same.
What can I do?
Before: http://tandklinikken-mariager.flywheelsites.com/
After moving: https://www.mariager-tand.dk
Hey Tine, the problem seems to be that something is blocking Divi Booster's javascript file (which displays the image) from being accessed. I get a 403 forbidden error when I browse directly to the javascript file:
https://www.mariager-tand.dk/wp-content/uploads/wtfdivi/wp_footer.js
Most likely this is caused by a setting in a security plugin (WP Fence, etc) – possibly one restricting access to javascript files within the uploads directory. Disabling that setting or adding an exception for the javascript file URL should solve this. (A quick test to see whether it is a plugin that's blocking it is to disable each security plugin in turn and try to access the link above). It could also be caused by file access permissions in a .htaccess file, but that's unlikely unless you set them up yourself.
A workaround, if you have any trouble unblocking the file is to go into the Divi Booster settings and enable "Developer Tools > Generated JavaScript > Use inline JavaScript". That will place the JavaScript into the main body of the page, bypassing the issue of the inaccessible javascript file.
Thanks Dan. I got i fixed by using the workaround.
https://www.mariager-tand.dk/wp-content/uploads/wtfdivi/wp_footer.js
This link is still forbidden though. Is it something i need to fix?
Great! The plugin will be fully functional without fixing this. In most cases, fixing this and restoring the default behaviour would give a slight performance improvement. But the difference is probably going to be minor so I wouldn’t spend too long trying to solve it!
Thank you for your help.
Have a nice day 😃
I just bought this and the header isn't clickable and when I save it with a link url it doesn't work! How can I make it clickable??
Hi Cheri, I'm very sorry I'm only just responding to this now. There was not previously an option in the plugin to make the header image clickable. I've just released an update (Divi Booster 2.7.3) which adds an option to make the header image into a clickable link, which you'll find on the Divi Booster settings page, just below the option to add the header image itself. I hope that helps.
How do I get the 'Image above Header' to also show on Mobiles and tablets?
Hey Chris, there isn't yet an option in Divi Booster for displaying it on mobiles / tablets, but I've added a section to the post above giving the CSS code to do it. Hopefully it will help you, but let me know if not.
https://divibooster.com/add-a-full-width-image-above-the-divi-header/#show-img-on-mobile
Hi !
Thank you so much for the tip, that work perfectly.
I have a question though, would it be possible to add some CSS to hide the logo (which is now my image above the header on homepage) only on the homepage ?
So the logo would appear as a big image above the header on the homepage, and on all the other ones, it would appear on the divi menu as usual.
Many thanks !!
Also, my main menu is vertical, and now that I added the CSS it's acting like it's horizontal and force the main content to be below it, leaving a large blank space between the header and the content… Tips to correct that ?
I found the solution, I added :
float:left;
to the #main-menu
and
/* Hide logo on homepage */
.home #main-header #logo { display: none; }
Great! I'm glad you figured it out and thanks for sharing your solution, Jul!