Here's a quick tip for positioning the slide text on individual slides in the Divi Theme's full width slider.
Horizontal Positioning
Divi doesn't let you directly set the horizontal positioning of the slide text, but we can still control the horizontal positioning of the slide text with the following steps:
Step 1: Add your slider to the page
If you haven't already, add your new slider. Here's how the unstyled slider looks by default:

As you can see, the slide text is center-aligned by default. It is also set to 100% width, resulting in a long text width. Note that due to padding on the slide, though it is set to 100% width, the slide text doesn't extend fully to the edge of the slide.
Step 2: Set the slide content width
Before we can adjust the horizontal position of the slide text we first need to constrain its width (as it makes little sense to left, center or right align something that is 100% width). To set a new width on the slide text, go into the slide settings and enter your desired width at:
Slide Settings > Design > Text > Text Alignment
This will reduce the width of the text, like so:

Step 3: Position the text area
Now we can move this reduced-width text area. Currently it is centered, due to it having its left and right margins both set to "auto". There is no built-in setting to adjust this, but with a bit of CSS we can overriding the margins to ensure our text area gets positioned how we want. We can enter the necessary CSS at:
Slide Settings > Advanced > Custom CSS > Module Elements > Slide Description Container
To right-align the text area in the full-width slider, we can enter the CSS as:
margin-right: 0;This gives us the following result:

Similarly, to left-align the text area you would enter the CSS as:
margin-left: 0;Increasing / decreasing this margin value will give you fine grain control over the exact horizontal position of the text area.
Step 4: Set the text alignment
One additional adjustment you may want to make is to adjust the alignment of the text itself. You can do so at:
Slide Settings > Design > Text > Text Alignment
For example, setting the (normally centered) text to be left aligned will give us the following result:

Hopefully this has helped you achieve the horizontal layout on your slides that you are looking for.
Vertical Positioning
Controlling the vertical alignment, especially to top-align the text is slightly trickier. We can do this by changing the top and bottom padding of the slide description. Normally there is a top and bottom padding of 16%, for a total vertical padding of 32%. We can move the text up by reducing the top padding, but need to correspondingly increase the bottom padding to keep 32% padding. So for example, if we set a top padding of 5%, we need to increase the bottom padding to 27% to balance it out (5%+27% = 32%).
This padding can be specified in:
Slide Settings > Advanced > Custom CSS > Slide Description
Like so:
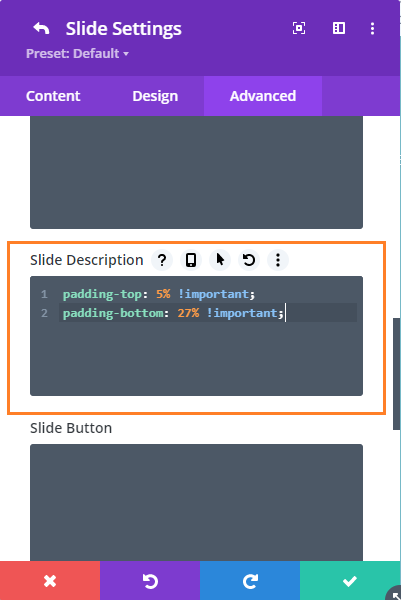
padding-top: 5% !important;
padding-bottom: 27% !important;

Hi! I want to align and position my text on the left side. I aligned it on the left and changed the width to 40%. The text is aligned left but the whole description is now centered. How do I change that, as I only want the text on the left side of the full width slider?
Hi Sarah, it looks like a bit of extra work is needed to achieve this now. I've completely re-written the section on horizontal positioning to walk you through the steps. I'd recommend removing the "40%" width you previously set in the module's custom CSS "Slide Description" box as this is no longer needed, since there is now a "Content Width" setting which we can use instead. I hope it helps!
Hi Ended up with too much headroom on the slider but the captions work great. Can't seem to move up?
Hi Melody, the issue seems to be that pushing the slide text down below the slide image is causing the total height of the slider to be increased. Since the image is centered in this increased height, an empty space is left at the top. While there's probably a way to remove this gap, an easy alternative solution that seems to work is just to move the slider up a bit (e.g. with a negative margin). In your case, the following CSS should work:
body.page-id-333 .et_pb_fullwidth_slider_0 {
    margin-top: -140px !important;
}
You can add this into the "Divi > Theme Options > General > Custom CSS" box. Alternatively, you could set the same negative margin via the slider module settings.
Hope that helps!
Totally confused – you say "Divi has an option in the slide settings to toggle the vertical alignment between centered and bottom-aligned" – but I can't find that option ANYWHERE.
Help?
Hi Omar, sorry the post was getting a bit outdated. I'm not 100%, but I think that option has now changed to apply only to the slide image ("Slide Settings > Design > Image > Image Alignment"), not the slide text. I've removed the reference and done a quick refresh of the post to be applicable to the latest version of Divi. I hope it helps, but if anything isn't clear / doesn't do what you need just let me know. Thanks!