In this guide we show you how to add custom text to the Divi Top Header. Learn how to display custom messages or information prominently at the very top of your website by adding text to the Divi Top Header. This allows you to communicate important announcements, contact details, or promotional content to your visitors in a highly visible area.
Add Custom Text to the Divi Top Header using Divi Booster
This method demonstrates how to display custom text in the Divi Top Header by using the Divi Booster plugin. It provides a straightforward interface to add your text (including HTML), and also shows how you can optionally hide this text on mobile devices by applying a simple CSS snippet for a more tailored mobile experience.
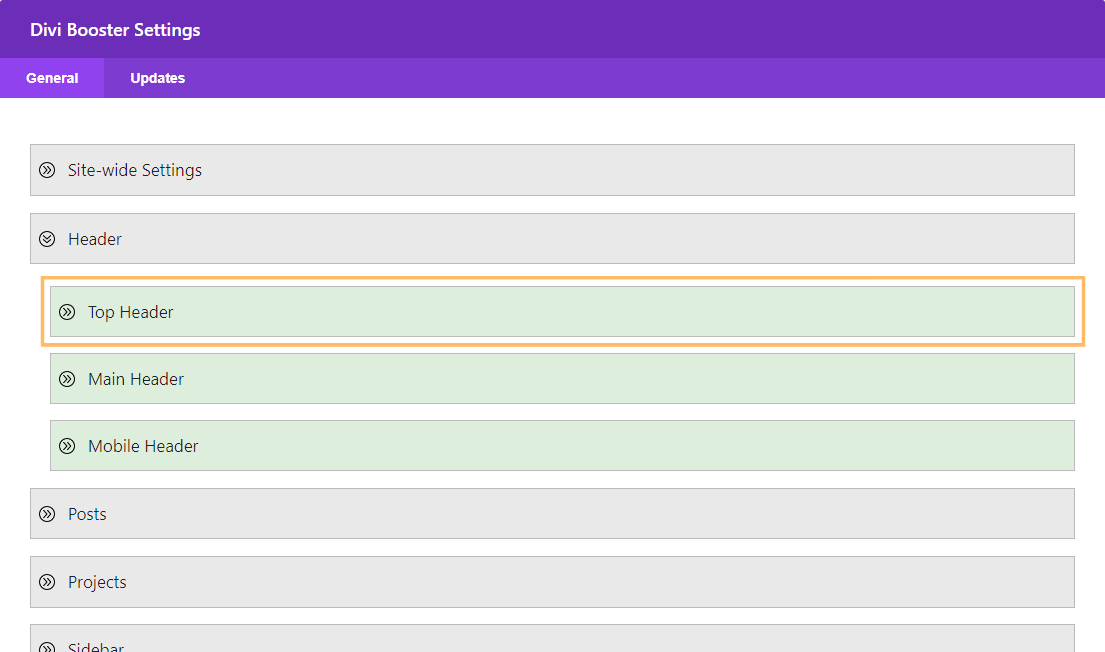
Access Divi Booster Header Settings
Navigate to the "Divi Booster" settings via the Divi menu in your WordPress dashboard. Once there, expand the "Header" section, then the "Top Header" subsection to reveal the relevant options.
Add Your Custom Top Header Text
Enable the option labeled "Add text to top header." You'll now see a text field where you can enter your custom message. You can use plain text or enhance it with HTML tags. Example:
<strong>Welcome!</strong> Contact us at <a href="mailto:info@example.com">info@example.com</a>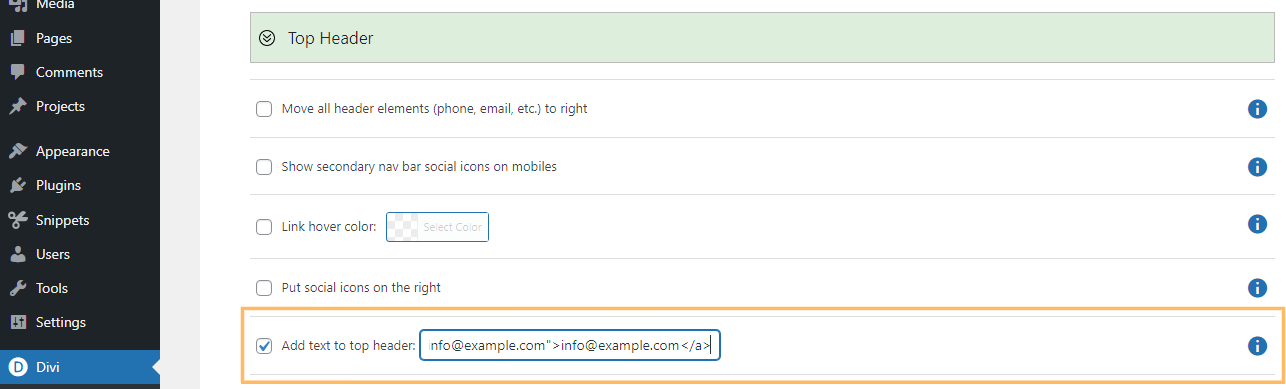
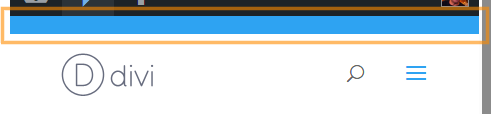
Save and Review Your Changes
Once your message is entered, save your settings by clicking the "Save Changes" button. Visit your site to confirm your custom text appears at the very top header as expected.
(Optional) Hide Top Header Text on Mobile Devices
If you'd like your custom top header text to only appear on desktops and larger screens, you can hide it on mobiles using a small CSS tweak. Go to Divi > Theme Options and scroll to the "Custom CSS" area. Paste the following code:
@media only screen and (max-width: 980px) {
  #db-info-text {
    display: none;
  }
}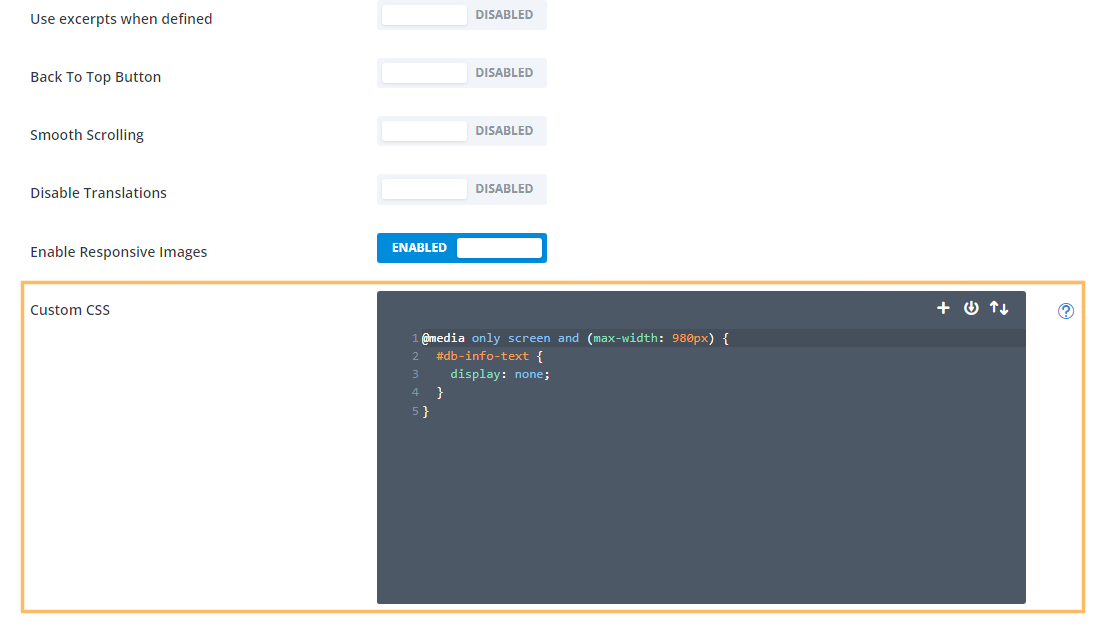
Click "Save Changes" to apply. Now resize your browser window or use a mobile device to confirm the top header text is hidden on smaller screens.
Add Custom Text to the Divi Top Header using jQuery
This method demonstrates how to add custom text to the Divi top header by inserting a jQuery script via the Theme Options Integration panel. It’s a flexible approach that allows you to dynamically inject and style your text site-wide without modifying theme files.
Paste jQuery Code into Divi Theme Options Integration
Head over to Divi > Theme Options and click the "Integration" tab. In the section labeled "Add code to the of your blog," paste this script, customizing the text as needed:
<script>
// Add custom text to Divi top header
jQuery(function($){
  if (!$('#top-header .container #et-info').length) {
    $('#top-header .container').prepend('<div id="et-info"></div>');
  }
  $('#top-header .container #et-info').prepend('<span style="margin:0 10px">Custom top header text</span>');
});
</script>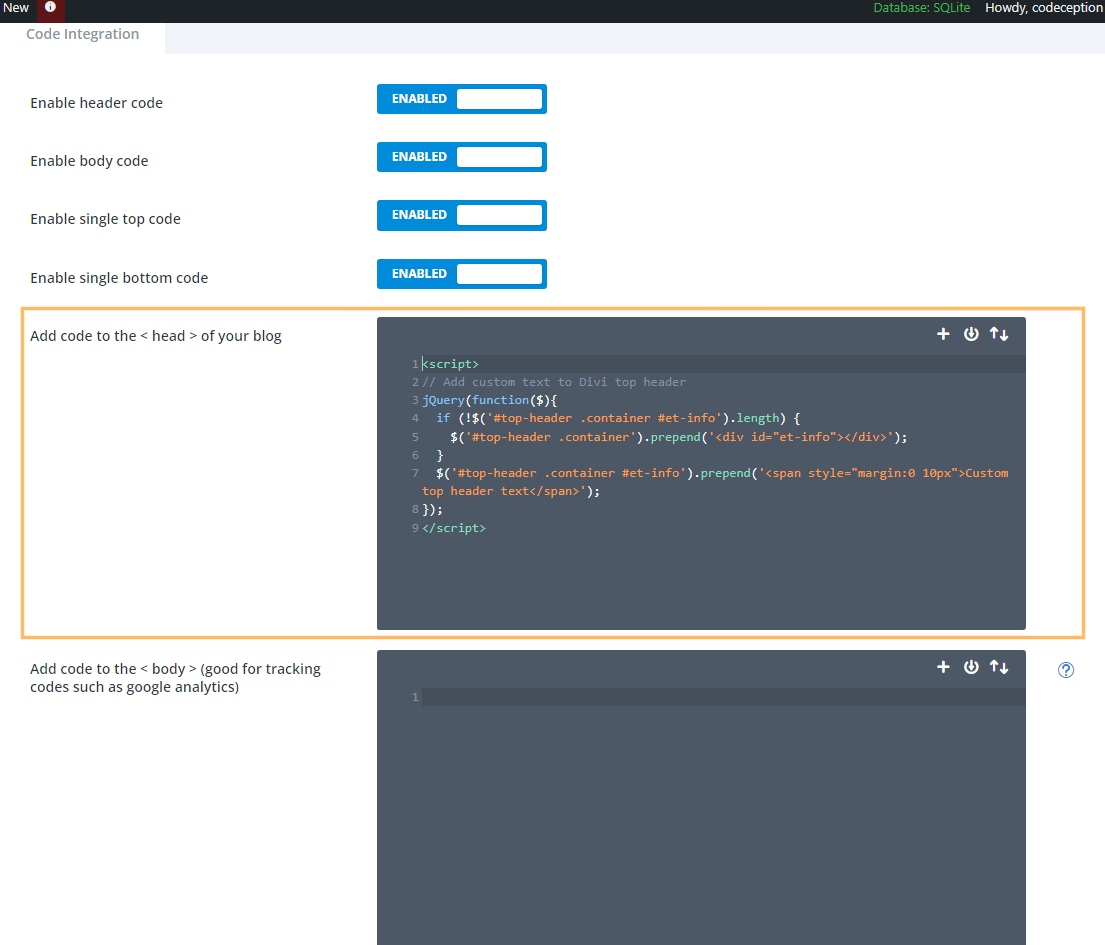
Save your changes.
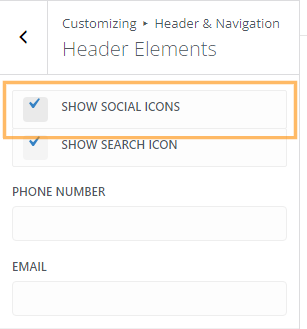
Enable the Top Header (if you haven't already)
If you don't yet have a top header active on your site, you'll need to enable it. In Divi, this is done by adding elements to the header, such as social icons, a phone number or an email address. For this example, we'll enable social icons. Open the Theme Customizer (Divi > Theme Customizer), expand the "Header & Navigation" > "Header Elements" section, and turn on the "Show Social Icons" option. Don’t forget to click "Publish" to save.
Review the Top Header Text
Once everything is set, visit your site’s homepage. Your custom message should now be displayed in the top header.
Conclusion
With these simple steps, you can easily showcase custom messages in your Divi site's top header—perfect for announcements or contact info. You also have options to control how (and where) that message appears, providing a polished experience for both desktop and mobile visitors.


Hello Dan,
at the moment the plain text is on the right site but unfortunately after the custom links. how can I remove the plain text to the first place?
Here is an example: NOW: Facebook, Email, CONTACT US:
Should be: CONTACT US: Facebook, Email
Thank you & best
Hi Inna,
Assuming you're working on the blackhatcoffee.de site linked in your comment, I think this variant should work for you:
jQuery(function($){
    $('#et-secondary-menu').prepend('Contact Us:');
});
The reason for the difference is that your facebook / email links are being added as menu items, rather than using Divi's customizer options. The code above takes that into account.
Hi,
Thank you. It is very helpfull. I want the shop icon with the text webshop. How do I get the icon in this line?
Kind regards,
Angelique
Hi,
I got the icon in line, but it is not visible at the homepage. At all pages it is, except at the homepage. Someone an idea who come?
Kind regards,
Angelique
Hi Angelique, as far as I can tell, the problem is that the font awesome plugin you're using to add the icon isn't loading on the homepage. Its CSS / font file aren't being loaded on the homepage, which is why the cart icon isn't being displayed. I'm not familiar with the plugin, but I'd suggest first checking its settings to see if there are any settings that might disable it from running on the homepage. If not, then your best bet would probably be to contact the plugin authors to see if they can advise you on how to get it to apply on the homepage.
If you aren't able to get an answer from them, let me know and I'll try to help out.
Hi Dan –
This worked perfectly for me, but I had a question.
I have the phone number floated right – is there a way to get this text I am adding to float left?
Thanks!
Hi Joe, something like this might work for you:
#et-info>span:first-of-type { position: absolute; left:0; }If not, any chance you can send me a link so that I can see exactly how your top header is set up?
Can the text be made into a link?
Sure, you should just need to change the line that actually adds the text to something like this:
$('#et-info').prepend('<span style="margin:0 10px"><a href="http://mysite.com">Welcome to my website</a></span>');Just replace http://mysite.com with your URL of choice.
Hi Dan,
I am new to this, but where would I edit this line?
Hi Adrian, this is a modification to the code given in the post. If you look at that code you'll see a line that begins "$('#et-info').prepend". You just need to replace that entire line with the one given in my comment. Hope that makes sense!
It would be great to have the option to include a link in the dialog box in Divi Booster rather than having to do it via Javascript.
Hi Maggie, I'm with you on that. I'm hoping to add it as an option in a future version :)
Hi Dan,
Can you please advise in which php file of the theme to search for the code that begins with “$(‘#et-info’).prepend”?
Hi Mila, you don't need to search the theme's PHP files for that line. The line of code that needs to be modified is the 5th line of the jQuery code given in the post above (in the "Adding Text to the Top Header using jQuery" section).
If I use this to put my tagline in the top header, is there a way to add a superscript TM after it?
Hi Penny, you can use the HTML code for the trademark symbol: ™
In the above example, you'd place it right after the word "website", and before "</span>".
Is there anyway to get this to work without having anything else in the top bar? Currently you have to either add the phone/email, or add the secondary menu. I don't want any of that. All I want is the text I had through the Divi Booster.
Hi Jon, at the moment this code needs the secondary bar to be visible to work. There are a couple of ways to get the secondary bar showing without having anything else in it:
1. If you don't intend to use social icons in the footer, you can enable the option to "Show Social Icons" in the customizer, but then disable each of the individual social icons in the Theme Options.
2. Put some value in as the phone number (so that it shows and activates the secondary header), then hide the phone number with this CSS:
#et-info-phone { display: none; }I'll try to update the code in the future to remove the need to do this.
Thanks for this.
I've enabled this feature using Divi Booster, however, the text appears on the left hand side of the top bar.
Is there a way to easily centre it?
See current layout on the website here: http://kesnet.co.uk
You're welcome, Paul. I think this should do the trick:
#et-info { position: relative; left: 50%; transform: translate(-50%, 0%); }Thanks Dan!
That worked perfectly.
Where does this line go? Sorry so confused.
Hey Scott, sorry I'm just getting to this. This is CSS code, so the easiest place to put it is in "Divi > Theme Options > General > Custom CSS".
This post gives some other options:
https://divibooster.com/adding-css-to-the-divi-theme/
thanks mate its working divi 3
This does not work on divi 2.7.8
Hi Peter, I just tested it on my own Divi 2.7.8 installation and it is working correctly for me. Are you able to share a link to your site? Hopefully I can spot what's causing it to fail for you.
Strangely it is already shown on the divi main preview.. http://www.elegantthemes.com/preview/Divi/
Just wish they would tell us how to implement it :(
Hey Paul, are you talking about the Shop / My Account / Checkout links? If so, they'll have done this by creating a standard WP menu (Appearance > Menus), and setting the Theme Location for the menu as "Secondary Menu". This will let you have a menu similar to the main Divi menu, though I don't think it will directly allow you to add plain text.
Hello,
This is a good feature.
However, It would be very good if you could add more than only test.
Like widget (search for exemple), images, tags (like post title)
Regards
David
Hi David, yeah these would be good to be able to do. I'll look into adding information on how to do this in the future.
Using Divi Booster. This doesn't seem to work, if there's no phone or email. I personally don't like that the email only works for mailto: links and want it to link to the contact page instead. So in most cases I just create my own phone and email links as menu items. I'd like to display a message up there on a project I'm currently working on, but have no use for the phone and email links. Yet without them, I can't display this message. Is there a way to add it without displaying those?
Hi Tevya, yes it looks like it was a bug in my code. I've just released an update to Divi Booster (v2.1.8) to fix this. If you upgrade you should be able to display the text without needing the phone / email to be showing. I've similarly updated the code in the post above. Thanks!