This post describes how to show, hide or toggle Divi Builder elements at the click of a button.
Reveal Elements on Click using Divi Show / Hide Module
Divi Show / Hide Button Module is a plugin I designed to make it easier to implement some of the effects described later in this post – without the need to mess around with jQuery code.
It is a modified version of the built-in Divi Button module. Rather than linking to another page, it lets you show, hide and toggle the visibility of elements on the same page. It can be styled the same way as the standard button module.
Check out the Divi Show / Hide Button Module here.

Reveal Elements on Click Using CSS / JQuery
Rob over at Divi Notes has a nice post on how to reveal a Divi section, row or module when a button is clicked. I've made what I think are a couple of improvements, which are shared below. The changes include:
- Preventing the hidden component from being briefly displayed when the page loads
- Support for multiple hidden sections / reveal buttons
- No hiding of the component in the visual builder for easier editing
Here are the steps to making a Divi Builder element (module, etc) displayed on the click of a button (and re-hidden if the button is clicked again).
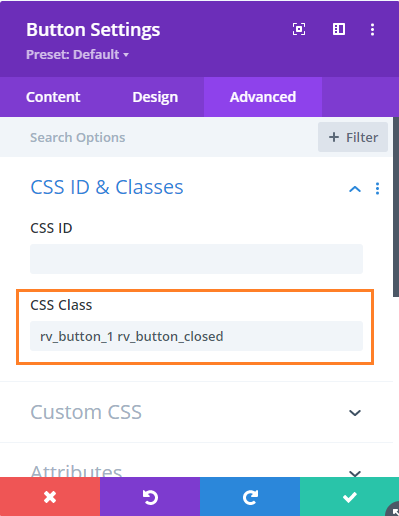
Step 1: Add the "reveal" button and give it a class
Add a Button Module to your page that you want to use to show / reveal the target element.
Then set
Button Settings > Advanced > CSS ID & Classes > CSS Class
to
rv_button_1 rv_button_closed
like so:
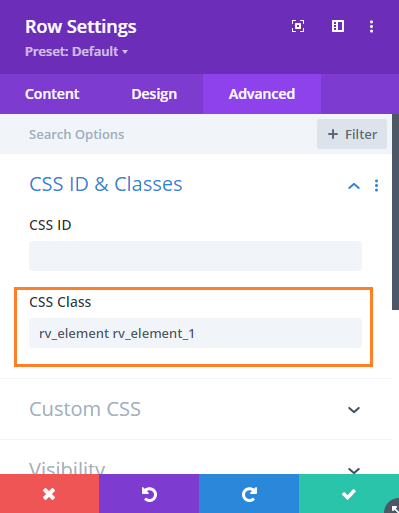
Step 2: Add the hidden element and give it a class
Now add the element you want to show / hide. This can be a section, row or module. Go to the settings for the element, e.g.
{Element} Settings > Advanced > CSS ID & Classes > CSS Class
And add the following to the CSS Class field:
rv_element rv_element_1
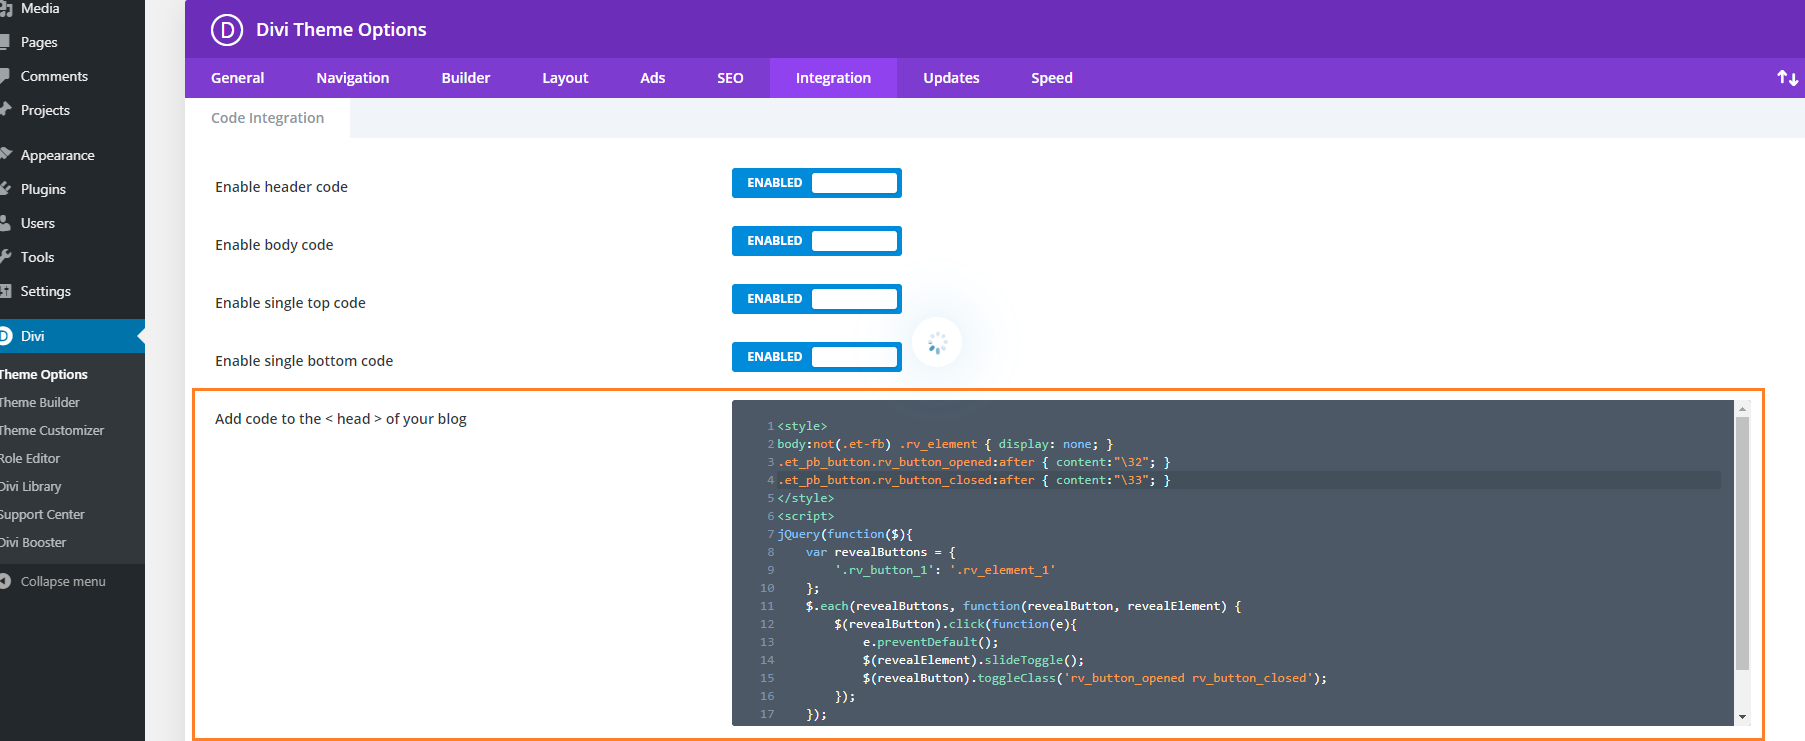
Step 3: Add the following CSS / JavaScript code to your site
<style>
body:not(.et-fb) .rv_element { display: none; }
.et_pb_button.rv_button_opened:after { content:"\32"; }
.et_pb_button.rv_button_closed:after { content:"\33"; }
</style>
Related Post: Adding CSS to the Divi Theme
<script>
jQuery(function($){
	var revealButtons = {
		'.rv_button_1': '.rv_element_1'
	};
	$.each(revealButtons, function(revealButton, revealElement) {
		$(revealButton).click(function(e){
			e.preventDefault();
			$(revealElement).slideToggle();
			$(revealButton).toggleClass('rv_button_opened rv_button_closed');
		});
	});
});
</script>
Related Post: Adding JavaScript / jQuery to Divi.
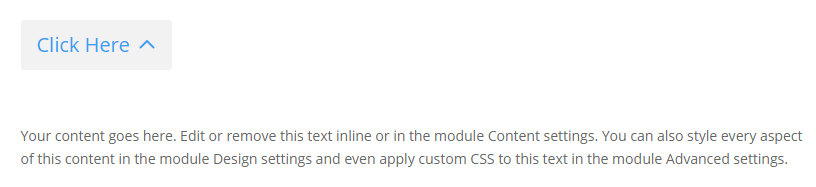
Step 4: Publish and view the page
If all has gone well, the element should be hidden on the page. Clicking on the reveal button should reveal the element, and clicking a second time should hide it again.
If you have any trouble getting it to work, let me know in the comments or via the contact form.
It should look something like this:
Before:

Advanced: Adding more reveal buttons
If you want to add further reveal buttons (which reveal their own elements), you can do it like so:
- Give each new reveal button its own CSS class, for example "rv_button_2" for the second reveal button, "rv_button_3" for the third and so on.
- Give each new hidden element its own CSS class, for example "rv_element rv_element_2" for the second element, "rv_element rv_element_3" for the third, and so on.
- Modify the JavaScript code to include these new classes, e.g.
<script>
jQuery(function($){
	var revealButtons = {
		'.rv_button_1': '.rv_element_1',
		'.rv_button_2': '.rv_element_2',
		'.rv_button_3': '.rv_element_3'
	};
	$.each(revealButtons, function(revealButton, revealElement) {
		$(revealButton).click(function(e){
			e.preventDefault();
			$(revealElement).slideToggle();
			$(revealButton).toggleClass('rv_button_opened rv_button_closed');
		});
	});
});
</script>
Advanced 2: Showing and hiding elements on click
If you want to do something more than just revealing an element when the reveal button is clicked, here's an extended version of the code above, which adds the ability to show, hide and toggle multiple elements from the same button. This lets you do things like hide an element when revealing another, or replacing the reveal button with content (by hiding the reveal button once clicked).
<style>
body:not(.et-fb) .show-on-click,
body:not(.et-fb) .toggle-on-click {
	display: none;
}
.et_pb_button.rv_button_opened:after { content:"\32"; }
.et_pb_button.rv_button_closed:after { content:"\33"; }
</style>
<script>
jQuery(function($){
	var buttons = {
		'.rv_button_1': {
			'toggle': '.toggle-on-click',
			'hide'  : '.hide-on-click',
			'show'  : '.show-on-click'
		}
	};
	$.each(buttons, function(button, elements) {
		$(button).click(function(e){
			e.preventDefault();
			$(elements.toggle).slideToggle();
			$(elements.show).slideDown();
			$(elements.hide).slideUp();
			$(button).toggleClass('rv_button_opened rv_button_closed');
		});
	});
});
</script>
The biggest change is that the buttons array now defines "toggle", "hide" and "show" values for the button(s).
- "toggle" takes a comma-separated list of CSS selectors which will be alternated between hidden and visible with each click of the reveal button. This is the default behavior of the earlier code examples.
- "hide" takes a comma-separated list of CSS selectors which will be hidden when the button is clicked. Subsequent clicks won't affect their visibility.
- "show" takes a comma-separated list of CSS selectors which will be displayed when the button is clicked. Subsequent clicks won't affect their visibility. It makes sense to hide such elements initially using CSS, as done for the ".show-on-click" class in the style block above.
Setup the button as per step 1, and give each element you want to be affected by the button the appropriate class (in the case of the example code this would be either "toggle-on-click", "hide-on-click" or "show-on-click").
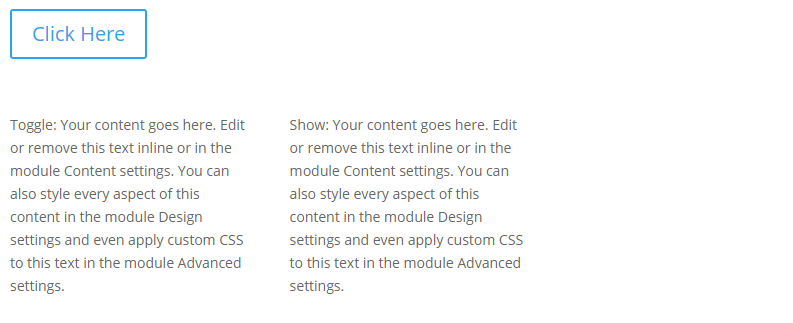
Now you should see an effect similar to this (left column is set to toggle, center to show, and right to hide):
Initial state:

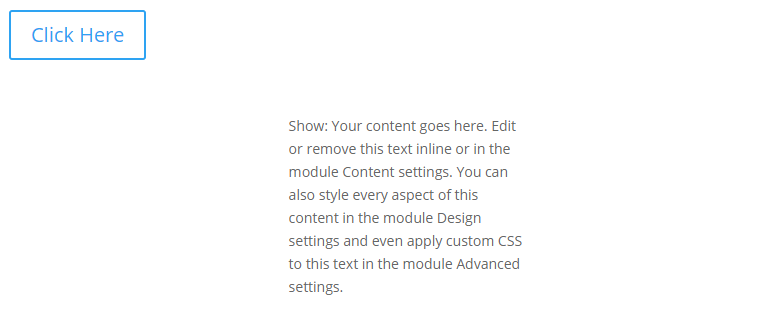
After first click:
After second click:
Advanced 3: Changing the Open / Close Icons
you can change the open / close icon from the default up / down arrow by changing these lines of CSS:
.et_pb_button.rv_button_opened:after { content:"32"; }
.et_pb_button.rv_button_closed:after { content:"33"; }
Here '32' is the code for the up arrow icon and '33' is the code for the down arrow icon. You can easily change this to another icon from this list:
https://www.elegantthemes.com/blog/resources/elegant-icon-font
Go to the "Complete Set and Unicode Reference Guide" section and then locate your desired icon(s). Take the part of the icon's code as shown here:
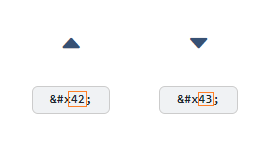
.et_pb_button.rv_button_opened:after { content:"42"; }
.et_pb_button.rv_button_closed:after { content:"43"; }
Advanced 4: Hiding Other "Tabs" Initially
If you have several reveal buttons and want to create a "tabbed" effect, you may wish to simulate a click on the first reveal button to hide the content of the other "tabs". Here's two ways to do it:
1) Hide the other tab content elements initially via CSS, such as:
.rv_element_2,.rv_element_3,.rv_element_4 {
	display: none;
}
Note that you may need to change these class names to match your setup.
You can add this into your child theme style.css file or the "Divi > Theme Options > General > Custom CSS" box.
2) Trigger a click event on the button using jQuery. You should be able to do so by adding this after the jQuery code you've already added above:
jQuery(function($){
	$('.rv_button_1').click();
});
Where "rv_button_1" is the class assigned to your first "tab" button.
The two options should achieve pretty much the same result, but there are some slight differences. The first option will apply immediately, while the second option only applies once the page is fully loaded, which might lead to the rows being briefly visible while the page is loading. The second option, though, more accurately simulates a button click which might be useful if you ever attach more complex behavior to the button.
Related post: Creating Tabs using the Divi Show / Hide Button Module
Advanced 5: Sliding the Revealed Element Left / Right
In the examples above, the element being revealed slides up / down as it is revealed / hidden. There isn't an equivalent way in jQuery to instead slide it left / right. However, we can achieve a left / right slide effect by additionally making use of the jQuery UI library.
First, install the jQuery UI library on your page / site following the instructions on the jQuery UI site. This will likely involve adding a script tag such as this to your site:
<script src="https://cdnjs.cloudflare.com/ajax/libs/jqueryui/1.13.2/jquery-ui.min.js" integrity="sha512-57oZ/vW8ANMjR/KQ6Be9v/+/h6bq9/l3f0Oc7vn6qMqyhvPd1cvKBRWWpzu0QoneImqr2SkmO4MSqU+RpHom3Q==" crossorigin="anonymous" referrerpolicy="no-referrer"></script>Important: To get jQuery UI to work correctly, you may also need to disable Divi's jQuery Deferral option at:
Divi > Theme Options > General > Performance > Defer jQuery And jQuery Migrate
This in the original example (given at the top of this post), replace the line that reads:
$(revealElement).slideToggle();With this (to slide right):
$(revealElement).toggle("slide", { direction: "left" }, 1000);Or this (to slide right):
$(revealElement).toggle("slide", { direction: "right" }, 1000);It is worth noting that loading jQuery UI and disabling Divi's jQuery Deferral may impact the page / site speed to some degree, so be sure to check that you are happy with the resulting site performance when implementing this.
Advanced 6: Deactivating Previously Active Buttons
In the above examples, a button which has been clicked becomes "active" and can be styled using the "rv_button_opened" class added to it. When the button is clicked again the class is removed, removing the active styling. However, buttons added using the instructions above act independently: activating one button doesn't "deactivate" the others. If you would actually like a newly active button to deactivate others (so you only have one button active at a time), then one way to handle this situation is to modify the code such that when the button is clicked, it removes the rv_button_opened class from the other buttons. Adding a line like this should do it:
$('.et_pb_button.rv_button_opened').not(revealButton).removeClass('rv_button_opened').addClass('rv_button_closed');This is how it would look added to the code in the "Advanced: Adding more reveal buttons" section:
jQuery(function($){
	var revealButtons = {
		'.rv_button_1': '.rv_element_1',
		'.rv_button_2': '.rv_element_2',
		'.rv_button_3': '.rv_element_3'
	};
	$.each(revealButtons, function(revealButton, revealElement) {
		$(revealButton).click(function(e){
			e.preventDefault();
			$(revealElement).slideToggle();
			$(revealButton).toggleClass('rv_button_opened rv_button_closed');
			$('.et_pb_button.rv_button_opened').not(revealButton).removeClass('rv_button_opened').addClass('rv_button_closed');
		});
	});
});
Note that if you use it with the code in "Advanced 2: Showing and hiding elements on click" you'd instead need to use:
$('.et_pb_button.rv_button_opened').not(button).removeClass('rv_button_opened').addClass('rv_button_closed');(as it uses "button" as the variable name, instead of "revealButton").
For users of the Divi Show / Hide Button module, the grouping option can be used to make a set of buttons act as a group with only one button active at a time. The currently active button can then be styled using the active button styling options.
Advanced 7: Only Show the Button on Mobile
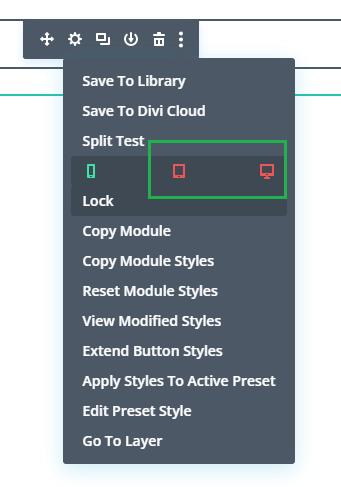
To only show the button on mobile:
1. Click on the "disable" option in the button module's menu:
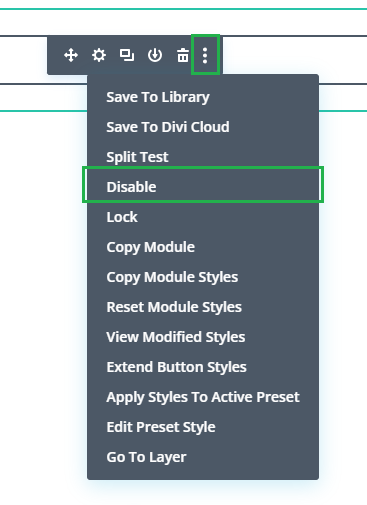
2. Click on the "tablet" and "desktop" icons, to disable the button module on those devices. This will make the button show on mobile only.
3. Wrap the CSS code from the tutorial in a "media query" which will make the CSS code only apply on mobile (leaving the filters visible on tablet / desktop). For example, if you are using this CSS from above:
<style>
body:not(.et-fb) .rv_element { display: none; }
.et_pb_button.rv_button_opened:after { content:"\32"; }
.et_pb_button.rv_button_closed:after { content:"\33"; }
</style>
You'd change it to this:
<style>
@media only screen and (max-width: 980px) {
	body:not(.et-fb) .rv_element { display: none; }
	.et_pb_button.rv_button_opened:after { content:"\32"; }
	.et_pb_button.rv_button_closed:after { content:"\33"; }
}
</style>

After I apllied all the instructions the button not functional if you click the button to reveal the section it just refresh the page
Hey Mark, I'm not sure if you've fixed this now or if I'm looking in the wrong place, but looking on your linked page I can see the "Show more case studies" button is correctly working to reveal the content (using different code from that given in the post). One minor issue with the button is that you need to click it twice before the content is revealed initially. That's because the code is toggling the content based on the value of the style.display property. Initially this actually undefined, causing the first click to set it to 'none', after which it behaves as expected. I think you should be able to fix that by modifying the code to this:
document.getElementById("toggleBtn").onclick = function() {
    var secondDiv = document.getElementById("secondDiv");
    if (!secondDiv.style.display || secondDiv.style.display === "none") {
        secondDiv.style.display = "block";
    } else {
        secondDiv.style.display = "none";
    }
};
I hope that helps, but if you have any remaining questions, or I'm looking at the wrong button, just let me know. Thanks!
Hi Dan, I wanted to start by saying that your tutorial was great. I just have a question: What if I have two or more sub-buttons within a single main button? How can I make it so that when the main button is clicked, it displays the sub-buttons followed by the element? I appreciate your assistance. Thank you!
Hey Walton, assuming that you've already got to the point where the main button hides and reveals your content element based on the content element's class (e.g. "rv_element_1"), then you should simply be able to add the same class to your sub-buttons (at "Button Settings > Advanced > CSS ID & Classes > CSS Class"). Now the sub-buttons and the content element should all be hidden / shown in the same way.
Alternatively, if your sub-buttons and content element are all in the same row or section, then you could move that class from the content element to the row / section and then the entire row / section would be hidden / revealed by the main button.
I hope that helps / makes sense, but if it isn't doing what you need, is there any chance you're able to share a link to the page you're working on so that I can be more specific? Thanks!
Hi Dan! Thanks for sharing all this valuable information!
I have been trying for several hours to resolve the following problem: If you go to my website (landing page): https://citaragadentistes.com/ you will see that the button below "Laia R" hides the underneath text smoothly. So the left button works perfectly. The problem is that in the button below Alex V, the text underneath is hidden but not with a smooth transition, it is hidden directly. I have tried everything I have been able to try for several hours but I really do not know how to resolve this. Please, go to my webpage and you will see the two buttons I mentioned you about beneath two photos (they are almost all the way down the landing page). The code that I am currently using is the following:
body:not(.et-fb) .rv_element { display: none; }
.et_pb_button.rv_button_opened:after { content:"\32"; }
.et_pb_button.rv_button_closed:after { content:"\33"; }
jQuery(function($){
var revealButtons = {
'.rv_button_1': '.rv_element_1',
'.rv_button_2': '.rv_element_2',
};
$.each(revealButtons, function(revealButton, revealElement) {
$(revealButton).click(function(e){
e.preventDefault();
$(revealElement).slideToggle();
$(revealButton).toggleClass('rv_button_opened rv_button_closed');
});
});
});
Thanks a lot for your time!
Hey Pol, I think the issue here is that there is a minimum height set on the Alex V text module, which is preventing the module from displaying at smaller heights during the reveal transition. I think you’ll be able to solve it by just removing the min height. I may be wrong, but I think this is currently being set in the text module’s settings at “Text Module Settings > Design > Sizing > Min Height”. I hope that helps, but let me know if not. Thanks!
Hey Dan, it worked!!!! Thanks for being so quick, I appreciate it.
Great! You're very welcome, and thanks for letting me know, Pol :)
Hi again Dan!
Thanks for your time in advantage.
I am facing another problem now related to the same issue. When trying to optimize my webpage (https://citaragadentistes.com) for phones and tablets, I some of the settings changed and as you can see, under the Alex V picture, if you click the button it opens and hides perfectly. The issue here is that the button beneath that hidden text doesn't move. You will appreciate that under the Laia R. image, if you click the button the content is displayed and hiddes perfectly, plus, the button beneath also moves that, which is the issue I am facing with the Alex V. button. As you will appreciate the text overlaps the button so it looks awful.
If you could help me out with this issue I would really appreciate it Dan.
Thank you again.
Hey Pol!
The issue here is due to the location of the "Reclama el teu diagnòstic sense compromís" button in relation to the two columns of your row.
This button is currently located in the left column of the two-column row, therefore it moves as expected when the text in the left column (below "Laia R") is revealed. However, it doesn’t get affected when the text is revealed in the right column (below "Alex V"); that's why you're seeing the overlap issue.
One solution is to modify the layout slightly. Create a new single-column row just below the two-column row, then move the "Reclama…" button to this new row. Afterwards, it should slide down correctly whenever the text in either of the two columns above it is revealed.
You may also need to modify the button styles slightly to get it to display in the correct place within the new row. Specifically, center the button within the new row and remove the current 300px position translation adjustment.
I hope that helps!
Hi Dan!
It worked! Thanks a lot for your time, I really do appreciate it!
Great! You're very welcome, Pol :)
Hi Dan,
I have one last question. If you go to the webpage I am creating (https://citaragadentistes.com) on your phone (I am still optimizing it), you will see that if you just click on the right "CV" button (under Alex…) without clicking on the left button (under Laia…) everything works fine. The thing is that if I wanted to show the content displayed by the two buttons at the same time, you will see that the text on the right is moved down, and I just want it to stay where it is.
By the way, I have applied what you recommendations and the on the computer version everything works absolutely perfect. In the phone version I have only made some changes related to sizes and positions of things so that it all fits perfectly but the structure of the rows is as you indicated me they should be (a double-column row with the texts that are displayed in their respective column and underneath that, a single-column row containing the "Reclama…" button).
Thanks for your help in advance,
Hey Pol,
I think there may be a better approach than trying to shift the individual modules into the correct position. Instead, I'd suggest adjusting the layout at the column level. One way to do this is to alter the width of the columns themselves, making them 50% (or less) of the row width, so that they end up side-by-side even on a mobile display.
I've just published a post demonstrating how to do this:
Display Two Divi Columns Side-by-Side on Mobile
Note that you'll need to remove your existing adjustments made via the position / margins. You may want to make a copy first until you get it working. By doing it at the column level, the solution should be a bit neater solve the layout issue you've been having.
I hope it helps!
Hi Dan,
I have actually tried what you recommended me but it is sadly not working. Even though I have set the columns width to 50% and have tried absolutely anything I have could throughout this day, the two columns do not set side-by-side, which is actually not a big problem since I can resize everything and position every element where I want it to be. The most important problem that I have to fix is the fact that when I want to display (on mobile version) the two texts that are hidden under the two "CV" buttons under each image, the text under the Alex V. Image is moved down when the text under Laia Raga is displayed.
Thanks in advance and I really hope there's a solution for this, I have really been trying to fix this for several hours but nothing seems to work. I have tried applying the column-gap CSS, the display:flex CSS (following other youtube video tutorials), I have also tried resizing everything and positioning everything so that the two texts are split up and not in contact widthwise (I thought that that could have been the issue but it was not).
Now you'll see that the elements are not perfectly resized and positioned but you will see what I mean when you enter https://citaragadentistes.com on your phone.
Hi Dan! I found a solution to this problem. I kept messing around with the CSS display: flex; and now everything is working fine so don't worry.
Thanks for your help so far though!
Awesome! Nice work, Pol :) I'm glad you got it sorted, but please feel free to give me a shout if you have any other questions about it. Cheers!
Hi Dan!
I am facing another problem now.
If you go to https://citaragadentistes.com on mobile version and scroll down till you see the two buttons I have been having problems with (the buttons under "Laia…" and "Alex…" ), there's a module beneath whose title is "més info sobre…". Problem comes when I click on the buttons (which by the way work perfectly) since the "més info sobre…" module doesn't move down enough so it ends up overlaying the two texts displayed when clicking in the "CV" buttons.
Do you know how can I solve this?
Hey Pol,
I think the main issue here is that the "més info sobre…" module has been shifted up out of the bounds of the section containing it. When the content above is revealed, the section is pushed down, but the text module now overlaps the revealed content in the section above.
One way to solve it is to remove the top margin from the "Més informació sobre l’ortodòncia" text module. You also need to remove the minimum height setting on the "Els professionals que t’atendran" section.
You should be able to do this via the module settings, but if you need it, here's the CSS equivalent.
@media only screen and (max-width: 980px) {


    /* "Els professionals que t’atendran" section */
    .et_pb_section_8 {
        min-height: auto !important;
    }


    /* "Més informació sobre l’ortodòncia" text module */
    .et_pb_section_9 .et_pb_module.et_pb_text_31 {
        margin-top: 0 !important;
    }
}
Note that this CSS references the sections / module by number, which can change if you add new sections, etc. If you decide to use the CSS, I'd recommend replacing the numbered classes with custom classes set in the section / module settings.
I hope that helps, but give me a shout if you have any further issues with it. Cheers!
Thanks again Dan, this works perfectly fine now, after messing around and correcting what you told me to correct.
You're very welcome, Pol. I'm glad that worked. All the best with the rest of the site and give me a shout if there's anything else I can help with. Thanks!
Hey Dan, is there anyway I could adapt this to click a blurb to reveal a row instead of a button being clicked?
Thanks
Hi Rachel, sorry I'm only just getting back to you on this. The code above will actually work on blurbs too – you can just add the classes to the blurb module instead of the button module. But I've written a separate post with a basic example of how to make blurbs reveal content when clicked. It includes some slight renaming of the classes and code to reference blurbs instead of buttons, and includes some minor tweaks such as changing the point where the blurb is hovered. I hope that helps!
Hey Dan,
thank you for the great tutorial.
I have implemented a Slider with the function that on every slide, you are able to basically see more content if you click on the button. With every slide, there is a new button.
This is my code:
body:not(.et-fb) .rv_element {
display: none;
}
.et_pb_button.rv_button_opened:after { content:"\32"; }
.et_pb_button.rv_button_closed:after { content:"\33"; }
jQuery(function($){
var buttons = {
'.rv_button_1': {
'toggle': ",
'hide' : '.rv_element:not(.rv_element_1)',
'show' : '.rv_element_1'
},
'.rv_button_2': {
'toggle': ",
'hide' : '.rv_element:not(.rv_element_2)',
'show' : '.rv_element_2'
},
'.rv_button_3': {
'toggle': ",
'hide' : '.rv_element:not(.rv_element_3)',
'show' : '.rv_element_3'
},
'.rv_button_4': {
'toggle': ",
'hide' : '.rv_element:not(.rv_element_4)',
'show' : '.rv_element_4'
},
};
$.each(buttons, function(button, elements) {
$(button).click(function(e){
e.preventDefault();
$(elements.toggle).slideToggle();
$(elements.show).slideDown();
$(elements.hide).slideUp();
$(button).toggleClass('rv_button_opened rv_button_closed');
});
});
});
One problem though, once I click the button and the content reveals, I cannot hide the content again with the same button.
What do I need to adjust in the code?
Thanks in advance!
Hey Rafael, you should be able to do it by changing the buttons definition to this:
var buttons = {
	'.rv_button_1': {
		'toggle': '.rv_element_1',
		'hide' : '.rv_element:not(.rv_element_1)',
		'show' : ''
	},
	'.rv_button_2': {
		'toggle': '.rv_element_2',
		'hide' : '.rv_element:not(.rv_element_2)',
		'show' : ''
	},
	'.rv_button_3': {
		'toggle': '.rv_element_3',
		'hide' : '.rv_element:not(.rv_element_3)',
		'show' : ''
	},
	'.rv_button_4': {
		'toggle': '.rv_element_4',
		'hide' : '.rv_element:not(.rv_element_4)',
		'show' : ''
	},
};
That way, the content associated with a particular button will "toggle" (alternate between visible and hidden with each click), rather than just "show" (become permanently visible on the first click).
Hope that helps, but let me know if not. Thanks!
Hi there,
I have tried as much as could figure it out but the first button, from a list of 6, keeps refreshing the page. All the other ones work just fine.
That's the script:
jQuery(function($){
var buttons = {
'mtc_button_1': {
'toggle': ",
'hide' :'.mtc_element_2, .mtc_element_3, .mtc_element_4, .mtc_element_5, .mtc_element_6',
'show' : '.mtc_element_1'
},
'.mtc_button_2': {
'toggle': ",
'hide' : '.mtc_element_1,.mtc_element_3, .mtc_element_4, .mtc_element_5, .mtc_element_6',
'show' : '.mtc_element_2'
},
'.mtc_button_3': {
'toggle': ",
'hide' : '.mtc_element_1,.mtc_element_2, .mtc_element_4, .mtc_element_5, .mtc_element_6',
'show' : '.mtc_element_3'
},
'.mtc_button_4': {
'toggle': ",
'hide' : '.mtc_element_1,.mtc_element_2, .mtc_element_3, .mtc_element_5, .mtc_element_6',
'show' : '.mtc_element_4'
},
'.mtc_button_5': {
'toggle': ",
'hide' : '.mtc_element_1,.mtc_element_2, .mtc_element_3, .mtc_element_4, .mtc_element_6',
'show' : '.mtc_element_5'
},
'.mtc_button_6': {
'toggle': ",
'hide' : '.mtc_element_1,.mtc_element_2, .mtc_element_3, .mtc_element_4, .mtc_element_5',
'show' : '.mtc_element_6'
}
};
$.each(buttons, function(button, elements) {
$(button).click(function(e){
e.preventDefault();
$(elements.toggle).slideToggle();
$(elements.show).slideDown();
$(elements.hide).slideUp();
$(button).toggleClass('mtc_button_closed mtc_button_opened');
$('.et_pb_button.mtc_button_opened').not(revealButton).removeClass('.mtc_button_opened').addClass('.mtc_button_closed');
});
});
});
Please help!
Hey George, I think you’re missing a period – it should be '.mtc_button_1' instead of 'mtc_button_1' in the third line of the script. Hopefully fixing that will sort it out, but let me know if not. Thanks!
Very useful tutorial, thank you ! Is there a way to change the text of the button when it's clicked on ? (show more => show less) ?
Hey Sophie, you're very welcome. Since it looks like you've just bought the Divi Show / Hide Button module (thank you!), you can do it using the option described here:
Change Show / Hide Button Text on Click
I hope that helps, but if you do need to be able to do it manually via jQuery code, let me know and I'll do my best to advise you :)
Hi, I am using toggle modules within toggle modules. This creates the problem that all nested toggle modules are being opened, when the parent toggle module is opened.
How can I adapt your code to close the nested modules, when you click on the button to open the parent toggle module?
Hi Martina, you're using the instructions from this post on nesting modules within other modules, right?
The issue is that when the Divi toggle module's title is clicked, it toggles the visibility of any and all toggle content elements contained within it. Normally, there is only one, but in your case, each of the sub-modules has its own content element and they are all being affected by the click on the parent toggle.
To solve this, you can use the following JavaScript / jQuery code, which will replace Divi's handling of clicks on the toggle title with one that won't affect nested toggles.
jQuery(function($) {
	$(".et_pb_toggle .et_pb_toggle_title").click(function(e){
		e.preventDefault();
		var $module = $(this).parent();
		$module.children(".et_pb_toggle_content").slideToggle(400, function() {
			$module.toggleClass("et_pb_toggle_open et_pb_toggle_close");
		});
	});
});
If you've followed the tutorial in that linked post, then you can add this code into the code module added by that tutorial. Alternatively, you can add it via the "Divi > Theme Options > Integration" area.
I hope that helps!
Hi Dan,
Thanks for tutorial! I'm trying to hide a section which contains a blog module with a grid layout. Whenever I click the button to show the blog's section, all of the blog's post thumbnails/cards are stacked on top of each other. If I then click on the pagination link the proper post grid will be displayed but only then. Any suggestions on how to fix this?
Thanks again!
Hey Adam, I've seen this type of behavior with some other modules, such as the filterable portfolio. Basically the issue with those was that Divi would dynamically lay them out once the page had loaded. However, it would only do that if they were visible, so it wouldn't apply this to a hidden portfolio, for example. So when it was revealed, the layout would be wrong, and would stay wrong until a redraw of the element was triggered (e.g. by resizing the page). The solution in those cases is to manually trigger the redraw when the button is clicked to reveal the hidden element.
I suspect a similar thing may be going on with your blog module. I've tried setting up an example, but I didn't encounter the same problem, so I'm not quite sure what is causing it on your site. I know you marked the site as being locally hosted, but is there any chance you're able to share a link to a live example so that I can look into it further? Alternatively, if you're able to save the HTML of the page (e.g. using your browser's "Save As" option) and send that to me, I might be able to figure it out from there. If you send me a message, marking it as a "Bug Report", via the contact form you'll get an auto-response email to which the HTML can be attached. Thanks!
Thank you, Dan! I've sent you the HTML via the contact form auto-response.
Thanks Adam. Am I right in thinking it's Divi Blog Pro post masonry module that you're using? If so, I think you may be able to get it working by modifying your code to this:
jQuery(function($){
	var buttons = {
		'.rv_button_1': {
			'toggle': '.toggle-on-click',
			'hide'  : '.hide-on-click',
			'show'  : '.show-on-click'
		}
	};
	$.each(buttons, function(button, elements) {
		$(button).click(function(e){
			e.preventDefault();
			$(elements.toggle).slideToggle();
			$(elements.show).slideDown();
			$(elements.hide).slideUp();
			$(button).toggleClass('rv_button_opened rv_button_closed');

			try {
				$('.brbl-post-masonry .brbl-blog-items').isotope({itemSelector: ".brbl-blog-item"}).isotope('layout');
			} catch(e) {}

		});
	});
});
The added line that reads:
$('.brbl-post-masonry .brbl-blog-items').isotope({itemSelector: ".brbl-blog-item"}).isotope('layout');Triggers the layout of the post masonry module to be (re)drawn.
It's working in my testing, but I'm not hugely familiar with either isotope or Divi Blog Pro, so if you have any issues with it just give me a shout and I'll look into them further.
I hope that helps!
Great post. I'm trying to use this to create a tabbed effect, however I can't seem to change the color of the buttons from their activate state to an inactive state. The other links in your post don't quite work the way I'm intending. Can you help? The current code I'm using on the page is this:
.rv_element_2, .rv_element_3, .rv_element_4 {
position: absolute;
left: 100%;
display: none;
}
jQuery(function($){
var revealButtons = {
'.rv_button_1': {
'show': '.rv_element_1',
'hide': '.rv_element_2, .rv_element_3, .rv_element_4'
},
'.rv_button_2': {
'show': '.rv_element_2',
'hide': '.rv_element_1, .rv_element_3, .rv_element_4'
},
'.rv_button_3': {
'show': '.rv_element_3',
'hide': '.rv_element_1, .rv_element_2, .rv_element_4'
},
'.rv_button_4': {
'show': '.rv_element_4',
'hide': '.rv_element_1, .rv_element_2, .rv_element_3'
}
};
$.each(revealButtons, function(revealButton, revealElements) {
$(revealButton).click(function(e){
e.preventDefault();
$.each(revealElements['hide'].split(', '), function(index, value) {
$(value).animate({left: '100%'}, 500, function() {
$(this).hide();
});
});
$.each(revealElements['show'].split(', '), function(index, value) {
$(value).show().animate({left: '0'}, 500);
});
$(revealButton).toggleClass('rv_button_opened rv_button_closed');
$('.et_pb_button.rv_button_opened').not(revealButton).removeClass('rv_button_opened').addClass('rv_button_closed');
});
});
$('.rv_button_1').click();
});
Hey Nate, I just did a test on your code and this works for me:
1) Make sure each button has the "rv_button_closed" class set in "Button Settings > Advanced > CSS ID & Classes > CSS Class", alongside any other classes set there ("rv_button_1", etc). Separate the class names with a space.
2) Apply the following CSS:
.rv_button_opened {
	color: green;
}
.rv_button_closed {
	color: red;
}
This will color the active button green and the inactive buttons red.
If you're still having issues with it, are you able to share a link so that I can take a look? Thanks!
Hi
I've followed the tutorial and can get the buttons working individually – sections open and close based on their button clicks, but I have not been able to get the advanced 2 hiding feature to work and when I paste in the code for that it breaks the function and nothing works.
I'm not sure what I'm doing wrong?
Hey Rachel, sorry to hear this. Is there any chance you're able to share a link to the page you're working on so that I can take a look for you? Thanks!
Absolutely, I'm having problems with the black tabbed section towards the bottom on the home page – https://rachelfiske.com/
Thanks Rachel, I think this may do what you need:
<style>
body:not(.et-fb) .rv_element {
	display: none;
}
.et_pb_button.rv_button_opened:after { content:"\32"; }
.et_pb_button.rv_button_closed:after { content:"\33"; }
</style>
<script>
jQuery(function($){
	var buttons = {
		'.rv_button_1': {
			'toggle': '',
			'hide'  : '.rv_element:not(.rv_element_1)',
			'show'  : '.rv_element_1'
		},
		'.rv_button_2': {
			'toggle': '',
			'hide'  : '.rv_element:not(.rv_element_2)',
			'show'  : '.rv_element_2'
		},
		'.rv_button_3': {
			'toggle': '',
			'hide'  : '.rv_element:not(.rv_element_3)',
			'show'  : '.rv_element_3'
		},
		'.rv_button_4': {
			'toggle': '',
			'hide'  : '.rv_element:not(.rv_element_4)',
			'show'  : '.rv_element_4'
		},
	};
	$.each(buttons, function(button, elements) {
		$(button).click(function(e){
			e.preventDefault();
			$(elements.toggle).slideToggle();
			$(elements.show).slideDown();
			$(elements.hide).slideUp();
			$(button).toggleClass('rv_button_opened rv_button_closed');
		});
	});
});
</script>
It's basically the "Advanced 2" code configured for your particular tab setup. It should replace the code you currently have on the button (rather than being added alongside it).
I hope it helps, but let me know if not. Thanks!
Worked like a charm, thank you so much!!
Great! You’re welcome, and thanks for letting me know, Rachel :)
How do I make it so that after clicking one button all other revealed sections get closed? I have four buttons.
Hi Monika, you should be able to do it using the code in the "Advanced 2: Showing and hiding elements on click" section, with the buttons variable set to something like this:
var buttons = {
	'.rv_button_1': {
		'toggle': '',
		'hide'  : '.rv_element_2, .rv_element_3, .rv_element_4',
		'show'  : '.rv_element_1'
	},
	'.rv_button_2': {
		'toggle': '',
		'hide'  : '.rv_element_1, .rv_element_3, .rv_element_4',
		'show'  : '.rv_element_2'
	},
	'.rv_button_3': {
		'toggle': '',
		'hide'  : '.rv_element_1, .rv_element_2, .rv_element_4',
		'show'  : '.rv_element_3'
	},
	'.rv_button_4': {
		'toggle': '',
		'hide'  : '.rv_element_1, .rv_element_2, .rv_element_3',
		'show'  : '.rv_element_4'
	}
};
This is assuming you give your buttons CSS classes of the form "rv_button_1", "rv_button_2", etc., and give the elements they reveal the CSS classes "rv_element_1", "rv_element_2", etc.
Basically, each button is configured to show its own element, and simultaneously hide the other ones, which I think should give you the effect you are looking for. Let me know if it doesn't do what you need (with a link to the page you're working on, if possible). Thanks!
This code works fine on my computer browser, but strangely it doesn't work on mobile, what should I do?
Hey Esther, is any chance you're able to share a link to the page you're working on so that I can take a look for you? Thanks!