This post describes how to show, hide or toggle Divi Builder elements at the click of a button.
Reveal Elements on Click using Divi Show / Hide Module
Divi Show / Hide Button Module is a plugin I designed to make it easier to implement some of the effects described later in this post – without the need to mess around with jQuery code.
It is a modified version of the built-in Divi Button module. Rather than linking to another page, it lets you show, hide and toggle the visibility of elements on the same page. It can be styled the same way as the standard button module.
Check out the Divi Show / Hide Button Module here.

Reveal Elements on Click Using CSS / JQuery
Rob over at Divi Notes has a nice post on how to reveal a Divi section, row or module when a button is clicked. I've made what I think are a couple of improvements, which are shared below. The changes include:
- Preventing the hidden component from being briefly displayed when the page loads
- Support for multiple hidden sections / reveal buttons
- No hiding of the component in the visual builder for easier editing
Here are the steps to making a Divi Builder element (module, etc) displayed on the click of a button (and re-hidden if the button is clicked again).
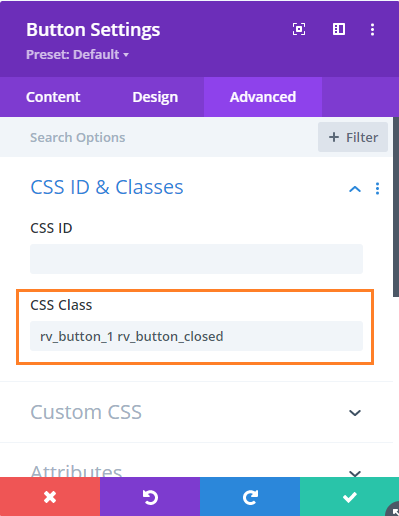
Step 1: Add the "reveal" button and give it a class
Add a Button Module to your page that you want to use to show / reveal the target element.
Then set
Button Settings > Advanced > CSS ID & Classes > CSS Class
to
rv_button_1 rv_button_closed
like so:
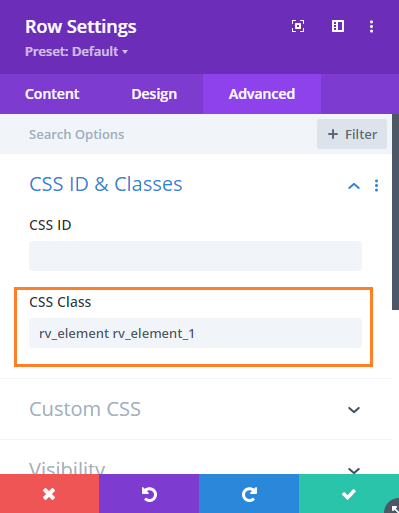
Step 2: Add the hidden element and give it a class
Now add the element you want to show / hide. This can be a section, row or module. Go to the settings for the element, e.g.
{Element} Settings > Advanced > CSS ID & Classes > CSS Class
And add the following to the CSS Class field:
rv_element rv_element_1
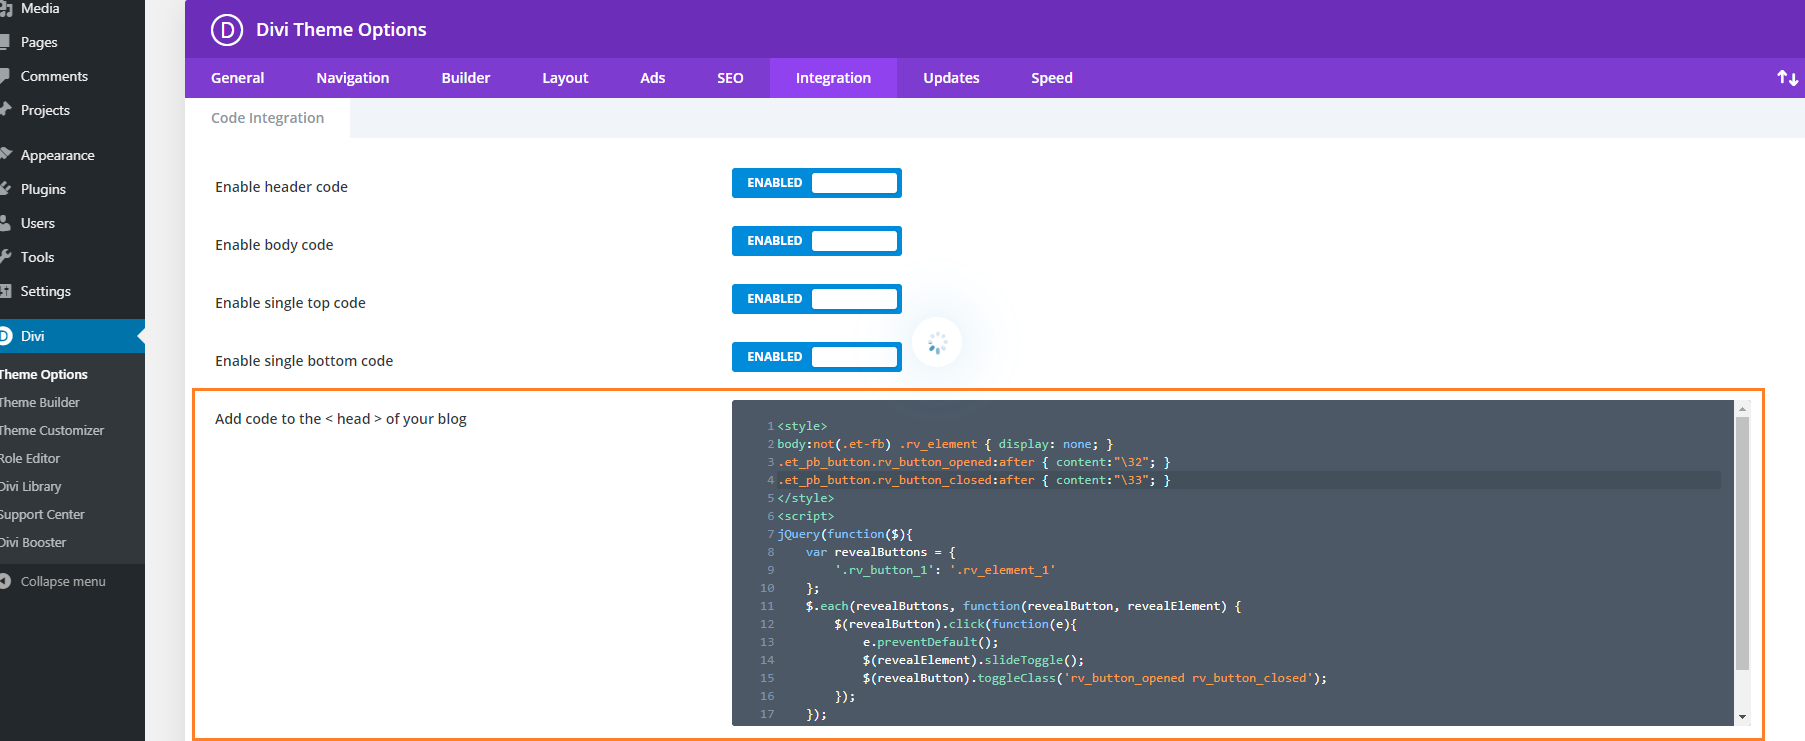
Step 3: Add the following CSS / JavaScript code to your site
<style>
body:not(.et-fb) .rv_element { display: none; }
.et_pb_button.rv_button_opened:after { content:"\32"; }
.et_pb_button.rv_button_closed:after { content:"\33"; }
</style>
Related Post: Adding CSS to the Divi Theme
<script>
jQuery(function($){
	var revealButtons = {
		'.rv_button_1': '.rv_element_1'
	};
	$.each(revealButtons, function(revealButton, revealElement) {
		$(revealButton).click(function(e){
			e.preventDefault();
			$(revealElement).slideToggle();
			$(revealButton).toggleClass('rv_button_opened rv_button_closed');
		});
	});
});
</script>
Related Post: Adding JavaScript / jQuery to Divi.
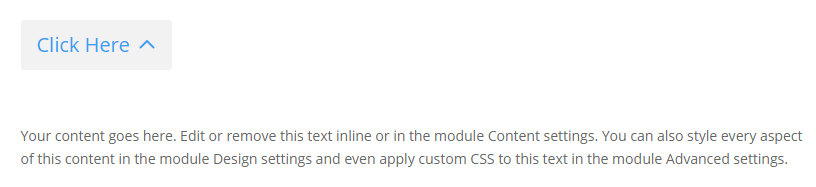
Step 4: Publish and view the page
If all has gone well, the element should be hidden on the page. Clicking on the reveal button should reveal the element, and clicking a second time should hide it again.
If you have any trouble getting it to work, let me know in the comments or via the contact form.
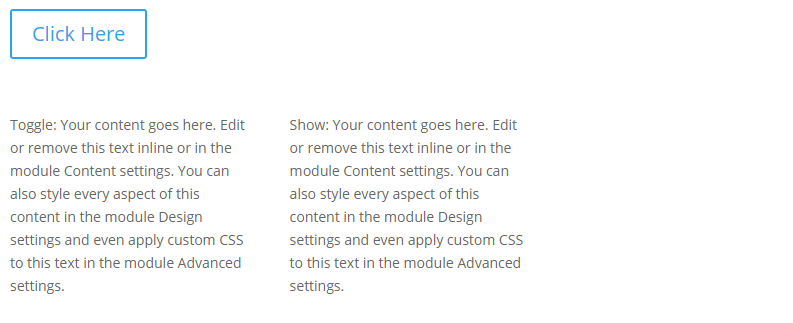
It should look something like this:
Before:

Advanced: Adding more reveal buttons
If you want to add further reveal buttons (which reveal their own elements), you can do it like so:
- Give each new reveal button its own CSS class, for example "rv_button_2" for the second reveal button, "rv_button_3" for the third and so on.
- Give each new hidden element its own CSS class, for example "rv_element rv_element_2" for the second element, "rv_element rv_element_3" for the third, and so on.
- Modify the JavaScript code to include these new classes, e.g.
<script>
jQuery(function($){
	var revealButtons = {
		'.rv_button_1': '.rv_element_1',
		'.rv_button_2': '.rv_element_2',
		'.rv_button_3': '.rv_element_3'
	};
	$.each(revealButtons, function(revealButton, revealElement) {
		$(revealButton).click(function(e){
			e.preventDefault();
			$(revealElement).slideToggle();
			$(revealButton).toggleClass('rv_button_opened rv_button_closed');
		});
	});
});
</script>
Advanced 2: Showing and hiding elements on click
If you want to do something more than just revealing an element when the reveal button is clicked, here's an extended version of the code above, which adds the ability to show, hide and toggle multiple elements from the same button. This lets you do things like hide an element when revealing another, or replacing the reveal button with content (by hiding the reveal button once clicked).
<style>
body:not(.et-fb) .show-on-click,
body:not(.et-fb) .toggle-on-click {
	display: none;
}
.et_pb_button.rv_button_opened:after { content:"\32"; }
.et_pb_button.rv_button_closed:after { content:"\33"; }
</style>
<script>
jQuery(function($){
	var buttons = {
		'.rv_button_1': {
			'toggle': '.toggle-on-click',
			'hide'  : '.hide-on-click',
			'show'  : '.show-on-click'
		}
	};
	$.each(buttons, function(button, elements) {
		$(button).click(function(e){
			e.preventDefault();
			$(elements.toggle).slideToggle();
			$(elements.show).slideDown();
			$(elements.hide).slideUp();
			$(button).toggleClass('rv_button_opened rv_button_closed');
		});
	});
});
</script>
The biggest change is that the buttons array now defines "toggle", "hide" and "show" values for the button(s).
- "toggle" takes a comma-separated list of CSS selectors which will be alternated between hidden and visible with each click of the reveal button. This is the default behavior of the earlier code examples.
- "hide" takes a comma-separated list of CSS selectors which will be hidden when the button is clicked. Subsequent clicks won't affect their visibility.
- "show" takes a comma-separated list of CSS selectors which will be displayed when the button is clicked. Subsequent clicks won't affect their visibility. It makes sense to hide such elements initially using CSS, as done for the ".show-on-click" class in the style block above.
Setup the button as per step 1, and give each element you want to be affected by the button the appropriate class (in the case of the example code this would be either "toggle-on-click", "hide-on-click" or "show-on-click").
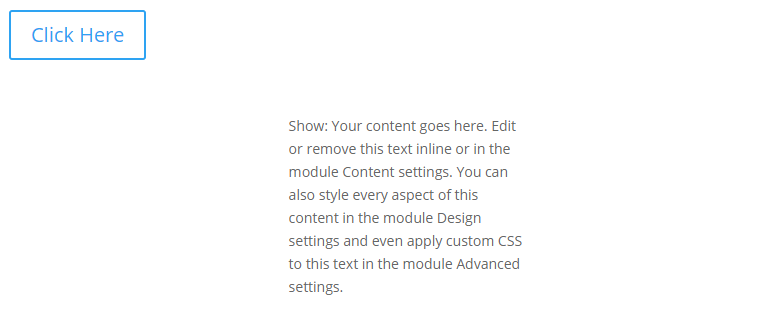
Now you should see an effect similar to this (left column is set to toggle, center to show, and right to hide):
Initial state:

After first click:
After second click:
Advanced 3: Changing the Open / Close Icons
you can change the open / close icon from the default up / down arrow by changing these lines of CSS:
.et_pb_button.rv_button_opened:after { content:"32"; }
.et_pb_button.rv_button_closed:after { content:"33"; }
Here '32' is the code for the up arrow icon and '33' is the code for the down arrow icon. You can easily change this to another icon from this list:
https://www.elegantthemes.com/blog/resources/elegant-icon-font
Go to the "Complete Set and Unicode Reference Guide" section and then locate your desired icon(s). Take the part of the icon's code as shown here:
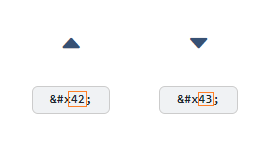
.et_pb_button.rv_button_opened:after { content:"42"; }
.et_pb_button.rv_button_closed:after { content:"43"; }
Advanced 4: Hiding Other "Tabs" Initially
If you have several reveal buttons and want to create a "tabbed" effect, you may wish to simulate a click on the first reveal button to hide the content of the other "tabs". Here's two ways to do it:
1) Hide the other tab content elements initially via CSS, such as:
.rv_element_2,.rv_element_3,.rv_element_4 {
	display: none;
}
Note that you may need to change these class names to match your setup.
You can add this into your child theme style.css file or the "Divi > Theme Options > General > Custom CSS" box.
2) Trigger a click event on the button using jQuery. You should be able to do so by adding this after the jQuery code you've already added above:
jQuery(function($){
	$('.rv_button_1').click();
});
Where "rv_button_1" is the class assigned to your first "tab" button.
The two options should achieve pretty much the same result, but there are some slight differences. The first option will apply immediately, while the second option only applies once the page is fully loaded, which might lead to the rows being briefly visible while the page is loading. The second option, though, more accurately simulates a button click which might be useful if you ever attach more complex behavior to the button.
Related post: Creating Tabs using the Divi Show / Hide Button Module
Advanced 5: Sliding the Revealed Element Left / Right
In the examples above, the element being revealed slides up / down as it is revealed / hidden. There isn't an equivalent way in jQuery to instead slide it left / right. However, we can achieve a left / right slide effect by additionally making use of the jQuery UI library.
First, install the jQuery UI library on your page / site following the instructions on the jQuery UI site. This will likely involve adding a script tag such as this to your site:
<script src="https://cdnjs.cloudflare.com/ajax/libs/jqueryui/1.13.2/jquery-ui.min.js" integrity="sha512-57oZ/vW8ANMjR/KQ6Be9v/+/h6bq9/l3f0Oc7vn6qMqyhvPd1cvKBRWWpzu0QoneImqr2SkmO4MSqU+RpHom3Q==" crossorigin="anonymous" referrerpolicy="no-referrer"></script>Important: To get jQuery UI to work correctly, you may also need to disable Divi's jQuery Deferral option at:
Divi > Theme Options > General > Performance > Defer jQuery And jQuery Migrate
This in the original example (given at the top of this post), replace the line that reads:
$(revealElement).slideToggle();With this (to slide right):
$(revealElement).toggle("slide", { direction: "left" }, 1000);Or this (to slide right):
$(revealElement).toggle("slide", { direction: "right" }, 1000);It is worth noting that loading jQuery UI and disabling Divi's jQuery Deferral may impact the page / site speed to some degree, so be sure to check that you are happy with the resulting site performance when implementing this.
Advanced 6: Deactivating Previously Active Buttons
In the above examples, a button which has been clicked becomes "active" and can be styled using the "rv_button_opened" class added to it. When the button is clicked again the class is removed, removing the active styling. However, buttons added using the instructions above act independently: activating one button doesn't "deactivate" the others. If you would actually like a newly active button to deactivate others (so you only have one button active at a time), then one way to handle this situation is to modify the code such that when the button is clicked, it removes the rv_button_opened class from the other buttons. Adding a line like this should do it:
$('.et_pb_button.rv_button_opened').not(revealButton).removeClass('rv_button_opened').addClass('rv_button_closed');This is how it would look added to the code in the "Advanced: Adding more reveal buttons" section:
jQuery(function($){
	var revealButtons = {
		'.rv_button_1': '.rv_element_1',
		'.rv_button_2': '.rv_element_2',
		'.rv_button_3': '.rv_element_3'
	};
	$.each(revealButtons, function(revealButton, revealElement) {
		$(revealButton).click(function(e){
			e.preventDefault();
			$(revealElement).slideToggle();
			$(revealButton).toggleClass('rv_button_opened rv_button_closed');
			$('.et_pb_button.rv_button_opened').not(revealButton).removeClass('rv_button_opened').addClass('rv_button_closed');
		});
	});
});
Note that if you use it with the code in "Advanced 2: Showing and hiding elements on click" you'd instead need to use:
$('.et_pb_button.rv_button_opened').not(button).removeClass('rv_button_opened').addClass('rv_button_closed');(as it uses "button" as the variable name, instead of "revealButton").
For users of the Divi Show / Hide Button module, the grouping option can be used to make a set of buttons act as a group with only one button active at a time. The currently active button can then be styled using the active button styling options.
Advanced 7: Only Show the Button on Mobile
To only show the button on mobile:
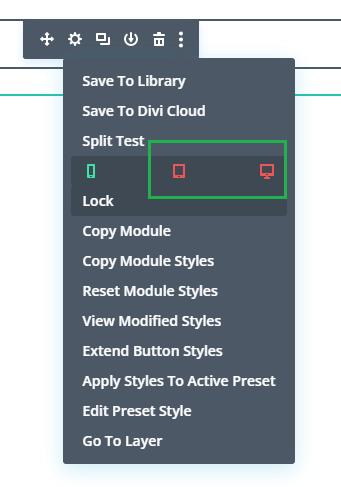
1. Click on the "disable" option in the button module's menu:
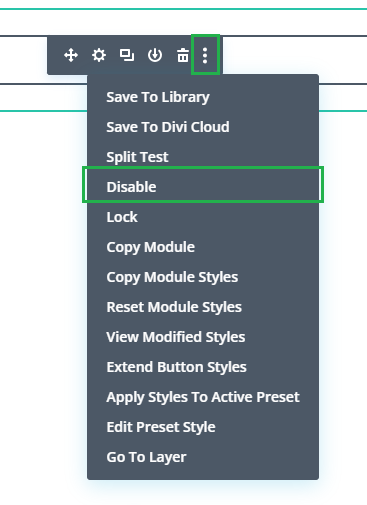
2. Click on the "tablet" and "desktop" icons, to disable the button module on those devices. This will make the button show on mobile only.
3. Wrap the CSS code from the tutorial in a "media query" which will make the CSS code only apply on mobile (leaving the filters visible on tablet / desktop). For example, if you are using this CSS from above:
<style>
body:not(.et-fb) .rv_element { display: none; }
.et_pb_button.rv_button_opened:after { content:"\32"; }
.et_pb_button.rv_button_closed:after { content:"\33"; }
</style>
You'd change it to this:
<style>
@media only screen and (max-width: 980px) {
	body:not(.et-fb) .rv_element { display: none; }
	.et_pb_button.rv_button_opened:after { content:"\32"; }
	.et_pb_button.rv_button_closed:after { content:"\33"; }
}
</style>

I may have missed it, but what if you want to show/hide a row that can be called by TWO of the "buttons"? For example, I am using your code to show players on a high school soccer team. Some of the girls are on both the JV and Varsity team. Currently, each player has their own div from the loop query and it adds the class "mtc_element_varsity" and "mtc_element_jv" when a girl has both categories. As you probably already know, if I click Varsity, a girl with both categories will not show.
Hey Chris, when you set up your buttons, ensure that the Varsity button is set to display any elements with the ".mtc_element_varsity" class and to hide all elements without that class using the ":not(.mtc_element_varsity)" selector. Do the same for the JV team, using ".mtc_element_jv" and ":not(.mtc_element_jv)" as your selectors. This should ensure that players who are on both teams will show up when either button is clicked. If you're still encountering issues or aren't sure how to modify your current code for this, feel free to send over a link to the page you're working on and I'll try to offer some more tailored advice. Thanks!
Great thank you! I assume this goes in the script but I am not sure exactly where. Is it in the var buttons = { section?
'.mtc_button_womens-jv': {
'toggle': ",
'hide' : '.mtc_element_womens-varsity, .mtc_element_mens-jv, .mtc_element_mens-varsity, .mtc_title_all',
'show' : '.mtc_element_womens-jv'
},
'.mtc_button_womens-varsity': {
'toggle': ",
'hide' : '.mtc_element_womens-jv, .mtc_element_mens-jv, .mtc_element_mens-varsity, .mtc_title_all',
'show' : '.mtc_element_womens-varsity'
},
Hey Chris,
Yes, exactly – in the "var buttons" section. I'd expect your code to end up looking something like this:
var buttons = {
 // Women's Junior Varsity button setup
 '.mtc_button_womens-jv': {
 'toggle': '',
 'hide' : '.mtc_element:not(.mtc_element_womens-jv)',
 'show' : '.mtc_element_womens-jv'
 },
 // Women's Varsity button setup
 '.mtc_button_womens-varsity': {
 'toggle': '',
 'hide' : '.mtc_element:not(.mtc_element_womens-varsity)',
 'show' : '.mtc_element_womens-varsity'
 },
 // Men's Junior Varsity button setup
 '.mtc_button_mens-jv': {
 'toggle': '',
 'hide' : '.mtc_element:not(.mtc_element_mens-jv)',
 'show' : '.mtc_element_mens-jv'
 },
 // Men's Varsity button setup
 '.mtc_button_mens-varsity': {
 'toggle': '',
 'hide' : '.mtc_element:not(.mtc_element_mens-varsity)',
 'show' : '.mtc_element_mens-varsity'
 }
};
You probably want to check the classes are correct – I went with those from your latest example which include the "womens" / "mens" part.
Important: I've added a ".mtc_element" before the :not(…) selector, to prevent them from matching every other element on the page. So to make the code work, you'd also need to add the "mtc_element" class to each of the player elements, or modify "mtc_element" in the code above to some class that is already applied to all the players.
Insert this snippet in place of your current var buttons = { … }; block. If you encounter any further challenges or need more assistance, just ask.
Thanks!
Absolutely perfect! Thank you so much!
You're welcome, Chris :)
Thanks for the this tutorial. I created one button/reveal in a new row. The issue I'm having is upon reveal, it covers up the section underneath it. How do I scroll that section down when the row above is revealed? Thank you.
Hi Jennifer, I'm very sorry I'm only just replying to this one. I took a look at the homepage of the site linked in your comment and while I can see the reveal script, the element it's referencing (#reveal) doesn't seem to exist in the page. If you're still trying to get it working, is there any chance you're able to point me to an example of the issue so that I can take a look for you now. Thanks!
I would like to have an account icon and search icon and have the login field and search bar, and show the elements only when you click on the icons.
So my question is, can I do this with an icon instead of a button? If yes, is it the same process but instead of reveal button in code I should write reveal icon?
Thank you
Hey Ghita, one way to do it would be to use a button that only has an icon. This post explains how to do it:
Create a Divi Button with no Text
You may also want to remove the button border, so that all that is left is the icon.
Then you'd be able to just use the code as given in the post above.
Another option would be use the Divi icon module instead of the button. There's a chance that changing every reference to "button" in the code to "icon" might be enough to get it working – but I can't guarantee it. If the text-less button option doesn't do what you need, let me know and I'll test the code on the icon module and see what changes are needed. Thanks!
Hello, great content.
Can you double check why when I paste your code for Advanced 6: deactivating… is not working in my website:
jQuery(function($){
var revealButtons = {
'.rv_button_1': '.rv_element_1',
'.rv_button_2': '.rv_element_2',
'.rv_button_3': '.rv_element_3'
};
$.each(revealButtons, function(revealButton, revealElement) {
$(revealButton).click(function(e){
e.preventDefault();
$(revealElement).slideToggle();
$(revealButton).toggleClass('rv_button_opened rv_button_closed');
$('.et_pb_button.rv_button_opened').not(revealButton).removeClass('rv_button_opened').addClass('rv_button_closed');
});
});
});
Thank you for your help
Hey carlos, is there any chance you're able to share a link to the site / page you're working on so that I can look into it for you? Thanks!
Please check the website: https://rootcausewheel.reportsdrive.com/
When you click one button and then click other button, is not working unhide.
Thanks carlos. The code was designed for Divi button module, where buttons have the ".et_pb_button" class. However, in your case, you're using <button> tags which don't have this class. I think you should be able to get the "Advanced 6" code working in your case by changing this line:
$('.et_pb_button.rv_button_opened').not(revealButton).removeClass('rv_button_opened').addClass('rv_button_closed');
To this:
$('button.rv_button_opened').not(revealButton).removeClass('rv_button_opened').addClass('rv_button_closed');
Note that the "Advanced 6" code just swaps the "rv_button_closed" / "rv_button_opened" class on the button itself, allowing it to be styled differently. It doesn't affect the display of the content itself. If you want to hide a button's content when the button is deactivated, this can be done using the technique described in "Advanced 2: Showing and hiding elements on click".
I hope that helps, but let me know if you need any further help with it. Thanks!
Hi Dan,
Thanks a lot for creating this. Is it possible to keep the active button (or image in my case) in a different colour?
Thank you!
Tamara
Hi Tamara, if you've followed the naming conventions above then you should be able style the active button using the ".rv_button_opened" CSS class (which gets added when the button is activated and removed when it is deactivated). If you're able to share a link to the page you're working on, I should be able to better advise you on what will work for your image. Thanks!
Hi again Dan,
I forgot to mention on the last comment that I am facing a problem regarding the page reloading for the first two sections (you'll see that everything beneath that looks absolutely perfect). The thing is that if someone enters my webpage (https://citaragadentistes.com/) they'll see no background image and everything will be misaligned, same happens on phone and tablet.
A way to solve this is by going to dashboard: all pages: quick edit: and setting this main page as a draft, then reload the page and finally publish it again. This works until I refresh the page again, then the first two sections (where there's the header and the contact form) get misaligned again.
Thanks for the help. I know in order to solve this issue you may need more details so if that's the case, send me an email and I will record a video explaining everything way better and where you'll be able to see my screen
Hey Pol, I suspect this issue might be related to how Divi handles CSS caching. Divi typically includes styles inline on the first load of the page and generates a separate stylesheet for the subsequent loads. If something is going wrong with the stylesheet generation or loading, it could lead to the issue you've described.
A quick step to troubleshoot this would be to disable the following Divi settings relating to CSS file generation:
Once you make these changes, clear all caches (both Divi's and any caching plugins you're using), then check your page again. Hopefully that will get the sections to be styled correctly on all page loads. If that is the case, try re-activating the settings one at a time to see if you can further narrow down which setting is causing the issue. Let me know how you get on (whether or not this actually resolves the issue) and we can take it from there. Thanks!
As of now your solution is working. Thanks a lot Dan. I will keep you informed.
Great! Glad to hear it seems to have helped, Pol. Just let me know if you have any further issues with it. Thanks!
Hi Dan it's Pol again!
Now I am facing a new problem, I will explain you.
My website (https://citaragadentistes.com) is now perfectly optimized for phone 400 px, tablet 768 px and for my pc's screen size which is 1366 px. My question is, Divi only allows me to make the website responsive exclusively for these 3 screen sizes (as far as I know).
The thing is that people that will enter my website will have different devices with different screen sizes. How can I make changes for every type of screen resolution?
Thanks for your time,
Hey Pol, Good to hear from you again! You're correct. By default, Divi primarily offers settings for mobile (up to 767px), tablet (768px – 980px), and desktop (above 981px) layouts.
To have your site adapt to various screen sizes, a key strategy is to use relative measurements – such as percentages – as opposed to fixed ones like pixels. This approach allows the layout to naturally adjust based on the viewer's screen resolution. Let's say, for example, you want a containing div to always occupy 80% of the viewer's screen width. Instead of setting a fixed pixel width, you would set the width to 80%. As the screen size changes, the div continues to occupy 80% of that size.
However, there might be situations where the above approach isn't enough. In such cases, you can use media queries in your CSS. Here's a very basic example:
@media only screen and (max-width: 1200px) {
  .your-class {
    font-size: 14px;
  }
}
In this instance, for screens that are 1200px wide or less, the font size for elements with the class ".your-class" is set to 14px. You can set different media queries for different screen resolutions.
Of course, it can become quite a process to cover all possible scenarios using this technique, so I'd recommend using relative measurements wherever possible.
I hope this gives you a starting point. Let me know if you have any other questions about it. Thanks!
Ciao, grazie mille plugin utilissimo, io per esempio ho settato delle immagini che si collegano alle sezioni nascoste e funziona correttamente, ci sarebbe la possibilità che quando la scheda cambia automaticamente l'utente viene portato su? per vedere la scheda sostituita (tipo un ancoraggio)
Ti ringrazio gentilissimo
Ciao Luca, if I understand correctly that you want to scroll to the revealed element when the button to reveal it is clicked, then the solution is to use the "Button Link URL" option, described in this post:
Set the Divi Show / Hide Button Link URL
If you set this option to a CSS ID (e.g. "#mercenari"), then when the button is clicked it will scroll to the element with that ID. So, if you set it to the CSS ID of the corresponding tab it should scroll to the tab when the button is clicked.
Please let me know, though, if I've misunderstood the question or you need any further help with it. Thanks!
Hi, great solution here!
I have attempted the below following this tutorial.
https://jrnew.brandesign.co.za/product-category/juices-shots-and-smoothies/sport-range/
Its located at the bottom of the page. You click on either "Performance Conscious" or "Carb and Performance Conscious" to start the journey.
Once clicked it will reveal more options and will load accordingly.
My issue is that if I click on an option, and move to the next option (eg. Clicking Pre, and then Post), it still shows the existing loaded section, and does not hide the previous.
How do I hide the other sections? And also, if I clicked to the first button (e.g. Performance Conscious) how do I hide everything?
Hope this makes sense, and thanks again for this awesome solution.
Hey brandesign, you should be able to do this with a variant of the code in the "Advanced 2" section for this. It's similar to what you already have in place, but allows each button to show, hide or toggle elements. I haven't tested this, but I think something like this should be close to what you need:
jQuery(function($){
	var buttons = {
		'.pc_start': {
			'toggle': '.pc_pre_during_post',
			'hide': '.pc_pre_breakdown, .pc_during_breakdown, .pc_post_breakdown.'
		},
		'.pc_pre': {
			'show': '.pc_pre_breakdown',
			'hide': '.pc_during_breakdown, .pc_post_breakdown'
		},
		'.pc_during': {
			'show': '.pc_during_breakdown',
			'hide': '.pc_pre_breakdown, .pc_post_breakdown'
		},
		'.pc_post': {
			'show': '.pc_post_breakdown',
			'hide': '.pc_pre_breakdown, .pc_during_breakdown'
        },
        // Entries for the 'Carb and Performance Conscious' button
        '.cpc_start': {
			'toggle': '.cpc_pre_during',
			'hide': '.cpc_pre_breakdown, .cpc_during_breakdown'
		},
		'.cpc_pre': {
			'show': '.cpc_pre_breakdown',
			'hide': '.cpc_during_breakdown'
		},
		'.cpc_during': {
			'show': '.cpc_during_breakdown',
			'hide': '.cpc_pre_breakdown'
		},
	};
	$.each(buttons, function(button, elements) {
		$(button).click(function(e){
			e.preventDefault();
			if (elements.toggle) {
				$(elements.toggle).slideToggle();
			}
			if (elements.show) {
				$(elements.show).slideDown();
			}
			if (elements.hide) {
				$(elements.hide).slideUp();
			}
			$(button).toggleClass('rv_button_opened rv_button_closed');
		});
	});
});
Now you can specify which elements each button shows and/or hides. If you use a button to "show" an element, then it will remain visible until some other button hides it again. If you want the original button to be able to hide the element again, use "toggle" (i.e. alternate the visibility between show and hide on each click) instead of "show".
I hope that helps / makes sense, but let me know if you need any further help setting it up.
Wow that's amazing, thank you! It's almost 100% perfect.
The only thing is that when I click back to the first button (e.g "Performance Conscious"), its supposed to hide everything I clicked on in the journey.
Scenario:
• Click on "Performance Conscious" to start your journey
• "Pre, During and Post" Options show
• Click on "Pre"
• "Pre" Content Loads
• Click back on to "Performance Conscious"
• "Pre, During and Post" Options are gone, however, the "Pre" content is still showing.
Is there a way around this?
In addition, if I clicked on "Carb & Performance Conscious", can everything under Performance Conscious be hidden?
Thank you so much for taking the time to look at this. Its greatly appreciated.
Hey brandesign, I'm glad that has got you closer. Sorry, it looks like I made a typo in the code I gave you. This bit:
'.pc_start': {
	'toggle': '.pc_pre_during_post',
	'hide': '.pc_pre_breakdown, .pc_during_breakdown, .pc_post_breakdown.'
},
Should be changed to:
'.pc_start': {
	'toggle': '.pc_pre_during_post',
	'hide': '.pc_pre_breakdown, .pc_during_breakdown, .pc_post_breakdown'
},
There was a stray "." after "pc_post_breakdown" which was preventing this hide rule from working. I hope that solves it and my apologies again!
Hi, Dan, thanks so much for this!
I'm not able to get the elements initially hidden, because there is a:
"display: block" that I can not override.
If I use the
body:not(.et-fb) .rv_gallery { display: none !important; }
it will be hidden initially… and always.
Thanks!
Hi, Dan. Thanks so much for this tutorial!
I'm trying for days to get a photo gallery with 8 sections that should start closed except the first one. It's almost working, but I'm struggling with:
1) All the modules are always opened when I load the site, and then they close when I click. I couldn't get closed 7 of them at the beginning.
2) I have 8 buttons/modules and I wanted to start with the first opened and the rest closed. And if I open one, the opened should close. It's not working. :-(
Thanks so much!
Hi Dan. I'm sorry for insisting. Forget my 2 previous comments.
I'm almost there! Everything is working… except I'm not able to get the galleries hidden from the beginning. When I load the web, all the 8 galleries are opened. When I click in any of the 8 buttons, all of them close. After that, everything works perfectly.
The problem is when I write:
body:not(.et-fb) .rv_element { display: none; }
I can see all the galleries doing:
element.style {
display: block;
}
and this part crossed out:
body:not(.et-fb) .rv_element {
display: none;
}
If I write:
body:not(.et-fb) .rv_element { display: none!important; }
then everything is closed, but you can not open them, of course.
Any idea what is overriding the command of "display: none;"?
Thanks!
Hi Pablo, thanks for the update and sorry I'm only just getting back to you.
I've had a look and while I'm not yet sure what is adding the "display:block" to the galleries, it would appear to be done via JavaScript / jQuery, which overrides the CSS "display: none".
Unfortunately, as you've found, it can be tricky to resolve this in CSS alone. Instead, you can try and use the following jQuery to solve this issue:
jQuery(document).ready(function ($) {
    $('.rv_element:not(.rv_element_1)').hide();
});
Add it after the other jQuery from this post. It needs to run after the offending JavaScript / jQuery, so if it isn't working, try this version instead, which runs the code after a delay:
jQuery(document).ready(function ($) {
    setTimeout(function() {
        $('.rv_element:not(.rv_element_1)').hide();
    }, 500);
});
Increase / decrease the 500 (milliseconds) to get the best balance of reliability and minimal delay.
I hope that helps, but let me know if not. Thanks!
With the delay it worked perfectly. That was a great idea. Thank you sooooo much!
You’re very welcome, Pablo! I’m glad that helped :)
Hi Dan, thank you so much for this tutorial, it's great. I have put it into place on this page I am building https://roseforrest.co.uk/bridal-portfolio/ however I'm having a few issues with the sections loading. As you can see when you click the button the image reveals over the section below it and then takes quite some time to actually reset itself correctly. Have I missed something?
Not sure if its relevant but I have a separate page where I am using the code for 3 other buttons, they work perfectly but I am using the same class for these 3 buttons as I am for the first 3 buttons on the page linked above….does this make a difference? Should every button throughout the site using this code have their own number?? I hope that all make sense? Thank you so much. Nadine
Hi Nadine, thanks for the details of the issue. I'm sorry for taking so long to get back to you. It looks like you've removed the buttons at the moment, but I did manage to take a quick look while they were still up and so here's the answer in case it's still of use to you.
The Divi Supreme Masonry Gallery you're revealing uses a JavaScript library called Masonry to layout the images. Normally, it activates when the page is loaded and positions the images correctly. However, when the gallery is initially hidden, the layout doesn't trigger as Masonry can't correctly calculate the sizes.
When you reveal the gallery with a button click later, Masonry is unaware of a change in visibility and hence, doesn't trigger the layout again, resulting in overlapping images.
In such a case, you can call Masonry's layout method manually when revealing the gallery. Add this JavaScript code snippet to your site, for instance in "Divi > Theme Options > Integration > Add code to the body":
(function($){
    $(document).ready(function(){

        $(".rv_button_1").click(function(){
            setTimeout(function() {
                $(".dsm-gallery.grid").masonry('layout');
            }, 50);
        });

    });
})(jQuery);
In the code, replace ".rv_button_1" with the class (or ID) assigned to the gallery reveal button. This snippet listens for the click event on that button and then forces a layout refresh on the Masonry grid after a tiny delay.
This should hopefully solve the layout issue, but if you have any further issues with it, please let me know. Thanks!
Thanks so much for creating this module feature! I've set up four buttons at the bottom of this page for our FAQs (services, testing etc). https://optimise.mfm.au/
The first button I created worked now problem, but now with multiple buttons, when each one is clicked, it just takes me to the top of the website. What am I missing here? Thanks again!
Hey Melissa
You're very welcome!
The issue here seems to be that you're missing some commas in your code. In the revealButtons definition, you need to have commas to separate each key-value pair.
Here's how it should look:
var revealButtons = {
	'.rv_button_1': '.rv_element_1',
	'.rv_button_2': '.rv_element_2',
	'.rv_button_3': '.rv_element_3',
	'.rv_button_4': '.rv_element_4'
};
I hope that does the trick! If you have any other issues with it, just let me know!
Gosh, I've been looking at the screen too long i think! That did the trick – thank you :)
I've just noticed that the + icon isn't visible (mobile is ok though). Any ideas why?
Ha ha, I know that feeling :)
I think you may have the "Divi > Theme Customizer > Buttons > Buttons Styles" option set to "No". This is designed to disable button styles such as the icons. Specifically, it adds a class to the body tag (et_button_no_icon) which is then causes a CSS rule to apply which sets the display property on the icons to 'none'. While your mobile styles are overriding this, on the desktop it's resulting in the icons being hidden.
To solve this, either enable the option (though note that it may affect other buttons on the site), or add the following CSS:
.et_pb_button.rv_button_opened:after,
.et_pb_button.rv_button_closed:after {
    display: inline-block !important;
}
Then step away from the screen and have a rest ;)
Thanks so much, Dan. I added the CSS and it's perfect now. Thanks again!
Great! You're very welcome, Melissa, and thanks for letting me know :)